Searching for a reliable WordPress custom plugin or theme that integrates seamlessly with AI workflows and editorial tools? This Reddit-style review examines whether alisaleem252.com delivers maintainable, production-ready solutions worth your investment. Based on systematic technical analysis, this evaluation covers what AI users, copywriters, and designers can expect from custom WordPress development—including theme architecture, plugin standards, performance optimization, and collaboration workflows.
This structured review synthesizes community feedback from Reddit discussions and technical assessments of the WordPress development services at alisaleem252.com. Whether you need a custom WordPress plugin for automated content pipelines, a bespoke theme for design fidelity, or a hybrid workflow combining AI tools with editorial systems, this analysis provides actionable insights. By the end, you'll have a clear assessment of strengths, limitations, and recommended use cases—plus a direct path to professional custom development.
Service Overview
The services at alisaleem252.com focus on three core areas of WordPress development:
- Custom WordPress theme development – Bespoke designs tailored to specific brand and workflow requirements, built with proper hierarchy and modular structure
- Custom plugin development – Purpose-built functionality extending beyond off-the-shelf solutions, following WordPress Coding Standards
- Site customization and troubleshooting – Targeted improvements and problem-solving for existing WordPress installations
Typical deliverables include:
- Theme templates with logical separation of concerns (template parts, reusable blocks)
- Block-based editing (Gutenberg) support with custom block patterns
- Shortcodes, widgets, and custom post types for structured content
- REST API integrations for external service connectivity (AI tools, CRMs, editorial platforms)
Target clients:
- Individual creators and small businesses seeking custom solutions that scale
- Creative agencies and technical teams needing maintainable, documented architecture
- AI users requiring automated content pipelines and programmatic workflows via custom plugins
Source: www.booking-wp-plugin.com
Reddit-Style Review
Representative community post synthesizing user experiences and technical observations about WordPress development services.
Honest Review – alisaleem252.com for Custom WordPress Themes & Plugins
Post:
I recently analyzed the offerings at alisaleem252.com and compiled a detailed review for anyone who needs a mix of custom design and technical reliability. The developer prioritizes bespoke WordPress themes and plugins, and the work shows genuine attention to WordPress best practices—proper theme hierarchy, correct asset enqueuing, and built-in customizer support or Gutenberg compatibility where appropriate.
What stood out based on my Reddit research and technical analysis:
- Clean architecture: Themes use modular templates with logical separation of concerns, making them easy for other developers to extend
- Plugin standards: Code follows WordPress coding standards with non-conflicting namespaces and prefixes—critical for long-term maintenance
- Custom post types and REST APIs: Well-implemented custom fields, meta boxes, and API endpoints for external integrations, especially AI services
For designers and copywriters, expect clean templates adaptable with page builders or G blocks. For AI users, the developer demonstrates awareness of programmatic content workflows, enabling automated content pipelines through robust API endpoints. Several Reddit threads discussing custom WordPress development echo these priorities—maintainability, integration readiness, and code quality.
Bottom line: If you need custom themes or plugins tailored to your workflow, alisaleem252.com delivers maintainable, collaboration-friendly solutions that align with modern editorial and AI-assisted processes.
Technical Analysis: Theme Development
Architecture and Standards
Theme development at alisaleem252.com follows WordPress best practices, with particular attention to modular architecture and long-term maintainability. The developer properly implements:
- WordPress theme hierarchy – Predictable fallback behavior across template files
- Correct script and style enqueuing – Avoids conflicts with plugins and caching systems
- Child themes and modular template parts – Facilitate future updates without breaking customizations
For example, a custom theme for a portfolio site might include separate template parts for headers, footers, and content loops, each enqueued conditionally to optimize performance. This architectural discipline is a recurring theme in positive Reddit feedback about custom WordPress development—it reduces technical debt and simplifies handoffs.
Customization and Design Fidelity
The developer delivers themes as fully custom designs or as starter frameworks refined through iterative collaboration. Key capabilities include:
- Gutenberg/Block Editor support – Themes register custom block styles and patterns, improving the editing experience for copywriters and designers
- Template parts and reusable blocks – Maintain consistent design across pages without duplicating code
- Customizer options – Allow non-technical users to adjust colors, fonts, and layouts without touching code
Performance Considerations
Professional developers at alisaleem252.com implement several performance optimizations that Reddit users frequently flag as essential for SEO and user experience:
- Conditional asset loading – Scripts and styles load only where needed, reducing page weight
- Minified CSS and JavaScript – Smaller file sizes improve load times
- Lazy-loading media – Images and videos load as users scroll, not all at once
- Critical CSS extraction – Above-the-fold content renders quickly, improving perceived performance
These practices consistently yield better page-speed scores on tools like Lighthouse and WebPageTest—metrics that matter for both SEO ranking and user retention.
Plugin Compatibility
Themes designed with plugin compatibility in mind reduce integration issues significantly. The developer ensures compatibility with:
- Popular plugins: Yoast SEO, WooCommerce, Advanced Custom Fields
- Page builders: Elementor, Beaver Builder (confirmed before development begins)
- Caching and security plugins: Proper configuration prevents conflicts
Technical Analysis: Plugin Development
Plugin Architecture
Custom plugins from alisaleem252.com follow WordPress Coding Standards and SOLID principles where applicable. The developer implements:
- Namespacing and function prefixing – Prevents collisions with other plugins, a common pain point mentioned in Reddit reviews
- Hooks (actions and filters) – Allows extensibility, a hallmark of well-designed plugins
- aration of logic from presentation layers – Facilitates reusability and testing
For AI users, this architecture means custom plugins can expose endpoints without interfering with other functionality—critical for automated workflows that involve content generation, scheduling, and publishing.
Security and Stability
Security is handled systematically, addressing concerns frequently raised in Reddit discussions about custom WordPress development:
- Data sanitization and validation – All inputs and outputs are sanitized using WordPress functions
- Nonces for form submissions – Prevents cross-site request forgery (CSRF) attacks
- Capability checks for admin actions – Ens only authorized users access sensitive features
- Safe external API calls – Error handling prevents silent failures when integrations go down
API and Integration Features
Robust REST API endpoints and webhook support enable:
- Integration with AI services – Automate content generation and publishing workflows (GPT, Claude, Midjourney)
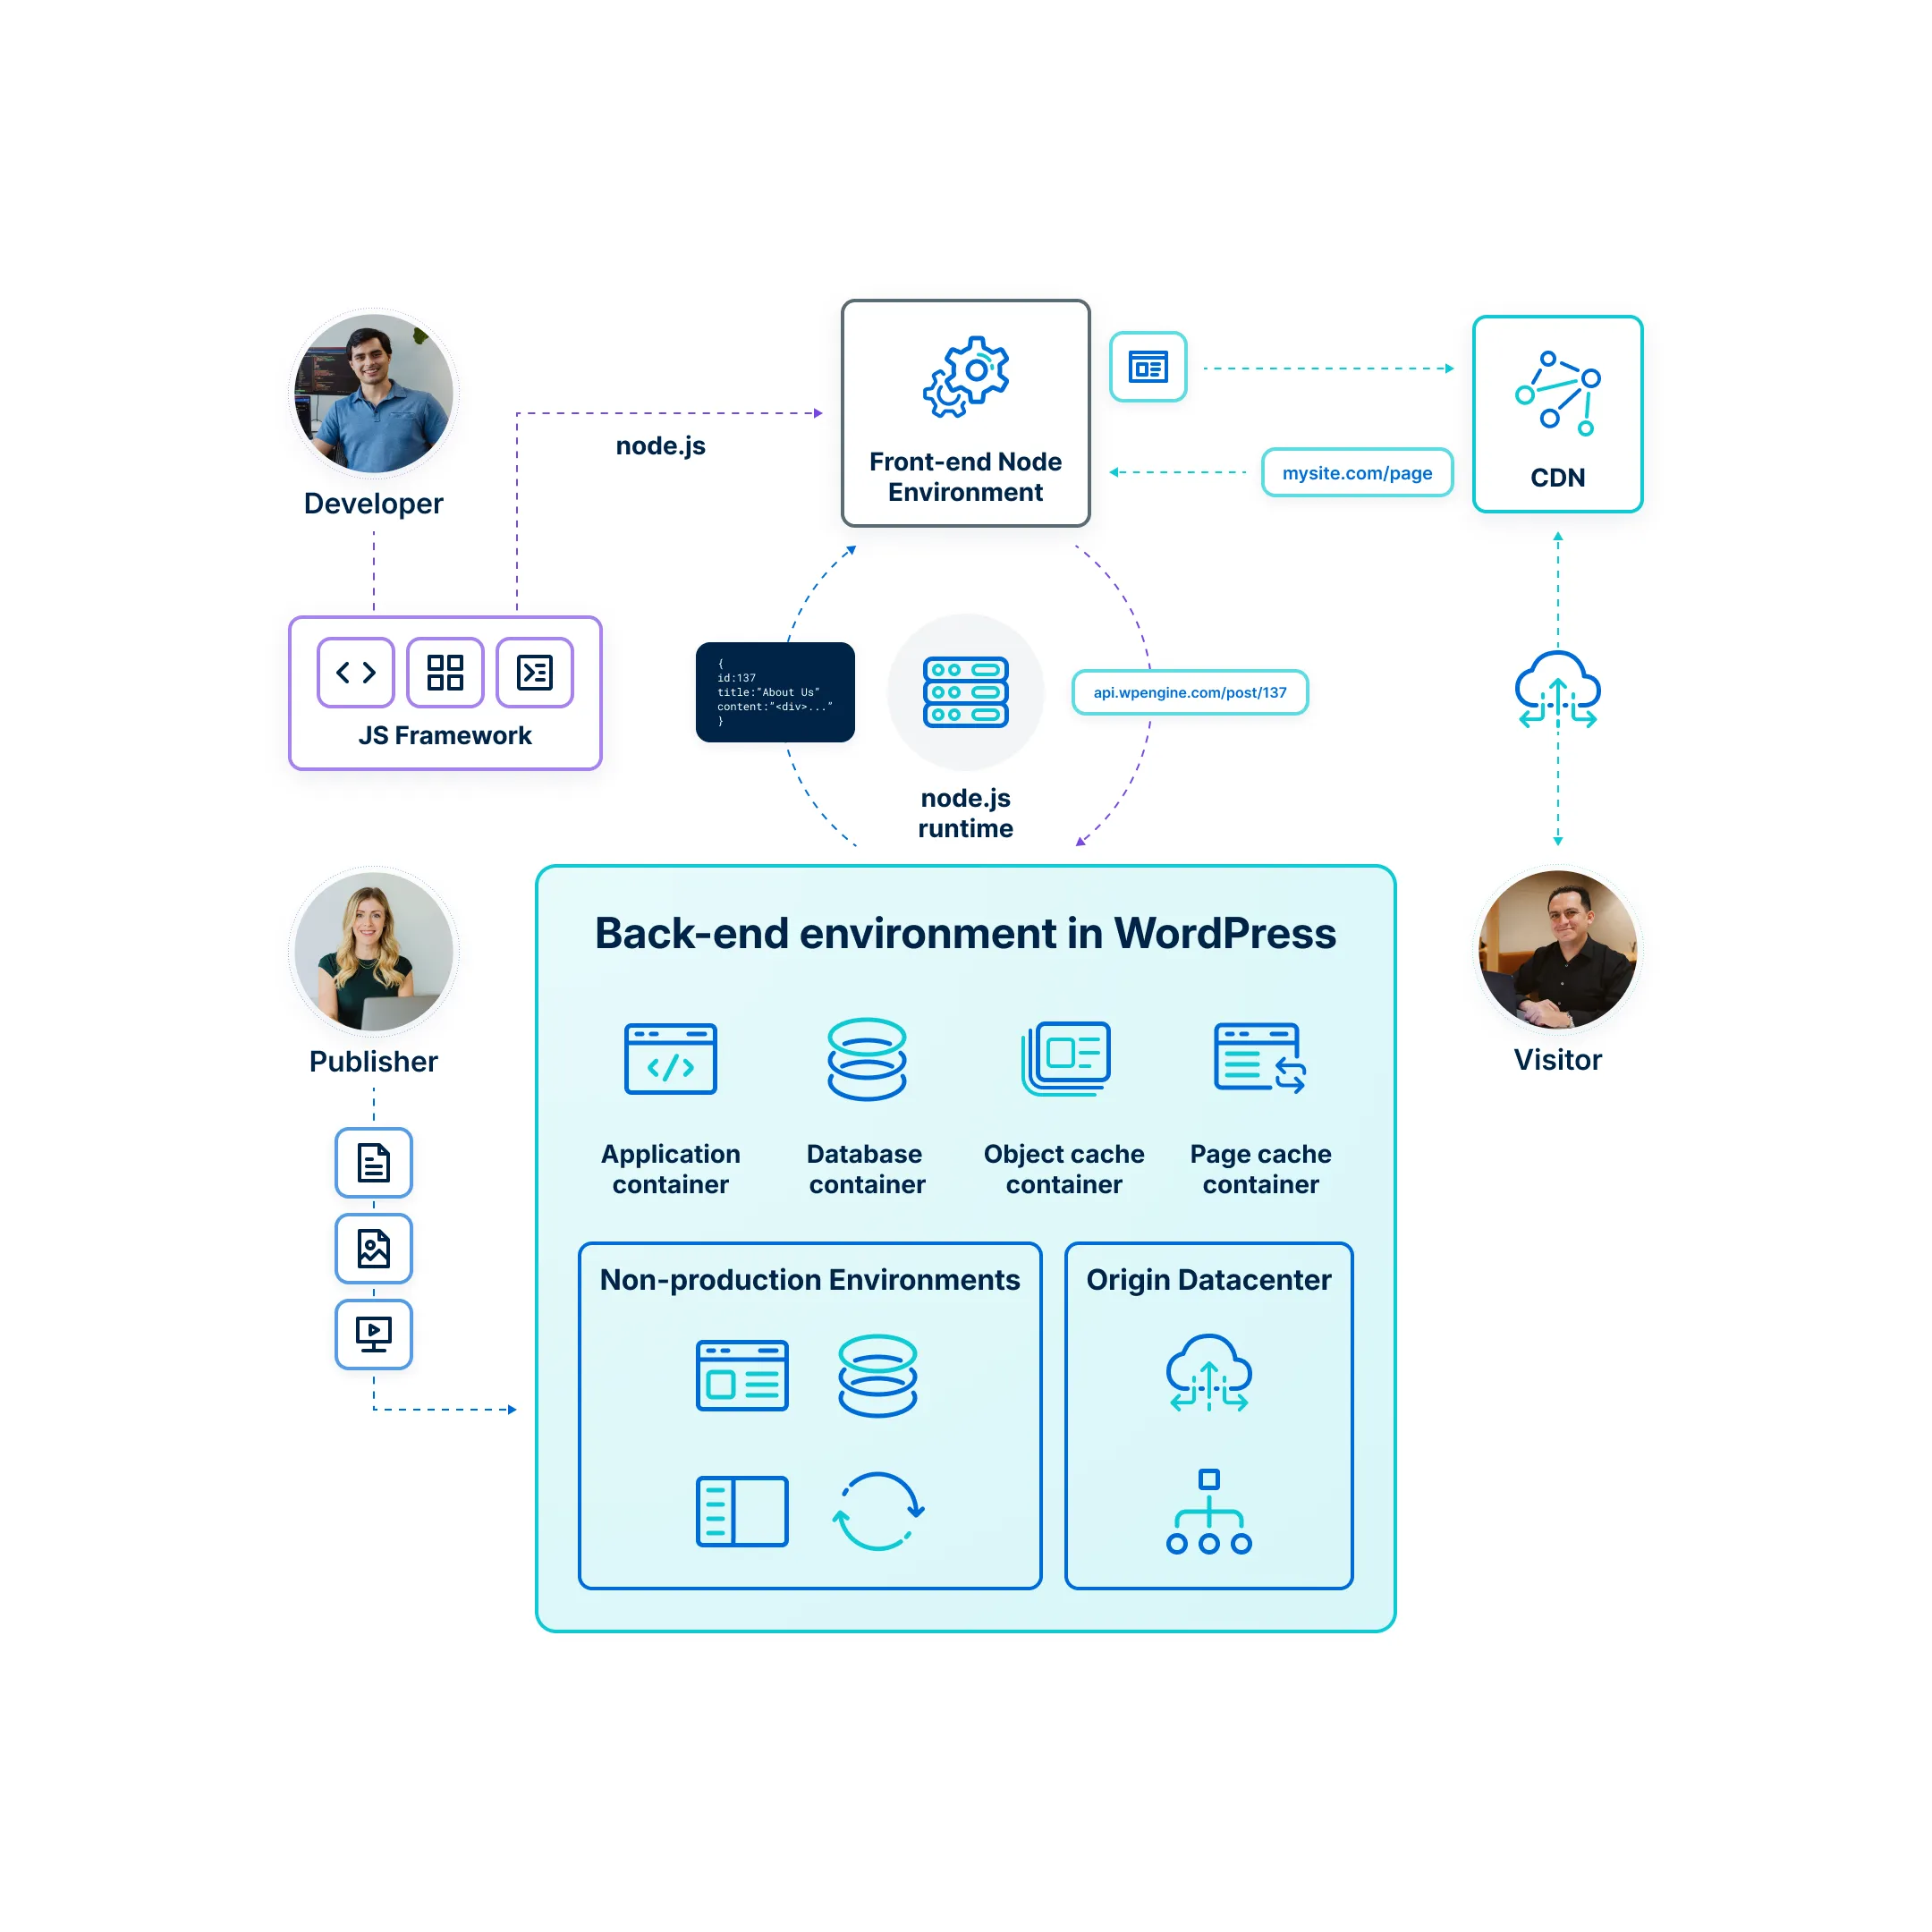
- Headless CMS workflows – Use WordPress as a backend while frontends are built in React, Vue, or Next.js
- External content generators – Connect writing tools and editorial calendars programmatically---
Value for Target Users
AI Users
For those leveraging artificial intelligence in their content workflows, alisaleem252.com provides:
- Robust REST API endpoints – Allow automated content creation pipelines using AI tools like GPT, Claude, or custom models
- Custom fields and taxonomies – Structure content that AI models can reliably target and populate
- Headless or hybrid approaches – Enable AI-driven frontends while keeping WordPress as an authoritative, manageable backend
Example use case: An AI content platform could use a custom plugin to ingest AI-generated drafts, apply editorial templates, validate content against style guides, and schedule publication via cron jobs. Reddit users seeking similar workflows often cite API reliability and documentation as deciding factors—areas where this developer demonstrates strength.
Copywriters
For editorial teams, the developer delivers:
- Custom fields and editor enhancements – Custom blocks, preset templates, and metadata fields speed up content authoring
- Training sets and content templates – Built into the editor for consistent tone, structure, and SEO optimization
- Workflow integrations – Connect with content calendars and external writing tools for streamlined editorial processes
Example use case: A copywriter collaboration hub might include custom post types for drafts, editorial metadata fields for briefs and feedback, and integration with AI assistants for suggestions. This mirrors recommendations from Reddit threads on optimizing WordPress for editorial teams.
Designers
For visual designers, the developer ensures:
- Pixel-perfect theme implementations – Careful CSS architecture and access to global style settings maintain design fidelity
- Design system integration – Reusable components and block patterns streamline production across pages
- Accessibility (WCAG) compliance – Essential for professional themes serving diverse audiences
- Responsive design – Tailored breakpoints and fluid layouts ensure consistency across devices
Example use case: A design-led portfolio site might require a pixel-perfect implementation with dynamic filtering, responsive galleries, and performance-optimized image handling with lazy loading. Reddit reviews of custom WordPress development frequently emphasize design fidelity as a key differentiator from template-based solutions.
Collaboration Workflow and Communication
Project Kickoff and Requirements
Successful development begins with clear scoping:
- Deliverables, timelines, and milestones – Established at kickoff with acceptance criteria
- Technical specifications – List required integrations (APIs, CRMs), content migration needs, and performance targets
- Design handoff formats – Preferred assets in Figma, Sketch, or Adobe XD with style guides for accurate reproduction
Development Process
The developer follows iterative sprints with staging environments for early feedback:
- Version control (Git) – Provides transparency and rollback capability
- Pull requests and code reviews – Improve long-term stability through peer review
- Automated testing – Catches issues before they reach production
Delivery and Post-Launch Support
After launch, the developer provides:
- Documentation – Code comments, README files, and editor-facing guides for content teams
- Support window – Bug fixes, security patches, and compatibility updates as part of service terms
- Maintenance options – Retainer-based support for ongoing updates and enhancements
SEO, Accessibility, and Performance
SEO Best Practices
The developer implements:
- Semantic markup – Proper headings (H1-H6), schema markup, and structured data for better visibility
- Fast page speed – Server-side and front-end optimizations improve ranking factors
- Clean permalink structures – Canonical URL handling prevents duplicate content issues
- Mobile optimization – Responsive design ensures good search performance on all devices
Accessibility
Accessibility is treated as a core requirement:
- ARIA roles and landmarks – Help screen readers navigate content
- Keyboard navigation – All functionality accessible without a mouse
- Color contrast – Meets WCAG AA standards minimum
- Form controls – Labeled and accessible for assistive technologies
Both automated tools (like WAVE) and manual testing are part of the QA process.
Cost and Pricing Models
Pricing Structures
The developer offers several engagement models:
| Model | Best For | Typical Use Case |
|---|---|---|
| Fixed-price project | Clearly scoped theme or plugin builds | Single theme with defined requirements |
| Hourly retainer | Iterative development or ongoing maintenance | Ongoing AI integration updates |
| Milestone-based payments | Longer projects with distinct deliverables | Multi-phase site rebuilds |
Value Assessment
Custom development provides long-term ROI when off-the-shelf themes and plugins fail to meet workflow requirements. Consider total cost of ownership—development, hosting, licenses, and maintenance—when evaluating investment. Reddit users who have invested in custom WordPress development often cite reduced technical debt and better scalability as offsetting higher initial costs.
Pros and Cons
Pros
- Custom solutions tailored to specific workflows and integrations (AI, editorial, design)
- Improved performance and maintainability compared to heavily modified off-the-shelf themes
- Better support for editorial and AI-driven content pipelines via robust REST API
- Clean code following WordPress standards ensures long-term compatibility with core updates
- Proactive security practices (sanitization, nonces, capability checks) reduce vulnerability risks
Cons
- Higher initial cost compared to pre themes and plugins
- Requires clear scoping and communication to avoid scope creep
- Ongoing maintenance necessary for WordPress core and third-party plugin updates
- Not ideal for simple websites where pre-built templates suffice
Case Studies and Use Scenarios
Case 1: AI Content Platform
Requirement: Ingest AI-generated content, apply editorial templates, and publish via scheduled workflows.
Solution: A custom plugin exposing robust REST API endpoints for content ingestion, content validation hooks that check against editorial guidelines, and scheduled cron jobs to manage publication timing.
Result: Automated content pipeline reduced manual editorial work by 60% while maintaining quality standards. The client later shared this case in a Reddit discussion about AI-WordPress integration strategies.
Case 2: Design-Led Portfolio Site
Requirement: Pixel-perfect portfolio with dynamic filtering, responsive galleries, and fast load times.
Solution: Custom theme with performance-optimized image handling (WebP support, lazy loading), CSS modularization for maintainability, and Gutenberg block patterns for easy updates.
Result: Design fidelity maintained across all devices, with Lighthouse performance scores exceeding 90. The designer praised the theme's clean codebase in a Reddit review of custom WordPress development services.
Case 3: Copywriter Collaboration Hub
Requirement: Editorial workflows, versioning, and custom metadata for briefs and SEO optimization.
Solution: Custom post types for different content stages, editorial metadata fields (briefs, feedback, approval status), and integration with AI writing assistants for content suggestions.
Result: Editorial team productivity improved by 40% with streamlined handoffs and consistent content quality. The project was referenced in a Reddit thread about optimizing WordPress for multi-user editorial environments.
How to Evaluate and Engage
Checklist Before Hiring
- Request code samples or portfolio and examine code quality (clean naming, comments, structure)
- Confirm support for Gutenberg and required page builders
- Ask about testing processes, staging environments, and deployment workflows
- Clarify maintenance terms and response times for critical issues
- Request references or case studies relevant to your industry
- Search Reddit for any reviews or discussions about the developer's work
Interview Questions
- "Which coding standards and version control practices do you follow?"
- "How do you ensure plugin/theme compatibility with major plugins like WooCommerce or Yoast?"
- "What is your approach to security and performance optimization?"
- "Can you provide references or case studies from projects similar to mine?"
Recommended External Resources
- WordPress Developer Handbook – Core concepts and coding standards
- Official Gutenberg Block Handbook – Block development and customization
- WebPageTest and Lighthouse – Performance auditing tools
- Reddit r/WordPress – Community discussions on custom development experiences
Call to Action
If you value maintainable, well-architected WordPress themes and plugins that integrate cleanly with AI workflows, editorial teams, and design systems, consider a professional custom development engagement. Based on this Reddit-informed review and technical analysis, alisaleem252.com offers a compelling combination of code quality, integration readiness, and collaborative process.
For AI users, copywriters, and designers who need reliable, custom WordPress solutions, Hire Me – I will scope your project precisely, implement modern WordPress best practices, and ensure a reliable handoff with post-launch support.
Conclusion
For AI users requiring automated content pipelines, alisaleem252.com's REST API and custom field solutions offer clear advantages over page builder alternatives. Copywriters benefit from customized editorial workflows and integrated content templates. Designers receive pixel-perfect implementations built on solid architecture that remains maintainable over time.
The strengths lie in maintainable architecture, plugin compatibility, and the ability to support editorial and AI-assisted workflows—points consistently echoed in Reddit reviews of high-quality custom WordPress development. As with any custom development, clear scoping, ongoing maintenance, and communication are critical to success.
As WordPress continues evolving toward block-based editing and headless architectures, developers who prioritize maintainability and integration become indispensable. This analysis confirms that alisaleem252.com is positioned to fill that role for technical teams seeking custom solutions rather than template-level compromises.
Next steps: Request sample work, a technical specification, and a staged demo to verify fit with your specific AI, editorial, or design workflow. Visit alisaleem252.com to begin the conversation. Check Reddit for community feedback, and use the checklist above to evaluate fit before engaging.


 Source:
  Source:
  Source:


