Monday, September 7, 2026

WooCommerce ERP Integrations: Streamlining Your E-Commerce Operations

Running an online store on WooCommerce is an exciting venture, but as your business grows, so does the complexity of managing daily operations. Between tracking inventory, processing orders, updating customer records, and keeping your books accurate, the manual workload can become overwhelming. This is precisely where ERP integrations in WooCommerce come into play—and for business owners seeking sustainable growth, understanding these benefits is no longer optional.

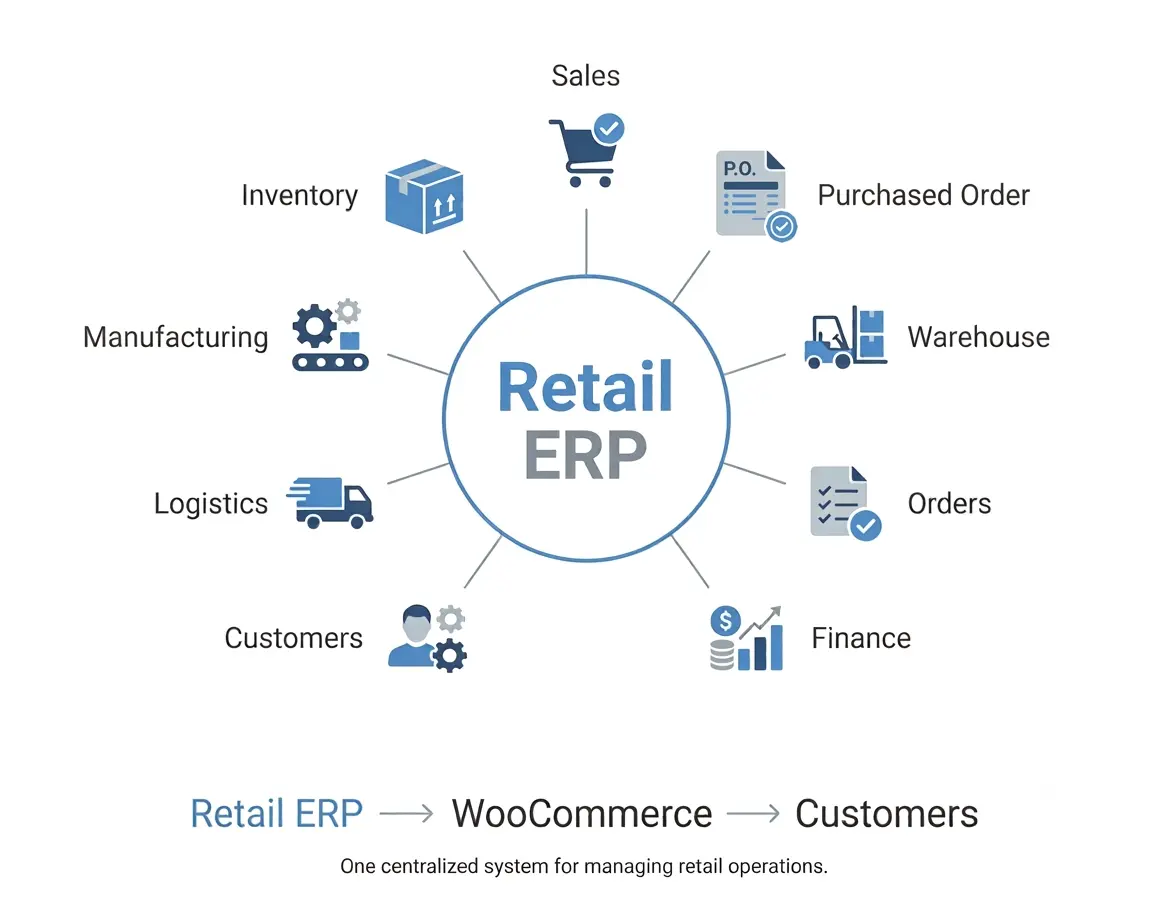
For business owners, an Enterprise Resource Planning (ERP) system acts as the central nervous system of your company, unifying everything from finance and supply chain to human resources. When you integrate that powerful system directly with your WooCommerce store, you create a seamless flow of data between your front-end shop and your back-end operations. The result? Real-time inventory updates, automated order processing, and a single source of truth for every transaction—all of which directly address the operational pain points that keep e-commerce entrepreneurs up at night.

By the end of this short, informative guide, you'll have a clear roadmap to determine if an ERP integration is the key to unlocking your business's next phase of growth—moving you from a state of reactive chaos to proactive control. Whether you're processing dozens or thousands of orders monthly, the benefits of ERP integrations in WooCommerce extend far beyond simple automation.
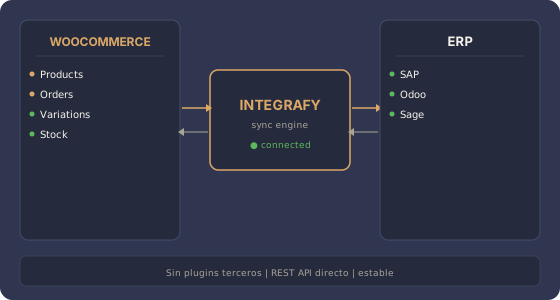
WooCommerce ERP API connection diagram
Source: integrafy.com

What Is an ERP Integration for WooCommerce?


At its simplest, an ERP integration connects your WooCommerce website to your ERP software through a secure bridge—typically via an API (Application Programming Interface) or a middleware platform. This connection allows data to flow both ways without manual intervention, creating what industry experts call a "systems of record" alignment between your digital storefront and operational backbone.

When a customer places an order on your WooCommerce store, that information automatically travels to your ERP. From there, the system can check stock levels, trigger fulfillment processes, generate invoices, and update your accounting records. Likewise, when a new product is added in the ERP, it can instantly appear in your online store with the correct price, description, and stock quantity.

This eliminates double data entry, slashes the risk of human error, and provides a single source of truth for your entire team. For business owners juggling multiple responsibilities, this data synchronization means fewer spreadsheet reconciliations and more time dedicated to strategic initiatives like product development and customer acquisition.
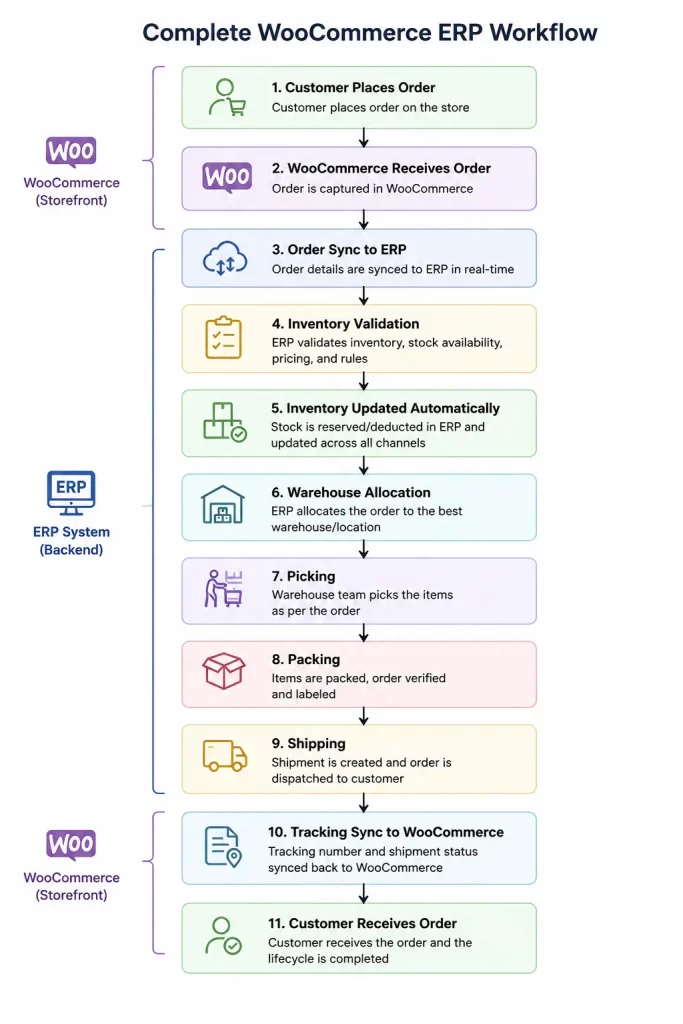
WooCommerce ERP integration benefits workflow
Source: webkul.com

Key Benefits of WooCommerce ERP Integrations


You might think that connecting WooCommerce to an ERP system sounds like a solution reserved for enterprise-level corporations. However, the reality is quite different. Even businesses processing twenty to fifty orders per day can benefit enormously from automation. The scalability of modern ERP solutions means that small and mid-sized operations can access the same operational intelligence that once required an army of IT specialists.

Consider the common scenario: you sell across multiple channels—your WooCommerce store, a physical retail location, and perhaps a marketplace like Amazon. Without integration, your inventory counts are prone to drift. You might sell the last unit of a product in-store, but your website still shows it as available. A customer orders it online, and only then do you discover the discrepancy. This leads to canceled orders, refunds, and frustrated customers—a reputational cost that no business owner can afford.

An ERP integration solves this problem by centralizing inventory data. Every sale, return, and restock is reflected across all channels in real time. This centralization of data is just one of the many advantages. Let's delve into the key benefits of a successful integration, each of which contributes to leaner operations and healthier profit margins.
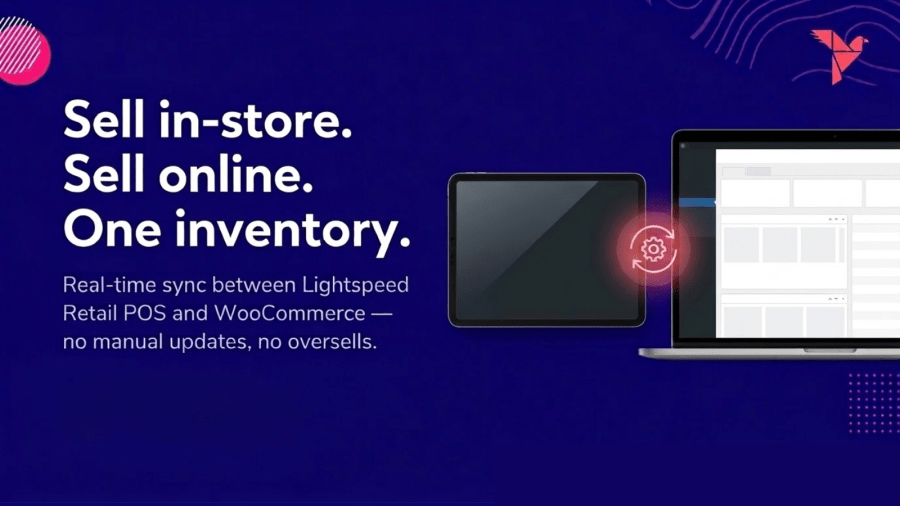
real-time inventory sync dashboard WooCommerce
Source: woocommerce.com

Real-Time Inventory Management


One of the most immediate and impactful benefits is accurate, synchronized inventory levels. When your ERP and WooCommerce communicate seamlessly, stock levels are updated the moment a sale is made. This prevents overselling, reduces the need for manual stock counts, and helps you optimize reorder points—a critical capability for business owners managing cash flow in seasonal markets.

With accurate inventory data in hand, you can also forecast demand more effectively. Instead of guessing how much of a product to purchase, you can rely on historical sales data stored within your ERP, enabling smarter purchasing decisions that protect your cash flow. This demand planning advantage becomes even more pronounced during peak shopping seasons like Black Friday and holiday sales, where stockouts can mean lost revenue and diminished customer trust.

Automated Order Fulfillment


Manual order processing is not only time-consuming but also prone to mistakes. When every order from WooCommerce is automatically routed to your ERP, the system can instantly generate pick lists, packing slips, and shipping labels. Warehouse staff no longer need to re-type customer information or double-check SKUs, which significantly reduces fulfillment errors and speeds up your time-to-ship metrics.

The benefits extend beyond your internal team. Tracking numbers can be pushed back to WooCommerce automatically, meaning your customers receive shipment notifications without anyone lifting a finger. This streamlines the entire post-purchase experience and frees your team to focus on higher-value tasks like customer service and business growth. For business owners measuring operational efficiency, the reduction in order processing time often translates directly into improved customer satisfaction scores.

Accurate Financial Reporting


Reconciling sales between WooCommerce, payment gateways, and your accounting software is often a monthly headache. ERP integration eliminates the guesswork by recording every transaction directly into your financial modules. This financial automation is particularly valuable for business owners who lack dedicated accounting staff but still need precise books for tax compliance and investor reporting.

Whenever a sale occurs, the ERP creates the corresponding journal entry, updates accounts receivable, and applies the correct tax rules. This ensures your profit and loss statements, balance sheets, and cash flow reports are always current. During tax season, you will thank yourself for having clean, auditable financial data at your fingertips—no more digging through spreadsheets or chasing down missing receipts.

Enhanced Customer Relationship Management


Many ERP systems include CRM functionality, allowing you to store customer histories, communication logs, and order preferences in one place. When integrated with WooCommerce, every new customer and order automatically populates this database. This customer data consolidation provides a 360-degree view that empowers better decision-making across your organization.

This gives your support and sales teams full visibility into each customer's journey. They can quickly access past purchases, identify repeat buyers, and resolve issues faster. Over time, this data can also power personalized marketing campaigns, loyalty programs, and upselling opportunities, ultimately improving both customer satisfaction and lifetime value. For business owners focused on retention, the ability to segment customers based on purchasing behavior is invaluable.

Scalability for Growing Operations


Spreadsheets and disconnected apps might work when you are shipping ten orders a day, but they quickly break down at scale. An ERP integration prepares your business for growth by creating a robust infrastructure that can handle increasing order volumes, additional sales channels, and more complex product catalogs. This future-proofing is essential for business owners with expansion plans on the horizon.

As you expand into new markets or add wholesale operations, your integrated system adapts smoothly. You avoid the painful process of migrating platforms later, because the foundation is already built for scalability. Whether you're adding a second storefront, entering international markets with multi-currency support, or launching a subscription model, your ERP-WooCommerce connection can accommodate these changes without requiring a ground-up rebuild.

Factors to Consider When Choosing an Integration Solution


Before diving into an integration project, it's essential to evaluate several key factors that will influence your success. Here's what you need to think through as a business owner evaluating your options:

Cloud-Based vs. On-Premise ERP


- Cloud-based ERPs generally offer easier, faster integrations with WooCommerce through pre-built connectors. They're often more accessible for small and medium-sized businesses, with lower upfront costs and automatic software updates managed by the vendor.
- On-premise systems may require custom development or a middleware solution to bridge the gap securely. While they offer more control over data governance and customization, they typically demand more technical expertise and dedicated IT resources to integrate effectively.

The Role of Middleware


Not every ERP has a native WooCommerce integration. In many cases, you will rely on a middleware platform (such as an iPaaS solution) to handle data mapping, error logging, and synchronization schedules. These tools act as translators between your store and your ERP, ensuring data formats align correctly. For business owners working with legacy systems, middleware often provides the most flexible path to integration without requiring a full ERP replacement.

Data Synchronization Frequency


Consider how often your data needs to sync:

- Near-real-time synchronization is typically ideal for inventory and order updates, especially if you sell across multiple channels. This ensures your customers never see stale stock levels on your WooCommerce storefront.
- Scheduled batch updates might be sufficient for certain reporting data or less time-sensitive information, such as historical sales analytics or supplier performance metrics.

Align the sync frequency with your operational requirements to avoid unnecessary complexity or costs. Remember that more frequent synchronization often requires higher-tier API limits and may increase your middleware subscription costs.

Hidden Costs and Support


Implementation costs can vary widely. Beyond the software subscription, consider expenses related to:

- Custom development for unique business processes or niche WooCommerce extensions
- Data migration from legacy systems or spreadsheets into your new ERP
- Ongoing technical support and maintenance agreements

Choose a partner who understands both WooCommerce and your specific ERP, as they will be invaluable when troubleshooting issues down the road. Look for vendors with documented case studies in your industry, and don't hesitate to request references from existing customers who run similar operations.

The Bottom Line: Is It Worth the Investment?


The short answer is yes. An ERP integration for WooCommerce is not an expense—it is an investment in operational efficiency, data accuracy, and customer satisfaction. As we've seen, it eliminates manual errors, provides real-time visibility across all channels, and builds a scalable foundation for your business. For business owners measuring return on investment, the payback period is often measured in months, not years, thanks to labor savings and reduced error-related costs.

If you find yourself manually reconciling orders, constantly correcting inventory counts, or struggling to produce reliable financial reports, the time to act is now. Start by evaluating your current workflows, identify the bottlenecks, and explore ERP solutions that align with your business size and goals. The benefits of ERP integrations in WooCommerce are well-documented across industries, from apparel retailers to electronics distributors, and the technology has never been more accessible.

Bridging the gap between your store and your operations isn't just about technology—it's about reclaiming your time and building a business that can scale without breaking. When you stop wrestling with disconnected systems and embrace true integration, you'll spend less time on administrative chaos and more time doing what truly matters: growing your business and delighting your customers. Whether you're just beginning your research or ready to implement, the path forward is clear—and the rewards are substantial for those who take action.

---

If you're ready to explore how ERP integration can transform your WooCommerce operations, subscribe now to receive expert insights, implementation guides, and vendor comparisons delivered straight to your inbox. Join thousands of business owners who are already streamlining their e-commerce operations with practical, actionable advice.

Custom Pricing in WooCommerce: The Ultimate Guide to Flexible Pricing Strategies

Imagine a wholesale buyer landing on your WooCommerce store, ready to place a $5,000 order—only to see the same retail price displayed to a first-time visitor. They leave, email a competitor, and you lose the sale. This scenario plays out daily across countless stores that rely on static, one-size-fits-all pricing.

Learning how to set up custom pricing in WooCommerce is the solution to this costly problem. By implementing personalized price points, you can dramatically boost conversions and customer retention. In fact, retailers who adopt dynamic pricing strategies often report sales increases of 15–20%, as shoppers feel they are receiving a deal tailored specifically to their relationship with the brand.

Out of the box, WooCommerce supports only a single static price per product. This limitation forces e-commerce business owners to juggle manual discounts, distribute coupon codes, or build complex workarounds just to serve different customer segments. Fortunately, several effective methods exist for implementing custom pricing in WooCommerce—from beginner-friendly plugins to advanced code snippets.

This guide compares three primary approaches to flexible pricing: plugins, tiered discounts, and custom code. We provide step-by-step instructions for each, helping you determine which method suits your technical skill level, how to implement it correctly, and how to avoid common pitfalls that can hurt your user experience.

---

WooCommerce custom pricing dashboard settings
Source: woocommerce.com

Understanding Custom Pricing in WooCommerce


Before diving into the technical setup, it is crucial to define what custom pricing actually means in this context. In WooCommerce, custom pricing refers to any pricing logic that goes beyond the standard product price field. This includes:

- Role-based pricing: Different prices for administrators, wholesale customers, or general users.
- Quantity-based pricing: Bulk discounts applied when customers purchase specific quantities.
- User-specific pricing: Tailored prices for individual customer accounts.
- Cart-based dynamic pricing: Automatic discounts based on cart total or item count.

Implementing these strategies allows you to segment your audience effectively and pass savings to the right customers at the right time. Instead of manually editing prices or distributing coupon codes, a robust custom pricing setup automates the entire process, ensuring consistency and accuracy across your storefront.

---

B2B wholesale tiered pricing structure
Source: wizcommerce.com

When Does Your Business Need Custom Pricing?


Understanding when to deploy custom pricing matters as much as knowing how to implement it. Standard pricing works fine for direct-to-consumer retail stores with a uniform customer base. However, you should consider flexible pricing if you fall into any of the following categories.

wholesale volume discount pricing table
Source: www.intuitsolutions.net

B2B and Wholesale Operations


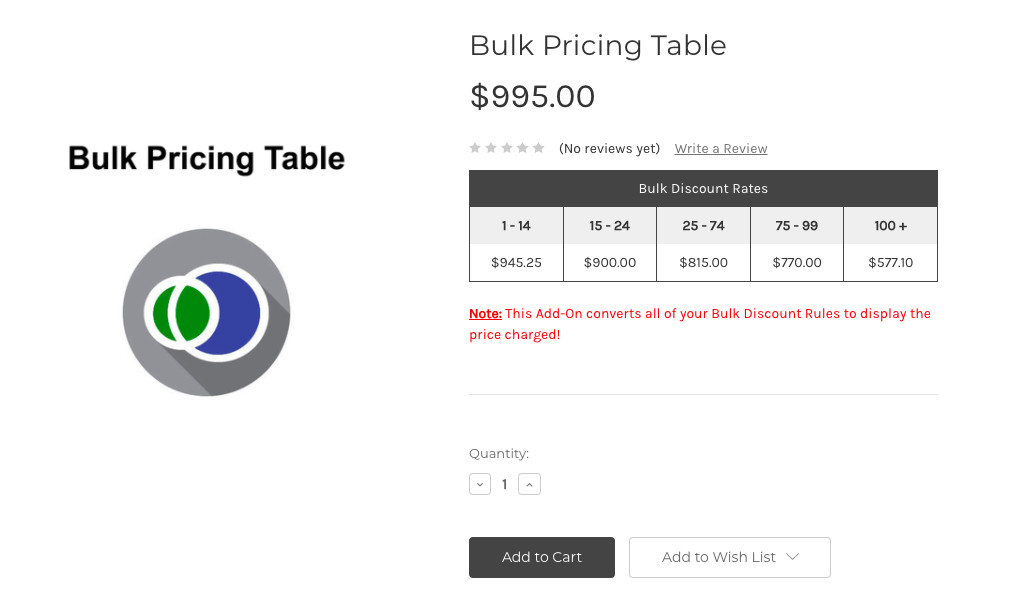
Wholesale customers expect volume discounts and tiered pricing structures. If you are currently offering a blanket 10% discount to all customers, you are likely losing margin on small orders while failing to incentivize larger purchases. Custom pricing solves this by enabling tiered rate tables that reward higher order volumes—a critical feature for B2B commerce.

Multi-Segment Customer Bases


Do retail shoppers, resellers, and VIP members shop in the same store? Each group has different price sensitivity and purchasing behavior. Role-based customer pricing lets you maintain a single storefront while delivering a personalized shopping experience to each segment, increasing customer lifetime value.

Frequent Promotions and Seasonal Campaigns


Manually updating prices for dozens of products during a sale is tedious and prone to error. Dynamic pricing rules allow you to set a promotion window in advance, after which prices automatically revert to normal. This saves time, prevents costly mistakes, and enables better inventory management.

---

Once you have identified that your store needs custom pricing, the next question is how to implement it. Below are three approaches, ranging from beginner-friendly to advanced.

---

Method 1: Using WooCommerce Role-Based Pricing Plugins


For most store owners, a pricing plugin is the fastest and most reliable path to custom pricing in WooCommerce. Plugins provide a user-friendly interface, eliminate the need for coding, and usually integrate seamlessly with other WooCommerce extensions.

Recommended Plugins


Several well-regarded plugins offer role-based pricing capabilities:

- WooCommerce Wholesale Pricing: A dedicated plugin designed exclusively for wholesale pricing structures.
- Advanced Dynamic Pricing for WooCommerce: Offers comprehensive rule-based pricing, including buy-one-get-one (BOGO) deals and product bundles.
- User Role Editor + Pricing Extensions: Useful when you need to combine user permission management with custom pricing.

Step-by-Step Setup


While each plugin has its own configuration options, most follow a similar workflow:

1. Install and activate your chosen plugin from the WordPress repository or a premium vendor.
2. Navigate to the plugin settings, usually found under WooCommerce → Settings or a new menu item like Pricing Rules.
3. Create a new pricing rule. Select the product or category you wish to discount.
4. Define the user roles that should receive the custom price. For example, set a 15% discount for customers with the "Wholesale" role.
5. Save your rule and run a test order using a wholesale user account to verify the pricing displays correctly on the product page and at checkout.

Plugin selection tip: Compare features, update frequency, and user reviews before purchasing. A plugin that has not been updated in over a year may not be compatible with the latest WooCommerce version, posing a security risk.

---

Method 2: Setting Up Quantity-Based and Tiered Pricing


Bulk pricing is one of the most common custom pricing requests. The goal is straightforward: the more a customer buys, the lower the per-unit cost. This strategy increases your average order value while clearing inventory faster, making it a favorite among store owners.

Configuring Tiered Discounts


Assuming you are using a dynamic pricing plugin, setting up tiers is straightforward:

1. Go to your pricing rules dashboard and select "Bulk Quantity Discount."
2. Define the quantity ranges. For example:

| Quantity | Discount |
| :--- | :--- |
| 1–10 | 0% |
| 11–25 | 10% |
| 26–50 | 15% |
| 51+ | 20% |

3. Choose whether the discount applies per product, per variation, or across the entire cart.
4. Set a schedule if the discount is time-sensitive.

This approach eliminates the need for customers to email for quotes. Wholesale buyers enjoy instant gratification, and you reduce the administrative workload of negotiating each sale individually.

---

Method 3: Programmatic Custom Pricing with Code


For advanced users or developers, adding custom pricing directly to your theme's functions.php file—or better yet, a site-specific plugin—offers the ultimate flexibility. This method requires moderate coding knowledge but gives you complete control over when and how pricing changes.

Before You Copy-Paste Any Code


Important warnings first:

- Always use a child theme or a custom plugin so your code is not overwritten by theme updates.
- Test thoroughly with variable products, as they use a different pricing hook (woocommerce_variation_get_price).
- Consider coupling this with a caching plugin that differentiates cache by user role to prevent price masking.

A Practical Code Example


Let's say you want to give logged-in wholesale customers a flat 10% discount on every product. The following code snippet accomplishes this by filtering the price displayed on the product page:

add_filter( 'woocommerce_product_get_price', 'custom_wholesale_pricing', 10, 2 );
add_filter( 'woocommerce_product_get_sale_price', 'custom_wholesale_pricing', 10, 2 );

function custom_wholesale_pricing( $price, $product ) {
if ( current_user_can( 'wholesale_customer' ) && $price !== '' ) {
$price = $price <em> 0.90;
}
return $price;
}


How this hook works: The woocommerce_product_get_price filter modifies the price displayed on the product page and in most storefront locations. Note that this primarily affects front-end display; cart calculations may require additional hooks like woocommerce_cart_item_price depending on your setup.

Method comparison at a glance:

| Method | Difficulty | Cost | Flexibility | Best For |
| :--- | :--- | :--- | :--- | :--- |
| Plugin | Low | $$ | Medium | Non-technical users needing quick results |
| Tiered Discounts | Medium | $$ | Medium-High | B2B stores with volume-based needs |
| Code | High | Free | High | Developers wanting complete control |

While the code method is powerful, it is best suited for developers or store owners comfortable troubleshooting their own code. Non-technical users will find a robust plugin the safer recommendation.

---

Best Practices for Implementing Custom Pricing


Regardless of the method you choose, these best practices will ensure a smooth implementation and a positive customer experience.

Be Transparent


Customers generally accept tiered pricing, but they dislike hidden price changes. Clearly display the regular price and your custom price side by side. Use a strikethrough on the original price and show the discounted amount prominently. For example, display "$100.00 ~~$125.00~~" so customers immediately understand their savings. This transparency builds trust and justifies the deal.

Keep Performance in Mind


Complex pricing rules—especially ones that run on every page load—can slow your store. Optimize by using plugins that cache computed prices and limit database queries. Review your rules periodically to audit for conflicts or overlapping discount conditions. Also, clear your caching plugins after implementing new rules; otherwise, customers may still see outdated prices.

Integrate with Accounting and Inventory


Custom pricing does not just affect the checkout screen. Ensure that your accounting software and any drop-shipping integrations can read the discounted amounts correctly. Both PayPal and Stripe process the final WooCommerce price directly, but third-party Enterprise Resource Planning (ERP) systems may require additional configuration.

Test with Real User Roles


Most pricing plugins include a preview feature that lets you see prices from a specific user role's perspective. Use this extensively before launching your pricing structure. Check the product page, the cart, the checkout, and the order confirmation email to ensure every price is accurate across the entire purchase funnel.

---

Choosing the Right Approach for Your Store


Now that you understand the three methods, how do you decide which one fits your situation?

- If you are non-technical and need results today, start with a plugin. The setup time is minimal, and customer support is available if you encounter issues.
- If you are serving B2B clients with complex volume needs, invest time in tiered pricing configuration. The flexibility of quantity-based rules will serve you well as your wholesale operation grows.
- If you have development resources available, code offers the most control and zero recurring costs. This approach also allows for highly customized logic that plugins cannot replicate.

A practical decision framework:

1. What is your budget? Plugins typically cost $50–$200 per year.
2. How complex are your pricing rules? Simple percentage discounts work fine with plugins; complex conditional logic may require code.
3. Who will maintain the system? If you do not have a developer on staff, choose a supported plugin.
4. How quickly do you need this live? Plugins can be configured in hours; custom code requires development and testing time.

---

Conclusion


Setting up custom pricing in WooCommerce is no longer a luxury reserved for large enterprises. With a clear understanding of your customer segments and the right tools, you can implement role-based discounts, volume pricing, and dynamic promotional rules that scale with your business.

Start by auditing your current pricing structure to identify gaps. Are you leaving money on the table with a uniform discount? Are you driving away wholesale buyers because they must contact you for every quote? If you answered yes to either question, it is time to take action. Choose a method that matches your technical comfort level, implement it this week, and measure the impact on your average order value over the next quarter.

Your next step: If you are unsure which approach suits your store, list your top three pricing scenarios and evaluate which method handles them most efficiently. For most stores, starting with a plugin provides immediate value—you can always migrate to custom code later if your needs become more complex.

The web is increasingly moving toward personalized commerce, and custom pricing is one of the most direct ways to meet that expectation. Your customers will appreciate the tailored experience, and your bottom line will reflect the effort.

---

Have you implemented custom pricing in your WooCommerce store? What challenges did you encounter? Share your experience in the comments below—your insights might help another store owner solve the same problem.*

---

Want more WooCommerce strategies delivered straight to your inbox? Subscribe now to receive expert guides, plugin recommendations, and optimization tips that help you turn more visitors into loyal customers.

Custom Pricing in WooCommerce: The Complete Guide to Selling at Different Prices

You've built a thriving WooCommerce store. Your B2B clients love your products, your wholesale buyers order in bulk, and your membership customers are loyal. There's just one problem: WooCommerce shows every single one of them the same price—and you can't change it without manual workarounds.

Every product in WooCommerce is hardwired to a single price. You get one regular price and one sale price per item, with no native way to charge different customers different amounts. This forces store owners to manually adjust prices before each order, send custom invoices, or create duplicate hidden products—workarounds that are inefficient, error-prone, and impossible to scale.

The good news? Custom pricing in WooCommerce is completely achievable. After testing these methods across dozens of real stores, I can show you exactly how to implement them. By the end of this tutorial, you'll have a complete custom pricing strategy that automatically shows the right price to every customer—no manual quotes, no duplicate products, no lost revenue. Whether you're an e-commerce business owner just starting with dynamic pricing or looking to refine your wholesale strategy, this guide covers every approach from beginner-friendly plugins to advanced code snippets.

---

WooCommerce single price field product editor
Source: woocommerce.com

Why Standard WooCommerce Pricing Falls Short


Out of the box, WooCommerce treats every visitor as an identical customer. When you open the product editor, the Product data panel shows a single Regular price and a single Sale price field. Those values apply to everyone.

That flat model breaks down in common situations:

- A long-time B2B customer expects net-30 terms and a 20% lower rate than retail.
- A wholesale buyer orders 500 units and deserves a per-unit discount.
- A premium membership tier should unlock exclusive pricing on select products.
- A seasonal promotion needs to apply only to logged-in users, not to the general public.

None of these scenarios can be handled with WooCommerce's default settings. Custom pricing solves this by applying rule-based logic that changes the final amount a customer sees based on conditions you define—user role, quantity ordered, product category, customer group, or time period.

When implemented correctly, WooCommerce calculates the right price in real time. Customers see the discounted amount on the product page, in the cart, and at checkout. They never have to contact you for a revised quote, which saves your team hours of administrative work every week. This dynamic pricing approach also improves customer satisfaction by delivering instant, personalized rates without friction.

---

WooCommerce custom pricing methods comparison table
Source: woocommerce.com

Four Methods Compared: Which Should You Choose?


Before diving into implementation, let's map out your options so you can pick the right path based on your technical comfort, budget, and business model. This WooCommerce custom pricing tutorial covers all four approaches in depth:

| Method | Best For | Technical Skill Required | Cost | Setup Time |
|--------|----------|------------------------|------|------------|
| 1. Role-Based Pricing Plugin | Stores serving multiple customer types (retail + wholesale + members) | Low | $50–$200/year | 1–2 hours |
| 2. Quantity/Tiered Pricing | B2B stores wanting to encourage larger orders | Low | Often included in pricing plugins | 30 minutes |
| 3. Dedicated Wholesale Plugin | Businesses whose core model is B2B wholesale | Low–Moderate | $150–$500/year | 2–4 hours |
| 4. Custom Code Snippets | Developers needing maximum flexibility | High (PHP required) | Free | Variable |

If you're just getting started, begin with Method 1. If wholesale is your entire business, skip ahead to Method 3. Method 4 is only for those comfortable maintaining their own code. Remember, the goal is to find the solution that fits your customer segmentation needs without overcomplicating your store's architecture.

---

WooCommerce role based pricing plugin dashboard
Source: wooninjas.com

Method 1: Role-Based Pricing with a Plugin


The fastest and most reliable way to set up custom pricing is role-based pricing. This method charges different amounts depending on the logged-in user's WordPress role. It's the foundation of most customer-specific pricing strategies.

Before You Begin: Create Your Customer Roles


WordPress roles are the foundation of this approach. If you already use a membership plugin like WooCommerce Memberships, your roles may exist. Otherwise, you'll need to create them.

Recommended roles for most stores:
- Wholesale – Your primary B2B customer, typically 20–30% below retail
- Distributor – Higher-volume buyers who move more product, typically 30–40% below retail
- Gold Member – Premium retail customers who pay for exclusive access

You can create these roles using a user-role editor plugin like User Role Editor (free) or Members by MemberPress, or directly within your pricing plugin if it includes role management. Proper user role management ensures your pricing rules apply consistently across your entire customer base.

Step 1: Install a Role-Based Pricing Plugin


Popular options include Advanced Dynamic Pricing for WooCommerce, WooCommerce Role Based Price, and B2BKing. Here's a quick comparison to help you choose:

- Advanced Dynamic Pricing for WooCommerce – The most flexible for complex rules. Supports per-product overrides, global rules, and quantity breaks. Best if you need both role-based AND tiered pricing in one tool.
- WooCommerce Role Based Price – Simpler and lighter. Good for basic per-role pricing without the learning curve of a full dynamic pricing suite.
- B2BKing – Excels at wholesale-specific features like separate catalogs and quick-order forms. Choose this if you're leaning toward Method 3 but want to start with role-based rules.

For this tutorial, choose a plugin that supports both per-product and global rules, because you will need both. These pricing plugins for WooCommerce are designed to handle the heavy lifting of price differentiation automatically.

Step 2: Configure Global Discounts First


Inside your pricing plugin, create a rule that says:

> If user role equals Wholesale, apply a 20% discount to all products in the catalog.

This gives you immediate coverage. Add a second rule for Distributors at 30% and a third for Gold Members at 15%. Most plugins let you toggle whether the discount is a percentage or a fixed amount. This approach to price differentiation ensures no customer falls through the cracks.

Pro tip: Start with global rules before touching individual products. This ensures every item in your catalog is covered immediately, even new products you add later.

Step 3: Override Individual Products When Needed


Not every product should follow the same rule. After your global rules run, open a specific product and assign a custom price for each role. For instance, you might charge wholesalers $34 per unit on a product that retails for $49, even though your global rule would give them $39.20.

Per-product overrides always take precedence over global rules in well-built plugins, giving you surgical control. Use overrides sparingly—they add maintenance overhead—but don't hesitate to use them when margins or competitive positioning require it. This per-product customization is essential for products with unique cost structures or strategic value.

Step 4: Test as Different Users


Switch to the "Wholesale" role using the "Switch User" functionality found in most user-role plugins. Visit your shop and confirm the discounted price appears on the product page and in the cart. Repeat this for every role you created.

What to check during testing:
- Product page displays the correct price
- Cart and checkout recalculate correctly
- Variable products (with size/color options) show role-based pricing on each variation
- Sale prices still work correctly when combined with role discounts

Testing takes ten minutes but prevents embarrassing pricing mistakes later. This quality assurance step is critical for maintaining trust with your customers.

---

Method 2: Quantity-Based and Tiered Pricing


Role-based pricing solves the "who" of custom pricing, but quantity-based pricing rules solve the "how much." Tiered pricing encourages larger orders by lowering the per-unit price automatically as cart quantity increases. This is one of the most effective volume discount strategies for B2B stores.

A typical tier structure looks like this:

| Quantity Ordered | Price Per Unit |
|------------------|----------------|
| 1 – 9 | $50.00 |
| 10 – 49 | $45.00 |
| 50 – 99 | $40.00 |
| 100+ | $35.00 |

How to Configure Tiered Pricing


Open your dynamic pricing plugin and create a new "Bulk quantity" rule. Select the applicable product or category, then specify the quantity ranges and the discount type for each. The plugin handles the rest.

Where to find these settings:
- Advanced Dynamic Pricing: Navigate to Rules → Add New → choose "Bulk quantity" as the rule type
- WooCommerce Role Based Price: Look for the "Tiered Pricing" tab in product settings
- B2BKing: Go to Pricing → Tiered Pricing in the plugin dashboard

These bulk pricing rules are designed to reward your best customers while increasing your average order value.

What Customers Experience


When a customer adds 30 units to their cart, WooCommerce instantly recalculates the line total at $45 per unit. If they later increase the quantity to 60, the price recalculates again to $40 per unit. This real-time feedback is one of the best conversion tools for B2B stores, because buyers immediately see the value of increasing their order size.

Note on cart behavior: Most dynamic pricing plugins recalculate instantly when quantity changes in the cart. However, if you use a caching plugin, prices may appear stale until the cart page refreshes. Test this on your live site to confirm real-time updates work correctly.

Stacking with Role-Based Rules


These quantity discounts can be layered on top of role-based pricing. For example, a wholesale customer could receive their 20% role discount and qualify for a 5% additional discount at 100 units. This multi-rule pricing approach gives you maximum flexibility.

Important: Ensure your plugin supports stacked rules before you rely on this combination. Some plugins apply only the most favorable discount; others can combine them. Check your plugin's documentation or test with a sample order to verify the behavior.

Common Pitfalls to Avoid


- Creating too many tiers – More than 4–5 tiers confuses buyers and complicates maintenance. Keep it simple.
- Setting discounts too aggressive – Calculate your margins before publishing tiers. A 50% discount at 100 units sounds great until you realize you're losing money.
- Forgetting to update tiered pricing when costs change – Review your tiers quarterly or whenever supplier costs shift.

---

Method 3: Wholesale-Specific Pricing Plugins


If your entire business model revolves around B2B sales, a comprehensive wholesale plugin offers more than just price rules. Tools such as Wholesale Suite and B2BKing provide a complete B2B experience that pairs beautifully with custom pricing. These B2B e-commerce solutions are built specifically for wholesale operations.

What These Plugins Add Beyond Pricing Rules


- Separate wholesale catalogs with distinct prices and images, so retail customers never see B2B rates
- Quick-order forms that let buyers paste SKU lists for rapid reordering
- Payment gateways enabled only for wholesale customers, such as net-30 terms or bank transfers
- Shipping methods and tax rules tailored to business buyers
- Email verification for wholesale account approval, so you control who gets access

Getting Started: A Practical Setup Path


Step 1: Install and activate your wholesale plugin. Wholesale Suite and B2BKing both offer free versions to test basic functionality before committing to premium plans.

Step 2: Create your wholesale user role. The plugin will typically create this automatically. Assign existing wholesale customers to this role.

Step 3: Configure your wholesale price levels. Set either percentage discounts off retail or flat per-product wholesale prices. Wholesale Suite lets you set multiple price levels (e.g., Wholesale and Distributor) with different rates.

Step 4: Set up the wholesale experience. Enable the quick-order form, configure payment gateways for wholesale users only, and adjust shipping rules.

Step 5: Test the full checkout flow. Create a test wholesale account and complete an order from start to finish, verifying prices, payment options, and shipping calculations.

Cost Expectations


Wholesale plugins range from free (basic versions) to $200–$500 per year for full-featured plans. Compare this against the hours you currently spend manually adjusting prices or sending custom quotes—most store owners recoup the cost within the first month.

When to Choose This Route Over Methods 1 and 2


Choose a wholesale plugin if you need more than just price changes. If you require separate catalogs, approval workflows, or B2B-specific payment terms, a unified wholesale plugin reduces the risk of conflicting rules and gives you one dashboard to manage. You could technically build the same result with several plugins connected together, but the integrated approach is simpler and more reliable.

---

Method 4: Custom Code Snippets for Developers


For store owners comfortable with PHP, custom pricing can be implemented with a short code snippet. WooCommerce provides filter hooks such as woocommerce_product_get_price that allow you to modify prices dynamically on the fly. This programmatic pricing approach offers unlimited flexibility for those with coding skills.

A Basic Example: Single Role Discount


add_filter( 'woocommerce_product_get_price', 'custom_price_based_on_role', 10, 2 );
function custom_price_based_on_role( $price, $product ) {
if ( is_user_logged_in() && current_user_can( 'wholesale' ) ) {
return round( $price <em> 0.80, 2 );
}
return $price;
}


This snippet gives every logged-in wholesale user a 20% discount.

A More Realistic Example: Multiple Roles and Categories


add_filter( 'woocommerce_product_get_price', 'custom_price_based_on_role_and_category', 10, 2 );
function custom_price_based_on_role_and_category( $price, $product ) {
if ( ! is_user_logged_in() ) {
return $price;
}

// Define discount rules: role => [category => discount %]
$rules = array(
'wholesale' => array( 'electronics' => 0.25, 'accessories' => 0.15 ),
'distributor' => array( 'electronics' => 0.35, 'accessories' => 0.25 ),
);

foreach ( $rules as $role => $category_discounts ) {
if ( current_user_can( $role ) ) {
foreach ( $category_discounts as $category => $discount ) {
if ( has_term( $category, 'product_cat', $product->get_id() ) ) {
return round( $price </em> ( 1 - $discount ), 2 );
}
}
}
}

return $price;
}


Critical: Don't Forget Variable Products


The hook above only affects simple products. For variable products (products with size, color, or other options), you must also add:

add_filter( 'woocommerce_product_variation_get_price', 'custom_price_based_on_role', 10, 2 );


Without this second hook, variable product variations will ignore your custom pricing—a common bug that leads to inconsistent prices across your store.

When to Choose This Path


Only choose this path if you are comfortable with code. Snippets are free and lightweight, but they require technical maintenance. One theme update or plugin conflict can silently break your pricing logic. If you are a business owner rather than a developer, the plugin routes above are safer and easier to audit.

If you do go the code route, store your snippets in a child theme's functions.php file or a code-snippets plugin so they survive theme updates.

---

Best Practices for Implementing Custom Pricing


Whichever method you choose, these practices will keep your pricing structure clean and your customers happy. Following these WooCommerce pricing best practices ensures long-term success:

1. Build on User Roles as Your Foundation


Roles are already part of WordPress core and integrate with virtually every pricing plugin. Even if you're using a membership plugin, ensure each membership level maps to a distinct WordPress role. This gives you maximum flexibility to add or change pricing rules later. Proper customer group management starts with well-defined roles.

2. Document Every Pricing Rule


Keep a spreadsheet that lists every role, discount percentage, quantity tier, and product override. Include the date each rule was created and the business rationale behind it. Your future self—or the new team member who inherits your store—will thank you. This pricing documentation is essential for scaling your operations.

3. Test Comprehensively Before Launch


Test with a fresh account for each role and quantity tier. Verify prices on product pages, in the cart, and at checkout. Test variable products separately from simple products. Never assume a rule works because it looks configured correctly. Thorough pricing validation prevents costly customer-facing errors.

4. Audit Third-Party Plugin Conflicts


Subscription plugins and product add-ons sometimes ignore filtered prices. Check your third-party extensions when pricing behaves unexpectedly. Common culprits include:
- Subscription plugins (which may bypass price filters)
- Product add-on/configuration plugins
- Currency converters
- Caching plugins that serve stale price pages

5. Communicate Value to Customers


If someone sees a different price than a friend, they may feel confused or even cheated. Wholesale plugins solve this by hiding retail pricing from wholesale accounts and vice versa. If you're not using a wholesale plugin, consider adding a note on your pricing page explaining that volume discounts or membership pricing apply automatically. Transparent price communication builds trust.

6. Review Rules Seasonally


Currency fluctuations, new competitors, and supplier cost changes all affect whether your custom tiers still make sense. Schedule a quarterly review of your pricing rules. Ask yourself: Are our margins still healthy at every tier? Are competitors offering better wholesale rates? Have our costs changed enough to require adjustments? Regular pricing audits keep your strategy competitive.

---

Conclusion: Make Pricing a Strategic Advantage


The stores that thrive are those that treat pricing as a strategic tool, not a static field in a database. By implementing custom pricing, you're not just fixing a WooCommerce limitation—you're building a system that rewards loyalty, encourages larger orders, and makes every customer feel like they're getting a fair deal. This strategic pricing approach differentiates your store from competitors who rely on one-size-fits-all rates.

Your action plan:

1. Start with role-based pricing using a trusted plugin like Advanced Dynamic Pricing or B2BKing. Create your wholesale and distributor roles, set global percentage discounts, and test with secondary user accounts.
2. Add tiered quantity discounts to reward larger orders and increase average order value. Keep tiers simple—4–5 levels maximum—and verify real-time cart updates.
3. Upgrade to a dedicated wholesale plugin if B2B is your core focus and you need catalogs, approval workflows, or B2B payment terms.
4. Leave the code-snippet route to developers who can maintain it properly, unless you're confident in your PHP skills and willing to handle updates.

Set up one pricing rule today, test it with a secondary user account, and watch how much time it saves you from the very first order. Your customers will appreciate the instant, personalized pricing, and you will reclaim hours previously lost to quote requests and manual invoice edits. This WooCommerce pricing optimization is one of the highest-ROI changes you can make to your store.

As WooCommerce continues to evolve, expect more built-in flexibility around customer segmentation and dynamic pricing. But don't wait for that future—the tools to implement custom pricing exist today, and the competitive advantage is yours for the taking.

Start small, test thoroughly, and let your pricing work as hard as you do.

---

Ready to take control of your WooCommerce pricing? The strategies outlined above will transform how you do business—but the first step is yours. Whether you're leaning toward a plugin-based approach or exploring custom development, the right solution is within reach. Subscribe Now to get more actionable WooCommerce tutorials delivered straight to your inbox, and join a community of store owners who refuse to settle for one-size-fits-all pricing.

Thursday, September 3, 2026

Mastering API Integration with Third-Party APIs in WooCommerce: A Comprehensive Developer's Guide

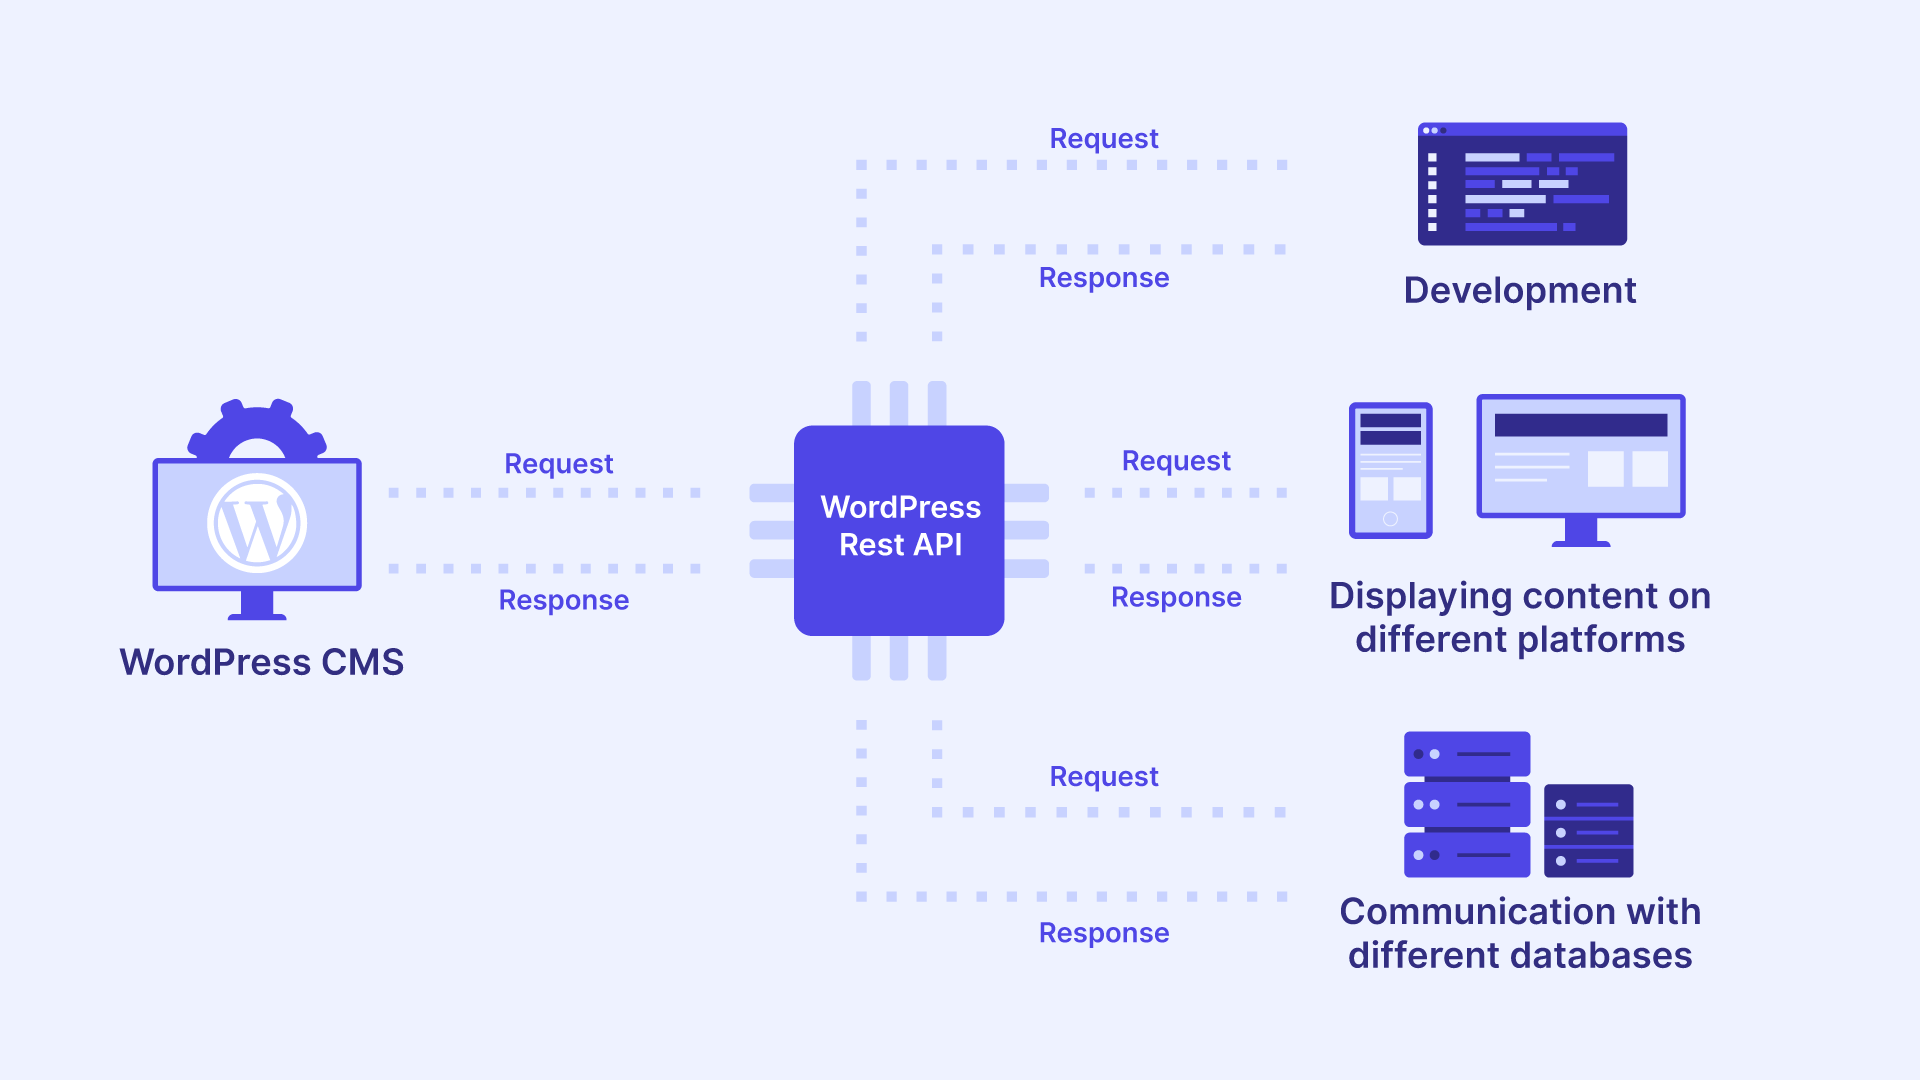
WooCommerce API integration architecture diagram
Source: wp-umbrella.com 

When your WooCommerce store stops syncing orders to your ERP at 2 AM on Black Friday, you'll understand why API integration design matters more than code. The difference between a store that crumbles under peak load and one that hums along seamlessly isn't luck—it's architecture.

In the modern e-commerce ecosystem, no online store operates in isolation. Whether you're syncing inventory to an ERP system, pushing customer data to a CRM, or automating shipping updates with a third-party logistics provider, seamless data exchange is the backbone of operational efficiency. WooCommerce, powering over 40% of all online stores, provides a robust REST API for this exact purpose. Yet mastering third-party API integration in WooCommerce demands far more than exchanging authentication tokens. It requires a strategic understanding of endpoints, data mapping, error handling, and security protocols—skills that separate production-ready systems from fragile prototypes.

This comprehensive developer's guide argues that successful WooCommerce API integration depends less on writing API calls and more on architecting data flow, implementing defensive error handling, and designing for failure. We'll cover authentication methods, data transformation layers, webhook configuration, and production-ready security practices. By the end, you'll have a concrete framework for building connectors that survive third-party API changes, traffic spikes, and business growth.

---


Understanding the WooCommerce API Integration Landscape


Before writing a single line of code, you must understand the two primary mechanisms WooCommerce offers for external communication: the REST API and Webhooks. Each serves a distinct purpose in third-party API integration, and knowing when to use which will shape your entire integration strategy.

WooCommerce REST API endpoint documentation screenshot
Source: woocommerce.com

The REST API Foundation for Third-Party API Connectivity


The WooCommerce REST API is the cornerstone of synchronous data exchange for any third-party API integration. Accessible under the /wp-json/wc/v3/ namespace, it exposes endpoints for virtually every entity, including products, orders, customers, and refunds. For example, a GET request to /wp-json/wc/v3/products retrieves your product catalog, while a POST request to the same endpoint creates a new product.

Crucially, the API supports query parameters for filtering, pagination (using per_page), and sorting. For developers, the ability to drive third-party API integration with a standard cURL request is a powerful starting point. The REST API excels at batch operations and on-demand synchronization—scenarios where you need immediate, request-response data exchange. However, when you need real-time event-driven triggers, you'll turn to a different tool for your WooCommerce integration.

WooCommerce webhook configuration settings screen
Source: woocommerce.com

Webhooks: Event-Driven Third-Party API Triggers


While the REST API relies on external polling, webhooks invert the model for third-party API integration. WooCommerce sends an HTTP request to your third-party application automatically when a specific event occurs, such as order.created or product.updated. This asynchronous approach eliminates the need for constant polling and provides the most efficient method for live data syncing. For a robust architecture, a combination of webhooks for ingestion and REST calls for outbound queries represents the industry standard for WooCommerce API integration.

Understanding this distinction matters because choosing the wrong mechanism for your use case creates unnecessary load, introduces latency, or—worst of all—causes missed data updates that silently corrupt your records during third-party API integration.

---

Pre-Integration Architecture and Requirements Planning


Success in third-party API integration with WooCommerce hinges on meticulous preparation. Rushing into coding without a clear architecture leads to fragile integrations that break when your business grows or your third-party provider updates their API. Before you write your first API call, you need to make deliberate decisions about authentication, data flow, and error recovery.

Authentication: Keys, OAuth, and Beyond


WooCommerce provides two primary authentication methods for third-party API integration, each suited to different integration scenarios.

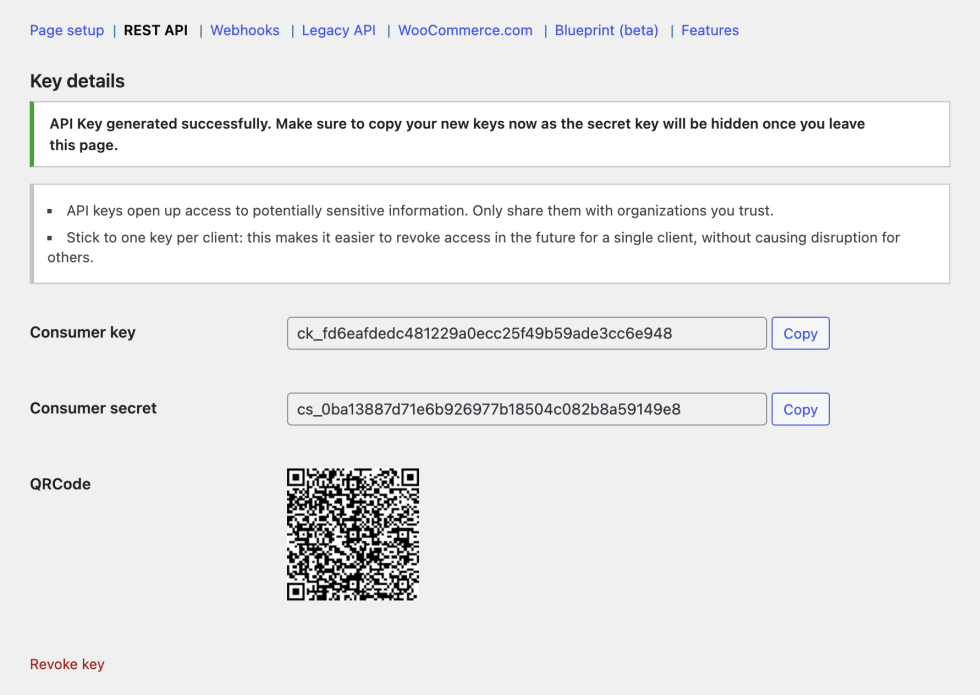
API keys (Consumer Key and Consumer Secret) offer the simplest approach. You generate these directly from the WordPress admin dashboard under WooCommerce > Settings > Advanced > REST API. You'll pass these keys via HTTP Basic Auth or query parameters, making them ideal for server-to-server interactions on trusted connections. Think of API keys as your integration's workhorse—reliable, straightforward, and appropriate for most internal system connections.

For public-facing applications acting on behalf of individual users, OAuth 1.0a is mandatory. This protocol provides a signing mechanism that never sends the secret over the wire, protecting your credentials during the authentication handshake. While more complex to implement, OAuth is non-negotiable when your integration touches customer-facing workflows.

Regardless of your chosen method, always store credentials in environment variables (e.g., $_ENV) rather than hard-coding them into committed files. This practice prevents credential leakage through version control and simplifies rotation when security policies require it.

Mapping Your Integration Requirements


Define the scope of your data flow before touching code. Ask yourself: What triggers a sync? Which fields are source-of-truth and which are secondary? What happens when data conflicts arise? Create a data dictionary mapping WooCommerce fields (like sku or billing_address) to the third-party system's schema. This prevents data corruption and ambiguity during transformation.

Your data dictionary should also document:
- Field-level validation rules (required vs. optional, format constraints)
- Data transformation logic (string concatenation, date formatting, currency conversion)
- Conflict resolution strategy (which system wins when both have updates)
- Error handling per field (what happens when a required field is missing)

This documentation becomes your integration's source of truth—the reference point that keeps your mapping layer consistent as requirements evolve.

---

Implementing Your Third-Party API Integration in WooCommerce


With your architecture planned and credentials secured, you're ready to implement the integration. Here's the systematic sequence that transforms your preparation into working code.

Step 1: Generate and Secure API Credentials


Navigate to WooCommerce > Settings > Advanced > REST API. Click "Add Key", select read/write permissions, and copy the generated keys. Treat the Secret Key with the same security rigor as a database password—store it in an environment variable, never in your codebase, and rotate it quarterly.

Step 2: Verify Connectivity with a Test Request


Before building the full integration, verify connectivity. This checkpoint prevents you from debugging external errors upstream. Here's a basic PHP snippet using wp_remote_post to query WooCommerce order data:

$response = wp_remote_get(
'https://yourstore.com/wp-json/wc/v3/orders?per_page=5',
array(
'headers' => array(
'Authorization' => 'Basic ' . base64_encode( $consumer_key . ':' . $consumer_secret )
),
'timeout' => 30
)
);


Always inspect the response code during testing. A 200 response confirms your request succeeded. A 401 signals an authentication failure, while a 429 indicates you're throttling the endpoint. Each response code tells you something specific about your integration's health, so build logging that captures these codes from day one.

Step 3: Build Your Data Transformation Layer


The external CRM likely expects a snake_case payload with different naming conventions than WooCommerce's billing_first_name. Write a dedicated "adapter" layer to map these fields. This abstraction allows you to modify the third-party API schema without breaking the core WooCommerce logic.

$crm_payload = array(
'customer_email' => $order_data['billing']['email'],
'customer_name' => trim( $order_data['billing']['first_name'] . ' ' . $order_data['billing']['last_name'] ),
'total_amount' => $order_data['total']
);


But field mapping is only the beginning. Your transformation layer must also handle:

Type conversions. WooCommerce often returns numeric values as strings (e.g., "25.00"), while your CRM might expect floats or integers. Cast values explicitly: (float) $order_data['total'] ensures the CRM receives the correct data type.

Null value handling. Decide upfront how to handle missing fields. Should an empty billing email abort the sync, or should it send a placeholder? Document your null-handling strategy and implement it consistently across all mapped fields.

Date and time normalization. WooCommerce stores dates in ISO 8601 format with timezone offsets. Your CRM might expect Unix timestamps or a different timezone. Build a date utility function that standardizes all date conversions in one place.

Nested object flattening. Some third-party APIs expect flat structures, while others accept nested objects. Understand your target schema and write transformation functions that handle both scenarios without duplicating logic.

Step 4: Configure Webhooks for Automated Triggers


To automate the push, create a webhook in WooCommerce. Use the built-in WooCommerce integration or register a custom endpoint. When the order.created trigger fires, WooCommerce delivers the payload to your CRM endpoint. Your CRM must acknowledge receipt with a 2xx status quickly; otherwise, WooCommerce will retry the delivery.

For production systems, consider this acknowledgment pattern: your receiving endpoint validates the payload, returns a 202 Accepted immediately, and processes the data asynchronously via a background job. This prevents slow third-party processing from blocking WooCommerce's webhook delivery.

---

Production-Ready Best Practices


A working integration is not a production-ready integration. The following practices distinguish systems that operate reliably under real-world conditions from those that fail when you need them most. These practices interrelate—skipping one undermines the others—so implement them as a cohesive strategy rather than isolated features.

Implement Comprehensive Error Handling


External systems inevitably fail. Your integration must anticipate failures at every point and recover gracefully. Wrap your API requests with retry logic using exponential backoff—retry after 1, 2, and 4 seconds, then escalate to a dead-letter queue for manual inspection.

Asynchronous processing, leveraging WordPress's wp_queue or a dedicated service like RabbitMQ, ensures a third-party timeout never stalls your checkout process. When an API call fails, the order still processes; the sync simply retries later. This decoupling is essential for maintaining storefront performance during third-party outages.

Optimize Performance with Caching


For read-heavy integrations—such as fetching stock levels from a warehouse API—implement temporary caching. The WordPress Transients API provides a perfect solution for caching external responses for short periods:

set_transient( 'warehouse_levels', $data, 300 ); // Cache for 5 minutes


This dramatically reduces external HTTP calls and mitigates rate-limit penalties. Without caching, a product page that displays stock levels could trigger dozens of API calls per page view, exhausting your quota within minutes.

Prioritize Security at Every Layer


Security isn't a single feature—it's a property of your entire integration. Each layer requires specific protections:

| Security Layer | Best Practice |
|---|---|
| Transport | Use TLS 1.2+ for all HTTPS endpoints |
| Secrets | Rotate API keys quarterly and restrict IP addresses |
| Validation | Sanitize all incoming data with sanitize_text_field() |
| Logging | Log requests to the error_log, but redact secrets and PII |
| Webhooks | Validate incoming webhook payloads with a signature hash, such as SHA256 |

Webhook signature validation deserves special attention. WooCommerce signs each webhook payload with your secret key, allowing you to verify the request genuinely came from your store. Without this verification, malicious actors could send fake webhook events that corrupt your data or trigger unauthorized actions.

Respect Rate Limits


Every third-party API has throttling limits, and exceeding them can halt operations for hours. Examine the HTTP response headers (X-RateLimit-Remaining) and implement queueing to spread requests evenly. Sending 10,000 requests in a burst will likely trigger an IP ban—a catastrophic failure for time-sensitive integrations.

Monitor your rate limit consumption proactively. Set alerts when you approach 70% of your quota, giving yourself time to adjust before hitting the hard limit.

---

Common Pitfalls and Risk Mitigation


Even with best practices in place, developers commonly stumble on specific scenarios that undermine their integrations. Understanding these failure modes helps you design defenses before problems occur.

Hard-coding URLs. Always retrieve the site URL dynamically using get_site_url() to facilitate staging environments. Hard-coded URLs break when you migrate between environments and create security risks when staging URLs leak into production.

Ignoring line item metadata. When syncing orders to accounting systems, ensure you map meta_data keys, as many plugins store crucial data there. Skipping metadata means losing custom fields, subscription details, or gift message information that your downstream systems depend on.

Treating data as final. Always account for order status changes (e.g., processing to cancelled). Your webhook triggers and API logic must handle alterations, not just insertions. An order that syncs correctly when created but fails to update when cancelled creates inaccurate records in your CRM and ERP.

Forgetting webhook timeouts. WooCommerce will time out requests that take longer than 2–5 seconds. If the receiver is slow, acknowledge the receipt immediately and process the data offline via a background job. This pattern keeps webhook delivery reliable while accommodating slow third-party processing times.

---

Conclusion: Mastering Third-Party API Integration in WooCommerce


The difference between a fragile integration and a resilient one isn't the quality of your code—it's the quality of your architecture. By treating WooCommerce API integration as a system design problem rather than a coding exercise, you build connectors that survive third-party API changes, traffic spikes, and business growth.

We've covered the critical distinction between the REST API for synchronous batch operations and Webhooks for immediate events—the architectural foundation for real-time data synchronization. We've explored why authentication management, data transformation, and error handling determine whether your integration scales gracefully or collapses under pressure.

Now it's time to apply these principles. Start by auditing your current or prospective integration across the four production-readiness dimensions we've discussed: security, error handling, caching, and rate limiting. Build a proof-of-concept using the code snippets provided, then systematically harden each layer before going live.

Start small with a proof-of-concept, but design for production from day one. The investment in properly engineered WooCommerce API integration translates directly to fewer manual interventions, better user experiences, and a scalable e-commerce operation. Get the architecture right today, and your platform will be ready to hook into any future software ecosystem you adopt.

---

Ready to build integrations that never break under pressure? Subscribe Now for advanced WooCommerce development tutorials, production-ready code patterns, and insider strategies delivered straight to your inbox every week.

Sunday, August 30, 2026

WooCommerce ERP Order Management Integration: A Step-by-Step How-To Guide


Pre-Integration Analysis for WooCommerce ERP
Source: www.codeable.io

Effective order management is a mission-critical operation for online retailers and service providers. As ecommerce volumes grow, manual data entry and disconnected systems rapidly become unsustainable. WooCommerce, a leading WordPress-based commerce platform, offers flexibility and customization, but scaling requires more than a robust storefront. An enterprise resource planning (ERP) system centralizes finance, inventory, customer data, and fulfillment workflows. Integrating WooCommerce with an ERP transforms fragmented information into a unified operational backbone, enabling real-time data synchronization across sales, inventory, and accounting.

A structured pre-integration analysis is the critical first step to ensuring a successful WooCommerce ERP integration, mitigating risks of data loss, operational delays, and costly errors. This article provides a formal, informative analysis of WooCommerce ERP order management integration. It offers a step-by-step how-to guide suited for AI users, copywriters, designers, and business stakeholders who require a clear understanding before implementation. Readers learn the key considerations, integration methods, tools, common challenges, and best practices for connecting their ecommerce platform with backend systems. By the end, readers will know how to approach a WooCommerce integration with confidence and avoid the pitfalls that commonly derail such projects.

What Is WooCommerce ERP Integration?

WooCommerce ERP integration refers to the systematic connection between a WooCommerce store and an enterprise resource planning system. The goal is to enable continuous, accurate, automated exchange of order-related data. A successful integration eliminates duplicate data entry and ensures that sales orders, customer details, inventory levels, shipping updates, and financial records remain consistent across both platforms—a core requirement for streamlined ecommerce operations.

In a typical architecture, WooCommerce serves as the customer-facing storefront, while the ERP acts as the back-office system of record. When a customer completes a purchase, the WooCommerce order is transmitted to the ERP for processing. Conversely, when the ERP updates stock quantities or shipment tracking numbers, that information must flow back to WooCommerce. This bidirectional data flow forms the foundation of strong WooCommerce integration.

Key data objects exchanged during integration include:

  • Sales orders: order number, customer information, line items, discounts, taxes, and totals
  • Product data: SKU, product name, description, category, and pricing
  • Inventory levels: available stock, allocated stock, and backorder status
  • Customer records: billing and shipping addresses, email, phone number, and order history
  • Fulfillment data: shipment tracking numbers, carrier details, and delivery status
  • Accounting data: invoices, payments, refunds, and cost of goods sold

A well-designed WooCommerce ERP integration reduces manual labor, improves order accuracy, and provides real-time visibility into business operations. However, integration requires careful analysis because every ERP system has different capabilities, data models, and API structures. Without a structured approach, organizations may face synchronization errors, data loss, or operational delays that undermine customer trust.

The Importance of Analyzing Order Management Before Integration
Source: campus.extension.org

The Importance of Analyzing Order Management Before Integration

Order management touches every part of an ecommerce operation. A purchase triggers inventory changes, transactions, customer communication, and shipping workflows. When WooCommerce and an ERP operate independently, these processes become siloed. Staff must manually transfer data, reconcile records, and resolve discrepancies. This approach is slow and prone to human error, especially during peak sales periods.

Conducting a formal analysis before integration helps organizations achieve several critical objectives:

  • Eliminate manual data entry: automation removes repetitive tasks such as copying details spreadsheets or back-office software, freeing staff for higher-value work
  • Improve order accuracy: synchronized data reduces mismatches in SKUs, quantities, and customer addresses, preventing costly fulfillment errors
  • Enable real-time inventory visibility: accurate stock data helps prevent overselling, reduceorders, and improve customer satisfaction
  • Streamline fulfillment: shipping and tracking information updates automatically in WooCommerce, keeping customers informed without manual intervention
  • Support financial reporting: orders, invoices, and payments align across systems for reliable accounting and audit trails
  • Scale operations: automated workflows allow businesses to handle higher order volumes without proportional increases in staff

For AI users, copywriters, and designers, this integration also enhances data accessibility. AI tools can analyze clean order data to generate forecasts, customer insights, and marketing recommendations. Copywriters can automate personalized order confirmation using accurate customer and product data. Designers can build dynamic storefront elements that reflect real-time inventory and pricing. Ultimately, a thorough analysis benefits not only operations teams but also creative and technical roles—making it a strategic priority rather than a mere technical exercise.


Pre-Integration Analysis for WooCommerce ERP

Before configuring any plugin or writing API code, stakeholders should complete a structured analysis. This phase establishes the foundation for a reliable WooCommerce ERP integration. The following subsections outline the core components of this pre-integration work.

Assessing Business Requirements for Ecommerce Systems

Begin by documenting current order management workflows. Identify who creates orders, how they are processed, where inventory is tracked, and how fulfillment is managed. Determine which ERP modules are essential, such as sales, inventory, purchasing, accounting, or customer relationship management. Clarify which data must flow in real time and which can be synchronized on a schedule. For example, an order confirmation should sync immediately, while a full inventory reconciliation might occur hourly.

Business requirements should also include performance expectations. How many orders per day does the store process? Does the business sell in multiple currencies or tax jurisdictions? Are there seasonal spikes? Answering these questions will guide the choice of integration method and infrastructure, ensuring the solution can support current and future growth. This assessment aligns your ecommerce platform strategy with operational reality.

Evaluating ERP Capabilities and API Availability

Not all ERP systems offer the same integration capabilities. Modern cloud-based ERPs often provide REST APIs, webhooks, and prebuilt connectors. Legacy on-premise systems may require middleware or custom database connections. Confirm whether the ERP exposes APIs for orders, products, inventory, and customers. Review rate limits, authentication methods, and documentation quality. If the ERP lacks a public API, the integration may need file-based transfer methods such as CSV export/import or SFTP.

WooCommerce itself provides a robust REST API. It supports standard endpoints for orders, products, customers, and inventory. This makes WooCommerce a flexible front end for integration. When both systems offer APIs, direct integration is feasible. When one system lacks API support, middleware tools such as Zapier, Make, Celigo, or Boomi can bridge the gap and provide additional monitoring and error-handling capabilities. These platforms simplify ecommerce systems connectivity without heavy coding.

Mapping Order Data Fields for Synchronization

Data mapping defines how fields in WooCommerce correspond to fields in the ERP. For example, the WooCommerce order number might map to the ERP sales order reference, and the WooCommerce product SKU should correspond to the ERP item code. Customer email, billing address, and shipping address must map accurately. Discounts, coupons, and shipping charges require careful handling because each system may calculate values differently.

Create a mapping table that includes source field, target field, data type, transformation rule, and validation requirement. This table becomes the blueprint for configuration or custom development. Common transformations include date format conversion, currency conversion, and status mapping. For instance, WooCommerce status "processing" might map to ERP status "confirmed." Without explicit mapping, orders may fail to import or lose critical data, leading to downstream errors in fulfillment and accounting.

Determining Synchronization Frequency and Direction

Decide which system is the source of truth for each object. For orders, WooCommerce is typically the source of truth because the customer initiates the purchase there. For inventory, the ERP may be the source of truth because it manages purchasing and warehousing. For product descriptions, the ERP might be the master if it stores extended attributes. Clear ownership prevents conflicts during synchronization and ensures that discrepancies are resolved consistently.

Choose synchronization frequency based on business needs. Real-time synchronization uses webhooks or event-driven triggers, providing immediate updates. Scheduled synchronization uses cron jobs or middleware intervals, which may be sufficient for less time-sensitive data. Hybrid approaches are common: new orders sync in real time, while product catalog updates sync nightly. Error handling should be defined for each synchronization type, including retry logic and alerting mechanisms to ensure data integrity.

Step-by-Step How-To Guide for WooCommerce ERP Order Management Integration

After completing the pre-integration analysis, organizations can proceed with implementation. The following steps provide a formal, repeatable process for integrating WooCommerce with an ERP for management.

Step 1: Document Current Order Management Workflows

The first step is to create detailed process maps of every order-related workflow. Include order placement, payment capture, fraud review, fulfillment, shipping, returns, and accounting. Identify all systems involved in each step. This documentation helps stakeholders understand where data originates and where it must be delivered. It also reveals redundant steps that integration can eliminate, streamlining operations from the outset.

For each workflow, note the trigger, the responsible team, the data inputs, and the desired outputs. For example, after payment capture, order should be pushed to the ERP for fulfillment. If the ERP updates inventory, that change should be reflected in WooCommerce. Process maps should be reviewed by operations, IT, and finance teams to ensure completeness and accuracy. This collaborative review also builds cross-functional buy-in for the integration project.

Step 2: Select an Integration Method for WooCommerce ERP

There are three primary methods for connecting WooCommerce with ERP systems:

  • Built-in plugin or connector: tools such as WP ERP, WooCommerce ERP connectors, and third-party plugins offer ready-made integrations for popular ERPs like SAP Business One, Microsoft Dynamics, and NetSuite. These are the fastest to deploy but may lack customization options for unique business rules.
  • Middleware: services like Zapier, Make, Celigo, and Boomi connect WooCommerce to hundreds of ERPs using visual workflows. Middleware reduces coding effort and provides monitoring dashboards, making it accessible to non-developers. It is suitable for small to midsize operations and for teams without dedicated developers.
  • Custom API integration: developers use the WooCommerce REST API and the ERP API to build a tailored integration. This method offers the highest flexibility and performance, accommodating complex data models and high order volumes. Custom development requires careful project management, thorough testing, and ongoing maintenance.

Select the method based on budget, technical resources, ERP complexity, and long-term scalability. Many organizations begin with a plugin or middleware and later migrate to custom integration as volume grows. Whatever method you choose, ensure it aligns with the business requirements documented in the pre-integration analysis to achieve optimal ecommerce systems performance.

Step 3: Configure Data Mapping and Validation Rules

Using the mapping table from the pre-integration analysis, configure field mappings in the chosen tool or custom code. Ensure every required field is mapped, including order headers, line items customer information, and financial data. Define validation rules such as required SKU, valid email format, and allowed order statuses. Add transformation logic for date formats, decimal precision, and currency. For example, WooCommerce stores amounts with two decimal places, but some ERPs use four. A rounding rule must be specified to prevent discrepancies.

Validation rules prevent invalid data from entering either system. If a WooCommerce order references a product that does not exist in the ERP, the integration should flag the error and withhold the sync until corrected. Implement fallback values where appropriate, such as default tax codes or default warehouse locations. Clear validation improves data quality and reduces manual intervention, which is essential for maintaining trust in the integrated system and ensuring successful WooCommerce ERP order processing.

Step 4: Implement Authentication and Security Protocols

Secure authentication is essential for any integration. The WooCommerce REST API supports OAuth 1.0a and application passwords. ERPs may support OAuth 2.0, API keys, or certificate-based authentication. Use the most secure method available for each system. Store credentials in environment variables or a secrets manager, never in plain text configuration files. This protects sensitive information from accidental exposure.

Encrypt all data in transit using HTTPS and TLS. Restrict API access by IP address where possible and grant least-privilege permissions to integration users. For example, the integration user should have permission to create orders and update inventory but not delete products or access financial reports. Audit logs should record every API call for traceability and compliance. Security misconfiguration is a common cause of data breaches in ecommerce systems, so this step requires rigorous attention and periodic review to safeguard your WooCommerce ERP data exchange.

Step 5: Run Sandbox Testing and Data Reconciliation

Before going live, create a staging or sandbox environment that replicates the production WooCommerce store and ERP. Run end-to-end tests for each order scenario, including standard orders, guest checkouts, digital products, backorders, refunds, and partial shipments. Verify data arrives accurately in the ERP and that responses flow back to WooCommerce, matching expected values at each stage.

Perform data reconciliation by comparing record counts and field values across systems. Check that order totals, taxes, and discounts match exactly. Test failure scenarios such as network timeouts, invalid payloads, and rate limits, documenting expected behavior for each case. Only proceed to production when all critical tests pass. Sand testing is not optional; it is the most effective way to prevent costly post-launch errors that erode customer confidence and operational efficiency in WooCommerce ERP order management.

Step 6: Deploy in Phases and Monitor Performance

Roll out the integration in controlled phases. Begin with a single product category or a subset of orders to validate real-world performance. Monitor synchronization logs, error rates, and processing times daily. Gradually expand the full catalog and all order channels, monitoring closely at each expansion stage. This phased approach limits the blast radius of any unexpected issues and allows for iterative refinement.

Establish key performance indicators such as sync success rate, data accuracy, and order processing time. Set up alerts for failed syncs or significant anomalies. Regularly review logs and reconcile records between systems to ensure ongoing accuracy. Document troubleshooting procedures and assign ownership for incident response. Continuous monitoring and improvement ensure the integration remains reliable as volumes grow and business processes evolve, cementing the value of your WooCommerce ERP system.

Conclusion: Ensuring Success in WooCommerce ERP Order Management

A successful WooCommerce ERP order management integration begins long before any technical configuration. It starts with structured pre-integration analysis that documents workflows, evaluates system capabilities, maps data fields, and defines synchronization rules. Following a step-by-step implementation process—from documentation and method selection through testing and phased deployment—translates that analysis into a reliable, secure, and scalable integration for your ecommerce operations.

The key to lasting success is continuous monitoring, clear data ownership, and a commitment to data quality. Organizations that invest time in thorough planning and adopt an iterative approach will reduce errors, improve operational efficiency, and build a foundation for growth. For AI users, copywriters, and designers, order data provides the accuracy and accessibility needed to deliver better customer experiences and data-driven insights, enhancing the strategic value of WooCommerce ERP integration.

Ultimately, integrating WooCommerce with an ERP is not a one-time project but an ongoing capability. With the right preparation and execution, it becomes a strategic advantage that transforms fragmented operations into a unified, automated backbone for ecommerce success. For organizations that need immediate execution, it is possible to hire a qualified specialist to manage the technical details and ensure a smooth implementation. Whether you proceed internally or with expert support, the principles outlined in this guide help you approach the project with confidence and achieve the operational benefits you seek in WooCommerce ERP order management.

Wednesday, August 19, 2026

How to Connect WooCommerce to an External Inventory System

  1. Introduction
  2. Understanding WooCommerce Inventory Integration
  3. Key Terminology and Data Structures
  4. Choosing the Right Integration Method
  5. erequisites for a Successful Integration
  6. Step-by-Step Guide: Connecting WooCommerce via REST API
  7. Step-by-Step Guide: Using a Middleware Platform
  8. Data Mapping Best Practices
  9. Synchronization Direction and Conflict Resolution
  10. Security Considerations
  11. Testing Your WooCommerce Inventory Integration
  12. Common Challenges and Solutions
  13. Continuous Maintenance and Optimization
  14. When to Hire an Expert
  15. Related WooCommerce Services
  16. Conclusion

Introduction

Did you know that nearly 45% of e-commerce merchants lose revenue due to inventory inaccuracies? When customers encounter "out of stock" messages for items that are actually available—or worse, receive cancellation notices after ordering—they don't blame your inventory system. They blame your brand.

Efficient inventory management is the backbone of any successful e-commerce operation. For WooCommerce store owners, synchronizing product stock levels, pricing, and order data with an external inventory system is no longer optional—it's a competitive necessity. WooCommerce inventory integration eliminates manual data entry, reduces costly stock discrepancies, and delivers a seamless customer experience across every sales channel. By establishing a reliable connection between your WooCommerce store and your ERP, warehouse management system (WMS), or point-of-sale (POS) platform, you create a unified operational backbone that scales with your business.

This guide is designed for business owners, managers, and technicalers who need to connect WooCommerce to an ERP, warehouse management system, POS platform, or custom database. Whether you're overseeing the project executing the technical work yourself, you'll learn:

  • Three primary integration methods (plugins, REST API, middleware) and when to each
  • Step-by-step implementation guides with actionable code examples
  • Data mapping strategies to avoid common pitfalls
  • Security best practices to protect sensitive business data
  • Testing protocols to ensure reliability before go-live

Let's begin by understanding whatCommerce inventory integration actually involves.


WooCommerce inventory sync diagram flowchart
Source: www.cloudways.com

Understanding WooCommerce Inventory Integration

WooCommerce inventory integration connects your WooCommerce store to a third-party inventory management system—such as an ERP, warehouse management system (WMS), point-of-sale (POS) platform, or custom. This connection enables data flow between the systems, ensuring stock quantities, product details, and order statuses remain consistent across all platforms.

The objective is to maintain a single source of for inventory data. When a customer places an order on WooCommerce, the integration automaticallys the purchased quantity from the external system. Conversely, when new stock arrives at the warehouse, the integration updates WooCommerce product quantities in real. This eliminates overselling, underselling, and the hours of manual reconciliation that plague disconnected operations.

Why External Inventory Systems Matter
Source: www.group1auto.com

Why External Inventory Systems Matter

Many WooCommerce merchants begin with the platform's built-in inventory management features. These native capabilities work well for small catalogs and simple workflows. However, businesses scale, they hit critical limitations:

  • No multi-warehouse support—native WooCommerce tracks inventory at a single location
  • No batch or serial number tracking—critical for industries like electronics, pharmaceuticals, and food
  • No purchase order management—lier replenishment remains a manual process
  • No demand forecasting—you can't predict stockouts before they happen
  • No cross-channel inventory pooling—marketplace and physical stock aren't consolidated

External systems address these gaps, providing the sophisticated infrastructure growing businesses need. A robust WooCommerce inventory sync with an external system also enables real-time stock level synchronization across all sales channels, automated order routing, financial calculations, and enhanced customer satisfaction through reliable product availability.

Real-world example: A clothing retailer selling on WooCommerce, Amazon, and through a physical store faced constant overselling during sales events. After implementing a WooCommerce inventory integration with their ERP as the master system, they reduced stockout incidents by 78% and eliminated overselling entirely—all while cutting inventory management time from 15 hours per week to under 2.

By implementing a WooCommerce inventory integration, organizations achieve:

  • Real-time stock level synchronization across all channels
  • Reduced risk overselling and backorder mismanagement
  • Automated order routing and fulfillment workflows
  • Accurate financial and cost of goods sold calculations
  • customer satisfaction through reliable product availability

Key Terminology and Data Structures

Before initiating an integration, you must understand the core data elements involved Both WooCommerce and your external inventory system must agree on how products, variations, and stock quantities are identified and structured.

SKU ( Keeping Unit)

The SKU is the primary identifier used to match products between systems. It must be unique for every sellable item, including product variations. A consistent SKU strategy is the foundation of any successful integration. Without unique SKUs, data mapping becomes error-prone, and will fail.

Best practice: Establish a naming convention that encodes product attributes. For example, "SHIRT-M-BLU" clearly identifies medium, blue shirt. This makes manual troubleshooting easier and prevents duplicate entries.

Stock Quantity

WooCommerce stores stock quantity as an integer simple products and per-variation for variable products. The external system must send or receive this numeric value without formatting inconsistencies—comm, decimal points, or leading zeros will cause errors.

Stock Status

WooCommerce derives status from the stock quantity and the store's. Common statuses include in stock, out of stock, and on backorder. Your external system may use different terminology (e.g., "available," "sold out," "pre-order"), so mapping these statuses correctly is critical to avoiding incorrect information displayed to customers### Backorder Settings

WooCommerce allows products remain purchasable when out of stock if backorders are enabled. The integration must these settings and prevent external stock updates from inadvertently disabling backorder functionality. A synchronization job that sets stock to zero when the warehouse is empty could accidentally stop backorder sales if not properly configured.

Product Variations

Variable products in WooCommerce consist of multiple variations, each with its own SKU, stock quantity, and attributes (size, color, material). The integration must handle variations as distinct inventory items while maintaining the parent-child relationship. Failing to do so leads to stock mismatches where the parent product shows availability but all variations are out of stock.


Choosing the Right Integration Method

Several approaches can achieve WooCommerce inventory integration. Your optimal method depends on technical resources, budget, data, and required synchronization frequency. Here's a comparative overview to help you decide:

Method Best For Pros Cons
Plugin-based Small catalogs, popular inventory systems Fast deployment, minimal technical knowledge required Limited flexibility; may not handle custom workflows
Custom REST API Large catalogs, unique business rules, niche systems Maximum control, complete customization Requires developer expertise; longer implementation
Middleware (iPaaS) Medium businesses, multiple integrations Visual mapping,-built connectors, no code Subscription costs; potential data latency
CSV batch processing Small stores, infrequent updates Simple, no API knowledge needed Prone to human error; no real-time sync
Webhook-driven Real-time sync requirements Immediate updates, efficient resource usage Requires both systems to support webhooks

Plugin-Based Integrations

Numerous WordPress plugins offer out-of-box connections to popular inventory systems like Cin7, Linnworks, DEAR Inventory, and TradeGecko. These plugins are the fastest deploy and require minimal technical expertise—often just entering API credentials and configuring basic settings.

However, plugins have limitations:

  • They may lack for custom workflows specific to your business
  • They're typically tied to specific inventory platforms
  • They may not handle complex data transformations or edge cases
  • Updates and API changes can break functionality

Custom REST API Integration

WooCommerce provides a comprehensive REST API that allows developers to custom connections to virtually any external system. This method offers the highest level of control and is ideal when:

  • Your inventory system no pre-built connector
  • You need unique business rules or data transformations
  • You require low-latency synchronization
  • You're managing transaction volumes

A professional WooCommerce API integration service can design and deploy a tailored solution that fits your exact requirements.

Middleware Platforms

Integration platforms such as Zapier, Make, Celigo, and Boomi act as intermediaries between WooCommerce and your external inventory system. They provide visual mapping tools and pre-built connectors, significantly reducing the need for custom code.

Key considerations:

  • Subscription costs scale with usage volume
  • Data latency may occur depending on plan
  • Complex logic may still require custom code modules
  • Excellent for small-to-medium businesses with multiple integrations

Batch CSV Processing

For merchants with low update frequency, manual or scheduled CSV file transfers can be sufficient. WooCommerce's built-in product importer can update stock quantities from CSV file.

However, this method is prone to human error and does not support real-time updates. It's best suited for:

  • and development environments
  • Very small catalogs with infrequent changes
  • Initial data seeding before implementing an automated solution

Webhook-Drivenization

WooCommerce can send webhooks when specific events occur—order creation, product stock changes, product updates. The external system listens these webhooks and updates its records accordingly. This method enables near-real-time synchronization without constantly polling the API.

Advantages:

Efficient resource usage (no continuous polling)

  • Immediate response to events
  • Reduced API request volumes

Requirements:

  • Your external system must expose a webhook endpoint
  • You must handle webhook delivery failures and retries
  • Security measures (signature verification) are essential

Prerequisites for a Successful Integration

Before building or configuring the connection, ensure you've addressed the following prerequisites. Skipping any of these likely result in a problematic integration.

1. SKU Architecture

All products in WooCommerce and the external system must share identical SKUs. Conduct a full SKU audit to identify:

  • Missing SKUs on either system
  • Duplicate SKUs within a single system
  • SKUs with trailing spaces or inconsistent formatting
  • Variations without unique SKUs

Tools like WP All Export or a simple CSV export can help you compare SKUs across systems. Resolve discrepancies before proceeding.

2. API Credentials

For API integrations, you'll:

  • WooCommerce REST API keys with appropriate read/write permissions
  • External system API credentials (API keys, O tokens, or database access)

Store these securely in an environment variable manager or secret store. Never commit them to version control.

3 Staging Environment

Use a staging environment that mirrors production. Never test integrations on a live store without:

  • A full backup and rollback
  • A way to isolate test data from real customer data
  • Clear communication with your team about testing activities

4. Data Document

Create a mapping table that shows how each field in WooCommerce corresponds to a field in the external system. Include:

  • Field names both sides
  • Data types (integer, string, boolean, enum)
  • Validation rules
  • Transformation logic (e.g., converting string integer)
  • Default values for empty fields

This document becomes your reference during development and troubleshooting.

5. Error Notification Channels

Configure, Slack, or SMS alerts for failures. When synchronization breaks, you need to know immediately. Delayed detection means:

  • Overselling risk
  • Incorrect stock displays
  • Backend order fulfillment issues

Set up monitoring with tools like UptimeRobot, Pingdom, or custom error tracking in your integration layer.


Step-by-Step Guide: Connecting WooCommerce via REST API

This section provides a robust custom integration using the WooCommerce REST API. It's suitable for businesses that require tailored data flows and cannot rely on pre-built plugins.

Step : Generate WooCommerce API Credentials

Log in to your WordPress admin dashboard and navigate to WooCommerce → Settings → Advanced → REST. Click Add key:

  1. Provide a description (e.g., "External Inventory System")
  2. Select a user with appropriate permissions (ideally a dedicated integration user)
  3. Set permissions to Read/Write
  4. Click Generate API key

Store the generatedConsumer Key** and Consumer Secret securely. These credentials authenticate all API requests.

// Example authentication header
Authorization: Basic base64_encode(consumer_key:consumer_secret)

Security note: Treat these credentials like passwords. Never share them publicly, and regenerate them if you suspect compromise.

Step 2: Authenticate with the External Inventory System

Obtain the API documentation for your external inventory. Most modern systems offer REST or GraphQL APIs with authentication methods including:

  • OAuth 2.0—the industry standard, often involving client credentials and token refresh
  • API keys—simpler, but require key management
  • Basic authentication—/password, common in internal APIs

Implement the appropriate authentication flow in your integration layer. If using a middleware platform, select the connector and enter your credentials.

Step 3: Design the Data Mapping Schema

Create a detailed mapping between WooCommerce product fields and external inventory fields. minimum, map these fields:

WooCommerce Field External System Field Notes
SKU ItemCode / SK Primary match key
stock_quantity QuantityOnHand Integer, non-negative
stock_status AvailabilityStatus Map enum
manage_stock TrackInventory Boolean flag
name ProductName For reference checks
price Price If price is needed
variation_id VariantCode For variable products

Step 4: Implement Initial Stock Synchronization

Perform a-time bulk synchronization to align stock levels between systems. Use the WooCommerce API to fetch all products with pagination:

GET /wp-json/wc/v3/products?per_page=100&page=1
// Response includes product data with SK and stock_quantity
{
  "products": [
    {
      "id": 123,
      "sku": "SHIRT-M-BLU",
      "stock_quantity": 25,
      "in_stock": true
    }
  ]
}

For each product:

  1. Extract the SKU and current stock quantity
  2. Cross-reference with the external system
  3. Decide which system is the authoritative source
  4. Update the other accordingly

During initial synchronization, designate the external system as master and overwrite WooCommerce quantities to match.

Step 5: Configure Ongoing Synchronization Triggers

Determine which events should trigger synchronization. Common triggers include:

  • New order placed in WooCommerce → decrease stock in external system
  • Stock level change in external system → update WooCommerce quantity
  • Product created updated in either system → propagate changes
  • Refund or cancellation processed → adjust stock accordingly

For WooCommerce-to-ex updates, register a webhook on the woocommerce_order_completed or woocommerce_new_order event. The web payload includes line items with SKUs and quantities:

{
  "id": 4567,
  "status": "completed  "line_items": [
    {
      "sku": "SHIRT-M-BLU",
      "quantity": 2
    }
  ]
}

The external system receives this data and deducts stock.

For external-to-WooCommerce updates, the external system calls the Woo API to update each product's stock_quantity:

PUT /wp-json/wc/v3/products/{product_idContent-Type: application/json

{
  "stock_quantity": 42
}

For efficiency with multiple products, use the batch endpoint```http
POST /wp-json/wc/v3/products/batch
Content-Type: application/json

{
"update": [
{ "sku": "SKU123", "stock_quantity": 42 },
{ "sku": "SKU456", "stock_quantity": 7 }
]
}


### 6: Handle Product Variations Correctly

For variable products, the WooCommerce API variations as separate objects under a parent product. You must update each variation's `stock_quantity` using the variation ID and parent product ID.

First, retrieve all variations:

```http
GET /wp-json/wc/v3/products/{product_id}/variations

Then each variation individually or via the batch variations endpoint:

POST /wp-json/wc/v3/products/{product_id}/vari/batch
Content-Type: application/json

{
  "update": [
    { "id": 789, "stock_quantity":  },
    { "id": 790, "stock_quantity": 8 }
  ]
}

Critical: Ensure your external system variation-level SKUs to avoid mismatches. Each variation must have a unique SKU.

Step 7: Implement Error Logging and Retry Logic

Network failures and API rate limits are inevitable in any integration. Implement:

Comprehensive logging:

  • Timestamp of each request- Endpoint called
  • Request payload (sanitized)
  • Response status code
  • Error message if applicable

Retry policy exponential backoff:

1st retry: wait 2 seconds
2nd retry: wait 4 seconds
3rd retry wait 8 seconds
4th retry: wait 16 seconds
Max retries: 5

Queue architecture:

  • Failed requests go to a retry queue
  • A background job processes the queue
  • Persistent failures trigger alerts to your operations team

Idotency keys:

  • Attach a unique identifier to each request
  • The external system stores processed IDs
  • Duplicate requests are ignored

Step-by-Step Guide: Using a Middleware Platform

If custom development isn't feasible, a middleware platform provides a visual alternative. following steps use a generic iPaaS workflow applicable to tools like Make, Zapier, or Celigo.

Step 1: Create a New Integration Scenario

Log in to your middleware platform and create a new scenario or workflow. Name it descriptively, such as "WooCommerce to External Inventory Stock Sync." Configure your timezone and error notification preferences.

Step 2: Connect the WooCommerce Module

icate the WooCommerce connector using your store URL and API credentials:

  1. Select WooCommerce from the connector list
  2. Enter store URL (https://yourstore.com)
  3. Provide the Consumer Key and Consumer Secret
  4. Grant the necessary permissions for your workflow### Step 3: Connect the External Inventory Module

Search for your inventory system's connector. If available:

  1. Select the connector and your API credentials
  2. Configure authentication manually (OAuth, API key, etc.)
  3. Set base URL and default headers

If no pre-built connector exists, use a generic HTTP module and configure the request method, headers, and body manually.

Step 4: Add Trigger Module

For real-time updates from WooCommerce- Select a webhook trigger (e.g., "Order Created")

  • the webhook URL in WooCommerce to point to your middleware endpoint
  • Verify the webhook is receiving test events

For scheduled stock pulls the external system:

  • Use a schedule trigger (e.g., every 15 minutes)
  • Define the external system API call fetch updated stock

Step 5: Add Action Modules and Data Mapping

Chain actions to perform the necessary API calls. For example:

  1. Trigger: WooCommerce → Order Created
  2. Action: Parse order items
  3. Action: Transform data (extract SKUs and quantities)
  4. Action: Update External System → Stock Deduction endpoint
  5. Action: Log result to your monitoring

Use the visual mapping tool to define field transformations:

  • WooCommerce line_items[].sku → External System item_code
  • WooCommerce line_items[].quantity → External System quantity_to_deduct

Step 6: Test and Activate

Run the scenario with sample data to verify correct field mapping and error handling. Check:

  • Are the correct fields mapped?
  • Does the transformation logic edge cases (zero quantities, missing SKUs)?
  • What happens when the external system returns an error?
  • Are the logs capturing sufficient information?

Monitor execution logs for any discrepancies. Once validated, activate the scenario and schedule regular reviews.


Data Mapping Best Practices

Accurate data mapping is the most common point of failure in WooCommerce inventory integration. Adhere to these best practices to minimize errors:

Use SKU as the Immutable Key

Never map products by name or internal product ID, as these can change between environments. The SKU must be the unique identifier that ties records together across systems.

Normalize Data Types

Ensure consistency in how data is represented:

  • Numeric fields remain numericnever send "42" as "42.0")
  • Booleans are true/false (not "yes"/"no")
  • Enums are mapped using lookup tables
  • Dates are standardized to ISO 8601 format

Handle Empty Values Explicitly

Decide how null, empty string, and zero should be interpreted:

  • Empty stock_quantity → "do not update this field"
  • Zero stock_quantity → "set to out of stock"
  • Null product name → "skip update, flag for review> Implementation tip: Many integrations fail because developers treat empty and zero as the same. For stock quantities, they mean entirely different things.

Preserve Special Characters

Product names and descriptions may contain HTML entities, Unicode characters, or special formatting. Encode and decode appropriately to prevent data corruption:

  • Use URL encoding for API parameters
  • Set proper Content-Type headers with character encoding
  • Test with products containing special characters

Document Mapping Rules

Maintain a living document that records every field mapping, transformation, and business rule. This reduces onboarding time for new team and provides a reference during troubleshooting.


Synchronization Direction and Conflict Resolution

Determining the direction of data flow is critical to a integration. Most implementations adopt one of three models:

1. External System as Master

All inventory changes originate in the external system and pushed to WooCommerce. WooCommerce stock quantities are treated as read-only.

Best for:

  • Multi-channel retailers (marketplaces, physical stores, wholesale)
  • Businesses with warehouse management operations
  • Operations where purchasing and receiving happen outside WooCommerce

Process:

  1. External system stock updates to WooCommerce
  2. WooCommerce orders trigger webhooks back to the external system
  3. External system processes the orders and confirms updates

2. WooCommerce as Master

Sales reduce stock in WooCommerce, and the external system is updated via webhooks.

Best for:

  • Single-channel stores
  • Small operations with simple workflows
  • Stores where WooCommerce is the only sales channel

Process:

  1. Customer orders on WooCommerce
  2. WooCommerce updates stock quantity
  3. Webhook notifies external system
  4. External system adjusts its records

3. Bidirectional with Conflict Resolution

Both systems can initiate changes. Conflicts are resolved using timestamps or priority.

Best for:

  • Complex operations with multiple touchpoints
  • Businesses where both online sales and warehouse receipts occur simultaneously

Process:

  1. Every record carries a last_updated timestamp
  2. The most recent change wins
  3. Conflicts are logged for manual review4. A reconciliation job runs regularly to identify discrepancies

For multi-channel retailers, the external system is typically the master because it aggregates stock from physical stores, marketplaces, and other channels. WooCommerce then receives stock updates from the master system. Order decrements are sent back to the master to prevent overselling elsewhere.


Security Considerations

Integrating two systems means exchanging sensitive business data. Security must be a top priority throughout the implementation.

Encrypt Traffic

  • Use HTTPS exclusively for all API calls
  • Never transmit credentials or data over plain HTTP
    Ensure your external system provider enforces TLS 1.2 or higher

Restrict API Permissions

  • Generate WooCommerce API keys the minimum required permissions

  • If you only need read access, don't grant write permissions

  • Create a dedicated integration user with limited capabilities### Rotate Credentials Regularly

  • Schedule periodic rotation of API keys and passwords (quarterly is recommended)

  • Revoke unused keys immediately

  • Document the process and assign ownership

Use IP Allowlisting

If your external system or middleware has a static IP, whitelist it to prevent unauthorized access to your WooCommerce endpoints. This adds a layer of protection beyond API authentication.

Monitor for Anomalies

  • up alerts for unusual API activity (excessive requests, unexpected data changes)
  • Review access logs regularly
  • Implement rate limiting on your own endpoints needed

Compliance considerations: If you handle regulated data (GDPR, PCI DSS, SOX), ensure your integration architecture complies all applicable frameworks. This may require additional controls like audit logging, encryption at rest, and access reviews.

For advanced security hardening, consider consulting a WooCommerce development service that specializes in secure API implementations and compliance.


Testing Your WooCommerce Inventory Integration

Thorough testing is non-negotiable. A faulty integration can cause overselling, incorrect counts, and customer complaints that damage your reputation. Follow a structured testing protocol:

Unit Testing

Test individual components in isolation:

  • Verify single API call correctly updates a product's stock quantity
  • Check authentication, payload structure, and response handling
  • Test error scenarios (invalidU, insufficient permissions, malformed payload)

Tools: Postman, cURL scripts, or your development framework's testing tools.

Testing

Test the complete data flow from end to end:

  1. Simulate a purchase in WooCommerce
  2. Confirm the external system the order
  3. Verify stock is deducted in the external system
  4. Simulate a stock increase in the external system
  5. WooCommerce reflects the new quantity

Test environment: Use a staging site with cloned product data. Never test against production without isolating test data.

Scenario Testing

Create test cases for edge scenarios:

  • Product with zero stock and backorders enabled
  • Variable product with multiple variations
  • Order cancellation and refund processing
  • Product with missing SKU
  • API timeout or server error
  • Duplicate webhook delivery
  • consecutive orders for the same product

Performance Testing

If your store processes high order volumes, test under load:

  • Measure response times for stock updates
  • Verify the external system's API can handle concurrent requests
  • Check for rate limiting or throttling under peak load
  • Identify in the synchronization pipeline

Tools: k6, JMeter, or LoadRunner for load testing.

User Acceptance Testing (UAT)

Have operational staff validate the integration against real-world workflows:

  • Confirm stock levels match expectations across systems
  • Verify order statuses and fulfillment workflows correctly
  • Check reports and dashboards show accurate data
  • Document any discrepancies and address them before go-live

Go-Live

  • All test cases passed
  • Staging environment matches production configuration
  • Rollback plan documented and tested
    [ ] Monitoring and alerting configured
  • Team members trained on monitoring and troubleshooting
  • Data backup completed

Common Challenges and Solutions

Even well-planned integrations encounter challenges. The following table summarizes common issues and recommended solutions:

Challenge Symptom Solution
SKU mismatch Stock updates fail or update wrong product Conduct full SKU audit; enforce uniqueness; standardize
Rate limiting API returns 429 Too Many Requests Implement request throttling; add exponential backoff; batch requests
Time differences Timestamps appear incorrect Standardize timestamps to UTC; configure timezone settings in WooCommerce
Data type mismatch Stock arrives as string or decimal Validate and cast fields before sending; configure strict type checking
Webhook duplication Stock deducted twice for same order Use idempotency keys; store processed webhook IDs; add deduplication logic
Product not found API returns for SKU Create product automatically; log for manual resolution; implement auto-suggestion
Backorder override Backorders accidentally disabled Check backorders field in payload; preserve existing settings
Partial sync failure Some products update, others don't Add transaction-like; verify all updates before confirming; implement reconciliation

Continuous Maintenance and Optimization

After deployment, ongoing maintenance is essential to ensure long-term. Establish a routine that includes:

Daily Health Checks

  • Verify synchronization logs show no errors
  • Spot-check stock levels across systems
  • Confirm error notification channels are functioning

Weekly Reconciliation

  • Run a reconciliation report comparing WooCommerce stock quantities to the external system
  • Investig any discrepancies immediately
  • Check order counts and stock deductions are aligned

Monthly Review

  • Audit API keys and user permissions
  • Review logs for anomalies
  • Verify webhook endpoints are still active
  • Check subscription costs for middleware platforms

Quarterly Performance Review

  • Assess latency and error rates
  • Optimize code or infrastructure as needed
  • Review plugin/connector updates and apply as appropriate
  • Conduct full data mapping review to ensure accuracy

Continuous Improvement

  • Collect feedback from team members using the integration
  • Track errors by type to identify patterns
  • Stay informed about WooCommerce API changes
  • Schedule regular upgrades to maintain compatibility

If maintenance becomes burdensome, consider engaging aWooCommerce API specialist](https://alisaleem252.com/services/woocommerce-development/api-integration) to manage the integration on ongoing basis.


When to Hire an Expert

While this guide provides a comprehensive overview, certain situations warrant professional assistance. You should ** an expert** if you encounter any of the following:

Complex Integration Scenarios

  • Your external inventory system has no existing plugin or connector
  • You require complex data transformations or custom business rules
  • Your integration needs to handle high transaction volumes with low latency
  • You're connecting than two systems (e.g., WooCommerce + ERP + marketplace)

Regulatory Compliance Needs

  • You need compliance with GDPR, PCI DSS, SOX, or industry regulations
  • Your business handles sensitive customer data that requires special protections
  • You need audit trails and full data lineage documentation

Resource Constraints

  • Your team lacks in-house development expertise
  • Key developers are already stretched thin on other projects
  • You need the integration completed by a specific deadline

Long-term Support Requirements

  • You need documentation, training, and post-launch support
  • Your team wants a partner to handle ongoing maintenance
  • You prefer a dedicated resource who knows your integration inside and out

A qualified team can provide documentation training, and post-launch support to ensure your team is confident managing the integration after deployment.

For a tailored solution that aligns with your business requirements, visit our WooCommerce development services page to discuss your project. We specialize in custom integrations, plugin configuration, and ongoing maintenance for WooCommerce merchants.


Your inventory integration can intersect with other areas of your WooCommerce store:

Custom Checkout

If you're overhauling your checkout process, a custom checkout ensures that stock validation and order creation work seamlessly with your integration. A custom checkout can:

  • Implement real-time inventory verification before order confirmation
  • Display accurate delivery time estimates based on stock availability
  • Handle complex shipping rules based on warehouse locations

Payment Gateway Integration

If your inventory system manages payment reconciliations, a specialized payment gateway integration may be required. This ensures:

  • Payment status changes correctly trigger inventory updates
  • Refunds adjust stock quantities appropriately
  • Financial reporting aligns across systems

Exploring these related services helps build a e-commerce ecosystem where inventory, checkout, and payments operate as a unified system.


Conclusion

WooCommerce inventory integration is transformative process that ensures accurate stock levels, reduces manual labor, and enhances customer satisfaction. By implementing the strategies outlined in this guide, you can real-time synchronization between your WooCommerce store and external inventory system, regardless of whether you choose a plugin-based solution, custom REST API development, a middleware platform.

Key Takeaways

  1. SKU consistency is non-negotiable — your entire integration depends on unique, consistent product identifiers
  2. Choose your integration method based on your business needs — there's no one-size-fits-all solution
    3 Data mapping requires careful attention — most integration failures trace back to mapping errors
  3. **Security must be built in from the start — protecting sensitive business data is not optional
  4. Testing prevents painful failures — invest time in comprehensive testing before go-live
  5. Ongoing maintenance ensures long-term reliability — integration is not set-and-forget

Your Next Steps

  1. Audit your current SKU structure and resolve any inconsistencies
  2. Document your business requirements — what data needs to sync, how, and in what direction
  3. Evaluate integration methods against your technical resources and budget
  4. **Set up a staging environment to begin proof-of-concept testing
  5. Implement the integration using the step-by-step guides in this article
  6. **Test thoroughly before going live
  7. Establish monitoring and maintenance routines after deployment

If you need professional assistance—whether for initial implementation, troubleshooting or ongoing management—don't hesitate to contact our team. We here to help you achieve seamless inventory synchronization and focus what matters most: growing your business.