Sunday, October 11, 2026

How to Hire a WordPress Plugin Developer in the USA: Checklist and Red Flags

Most WordPress plugin projects fail before a single line of code is written — in the brief. The fastest way to hire a WordPress plugin developer in the USA is to define your functional specification first, verify proof of shipped and maintained plugins second, and contract on milestone-based payments third. When you hire a WordPress plugin developer, prioritize candidates who can explain sanitization, nonces, capability checks, and database query optimization — that's real engineering. Developers who can only show you a polished demo are not. This guide gives you a complete vetting framework: the checklist that qualifies a candidate and the red flags that should end the conversation. It's written specifically for AI users, copywriters, and designers who buy WordPress development work but don't write PHP themselves.

Table of Contents

  1. Why the Developer You Choose Matters More Than the Plugin You Want
  2. Before You Post the Job: Define What You're Buying
  3. What a WordPress Plugin Developer Actually Does
  4. Where to Find WordPress Plugin Developers in the USA
  5. The 12-Point Hiring Checklist
  6. Technical Questions That Separate Real Developers from Talkers
  7. Red Flags: 15 Signs You Should Away
  8. Pricing Realities: What Custom Plugin Work Costs in the USA
  9. Contracts, Ownership, and Licensing
  10. After You Hire: Managing the Build
  11. A 60-Minute Shortcut for Non-Technical Buyers
  12. Frequently Asked Questions
  13. Conclusion

Why the Developer You Choose Matters More Than the Plugin You Want
Source: wordpress.org

Why the Developer You Choose Matters More Than the Plugin You Want

A custom plugin is not a asset. It is executable code that runs on every page load, touches your database, and often handles user input. distinction changes how you should evaluate the person building it.

A poorly built plugin does not simply look wrong. It can lock you out of the admin dashboard, slow your site from under a second to four seconds, expose customer data through an unescaped form field, or silently break the next time WordPress ships a core update. Those failures surface weeks after delivery — precisely when a low-cost developer has already moved on to the next contract.

For designers, the risk is reputational: your client sees their site break and remembers who recommended the build. For copywriters running content sites, the risk is revenue: a broken checkout or a 500 error on indexed pages destroys traffic you spent months earning. For AI builders shipping micro-SaaS products on WordPress, the risk is existential — plugin vulnerabilities are one of the most common entry points for compromised WordPress sites, and a breach ends customer trust permanently.

The cost of vetting a WordPress plugin developer is an afternoon. The cost of skipping vetting is a rebuild, plus everything you lost while the site was broken.

Before You Post the Job: Define What You're Buying
Source: resumeworded.com

Before You Post the Job: Define What You're Buying

The single biggest cause of failed WordPress development projects is an ambiguous brief. Vague briefs attract vague bids, and vague bids win on price. Nail down these three things before you write a posting.

Step 1: Write a functional specification, not a wish list

A functional spec describes behavior. A wish list describes feelings. Compare:

  • Wish list: "I want a members area that feels premium."
  • Functional spec: "Logged-in users with the 'member' role see a dashboard page listing the five most recent downloads. Non-members are redirected to the pricing page. Admins can add downloads from a custom post type with a file upload field."

The second version can be estimated, tested, accepted. The first cannot.

Step 2: Decide between a snippet, an existing plugin, or custom code

Custom development is not always the answer. Be honest about the trade-off:

Option Best when Ongoing cost
Existing plugin from the WordPress repository Your need is common and mainstream plugins solve it Free, but you maintain updates
Premium plugin plus light customization You need 80% of a plugin's features Annual license fee
Custom Your workflow is specific, or you need data ownership and performance control Ongoing maintenanceState this reasoning in your job posting. Developers respect buyers who have already eliminated the obvious options, and you will get more accurate quotes.

3: Map the technical touchpoints

List every system the plugin will interact with your theme, WooCommerce, a CRM, a payment, an email service, an API. Each integration point is a place where the build can fail, and each one should appear in the scope of work with a named owner.


What a WordPress Plugin Developer Actually Does

Job titles in the WordPress market are loose. Before you evaluate anyone, know which of these three roles you actually need to fill.

Custom plugins vs. customizing existing plugins

A custom plugin build means new functionality from scratch — a custom post type with a bespoke admin interface, a booking engine, a licensing system, or a REST API integration with a third-party SaaS. This requires architecture decisions, not just syntax.

Plugin customization means extending something that already exists — adding a field to WooCommerce's checkout, filtering a form plugin's submission data, or replacing a premium plugin's default behavior with a hook. This is faster and cheaper, but it only works if the underlying plugin exposes the right hooks and does not get overwritten on update.

Bug fixing and rescue work means repairing someone else's code. This is the hardest category to quote accurately, because the developer must diagnose before they can price it.

Plugin developer vs. theme developer vs. full-stack agency

A theme developer builds templates and styling. A plugin developer builds logic and data handling. Many WordPress professionals do both, but a full portfolio of Elementor and Divi layouts tells you nothing about whether someone can write a secure database query.

If your project involves payments, user accounts, personal data, or third-party integrations, you need logic experience specifically. Ask for it directly and verify it in the examples they send you.


Where to Find WordPress Plugin Developers in the USA

Each sourcing channel filters for a different kind of candidate. Use two or three rather than one.

Channel What it's good for Watch out for
Specialized WordPress marketplaces Vetted freelancers with WordPress-specific portfolios Premium pricing; smaller talent pool
General freelance platforms Wide reach and fast responses Wide variance in real skill; bids arrive in minutes
WordPress agencies Accountability, project management, support Higher rates; your project may be assigned to a junior
WordCamp and WordPress meetup networks Community reputation you can verify informally Slower to source; not all are commercial developers
Professional referrals Pre-filtered trust from someone with the same standards as you Limited to your network's reach

Whatever channel you choose, filter for US availability if time-zone overlap matters for your project. Confirm it in the first call rather than assuming the profile is accurate. Once you have a shortlist, run every candidate through the twelve checkpoints below.


The 12-Point Hiring Checklist

Any candidate that fails more than two of these is not a deposit.

  1. Shipped plugins you can inspect. Ask for three plugins they built or maintain. Repository-hosted plugins are verifiable by URL; private plugins require a walkthrough.
  2. WordPress Coding Standards fluency. They should name PHPCS with the WordPress rules as part of their workflow — not as a concept they've heard. The official WordPress coding standards are public and non-negotiable for professional work.
  3. Security-by-default habits. Sanitize on the way in, escape output on the way out, use nonces for form and AJAX verification, check user capabilities before privileged actions, and use $wpdb->prepare() for any custom SQL.
  4. Performance. They talk about query count, transients, object caching,oloaded options, and enqueuing assets only on pages that need them.
  5. Modern editor and JavaScript. For anything with an admin interface, expect familiarity with the Block Editor, the REST API, and the @wordpress/scripts toolchain.
  6. ** control discipline.** Git history, branch-per-feature, and pull requests. If they edit on a production server, stop here.
  7. Testing practice. At minimum, a stated approach to testing. PHPUnit for logic and a browser automation tool for user flows is the professional standard.
    . Licensing clarity. WordPress plugins must be GPL-compatible. If the developer proposes a license that redistribution in conflict with GPL, you have a legal problem later9. Documentation and handover. They should offer a README, inline documentation, and a walkthrough of the admin interface.
  8. Accessibility awareness. Semantic markup, keyboard navigation, and sufficient contrast. The WCAG .2 quick reference is the benchmark to ask about.
  9. A maintenance plan. WordPress ships frequent core updates. Ask what happens when a core update breaks the plugin in month four.
  10. References who will talk. Two references from projects similar in complexity to yours, contacted by voice or video call.

Technical Questions That Separate Real Developers from Talkers

You do not need to understand answers. You need to hear the difference between a specific answer and a confident deflection.

Question What a strong answer sounds like
How do you handle user-submitted data? Names sanitization functions, escaping functions, and nonce verification by name
How do you structure a plugin's files? cribes a bootstrap file plus includes for admin, frontend, and data classes
What happens when a site has 50,000 posts and your plugin queries them? Talks about indexed meta queries, meta_query performance, caching, and avoiding post__not_in at scale
How do you deploy changes? Staging environment, Git, review step, then production
How would you make this plugin work with a block theme and a classic theme? Explains hooks and filters, not "I'd just add CSS"
What's the uninstall behavior? Describesuninstall.php` and whether options and tables are removed

If you want to skip this interrogation entirely and work with a developer who already meets these standards, you can hire me directly and start with a scoped discovery instead.


Red Flags: 15 Signs You Should Walk Away

Red flags in WordPress hiring fall into three categories: technical incompetence, commercial risk, and conduct. The third is often the earliest signal.

Technical red flags

  1. Custom code placed in functions.php. Anything beyond a one-line tweak belongs in a plugin. Code in a theme disappears when the theme is updated.
  2. No mention of nonces or capability checks. This is the clearest indicator that the developer has never been through a security review.
  3. "We'll handle performance later." Performance is architectural. Retrofitting it costs more than building it in.
  4. Editing directly on production. No staging environment means no safety net — and no safety net means your live site is the test server.
  5. Bundled nulled or pirated plugins. Nulled plugins routinely carry backdoors. This ends the project immediately.
  6. Obfuscated code or code delivered asfinal." If you cannot read the code you paid for, you do not own it.
  7. AI-generated code shipped without review. This is the newest and fastest-growing red flag. Ask directly: "Which parts of this were generated with AI, and how did you verify them A professional answers without defensiveness.

Commercial red flags

  1. Refusing any IP assignment clause. You should own the custom code paid for. A developer who won't sign an assignment is reserving leverage over your business.
  2. Demanding 100% upfront. Milestone payments protect both sides. Full upfront payment removes your only real leverage.
  3. **Payment only in crypto or untraceable channels.**itimate US-based developers invoice through traceable business payment systems.
  4. Quotes dramatically below every other bid. With rare exceptions, an outlier bid means the developer has not understood the scope — or plans to disappear halfway through.
  5. No contract, only chat messages. A of work and a signed agreement are the baseline for professional work.

Conduct red flags

  1. Vague or evasive answers to direct. Confident specialists say "I don't know that one, I'd research it" — they do not deflect for minutes.
    14.Disappearing after the deposit.** Slow replies before you pay become silence after you pay. Test during the sales conversation.
  2. Trash-talking previous clients. It signals how they will talk about you, and it usually means scope disagreements are settled by blame rather than dialogue.

Pricing Realities: What Custom Plugin Work Costs in the USA

US-based developers reflect local costs of living, taxes, and business overhead, so they sit above the global average. As a general market reference point rather than a fixed rule, expect US freelance plugin developers to quote in the range of $60 to $150 per hour, with senior specialists and established agencies above that. Fixed-price project quotes typically range a few hundred dollars for a tightly scoped utility plugin to several thousand for something involving payments, member data, or complex integrations.

Three pricing models are common:

  • Fixed price per milestone. Best for well-specified work. Requires a detailed scope of work to prevent change-order disputes.
    Hourly. Best for rescue work, diagnostics, and evolving requirements. Cap the hours per phase.
    Retainer. Best for ongoing maintenance, updates, and incremental feature work after launch.

A useful framing: compare the price against the cost of the outcome failing. If a broken membership plugin costs you three months of subscription revenue, the difference between a $1,500 bid and a $4,000 is irrelevant. The cheap bid is the expensive one.

Also budget for maintenance. A plugin is not a one-time purchase; it is a small ongoing responsibility. Most professional developers offer a monthly maintenance arrangement, and it is usually worth taking.


Contracts, Ownership, and Licensing: The Fine Print That Prot You

Before any code is written, get these five things in writing:

  1. Scope of work. Deliverables, functionality, integrations, and explicit out-of-scope items.
  2. IP assignment. A clause transferring copyright in custom code to you on payment.
  3. Licensing statement. Confirmation the is released under GPL v2 or later, consistent with WordPress's own licensing.
  4. Payment schedule. Tied to milestones you can verify, not to dates alone.
  5. Post-launch terms. A defined warranty window for bug fixes and a maintenance option beyond it.

If developer cannot supply a contract and instead insists a written scope is unnecessary for "a small job," treat that as a red flag regardless of the project size.


After You Hire: Managing the Build Without Micromanaging

Good project management on your side is mostly about cadence. Set a weekly written update, a shared staging URL, and a demo at the end of each milestone. Ask for read access to the Git repository from day one, even if you never open it — repository access is your insurance policy if the relationship ends.

Two habits prevent most disputes:

  • Batch feedback. Collect observations and send them as one consolidated list per review cycle rather than a stream of messages. Developers estimate better against a list.
  • Test on staging, never on production. Confirm in writing that nothing will be deployed to your live site without your sign-off.

If you have a designer or copywriter on the project, give them staging access early. Content and layout bugs caught during development cost less to fix. The same bugs found after launch cost a change request.

Checking the Final Deliverable: A QA Checklist

Do not release the final payment until you have completed these checks:

  • Every item in the scope of work works on staging and production.
  • Activating the plugin on a fresh WordPress install causes no fatal errors.
  • Deactivating and deleting the leaves no orphaned database tables or options, unless retention is intentional and documented.
  • Forms reject malformed and malicious input; no raw user data echoed to the page.
  • No new console errors, and page load time has not measurably regressed.
  • Admin screens are keyboard navigable and labeled correctly for screen readers.
  • Code is delivered in your repository with documentation and a walkthrough recording.
  • The developer has demonstrated the update and rollback at least once.

That last point matters more than most buyers realize. You are not just buying a plugin; you are the ability to keep it alive### AI-Assisted Development: What AI Users, Copywriters, and Designers Should Verify

If you into this audience, you likely already use AI tools to write copy, generate layouts, or prototype functionality. That is an advantage — you can read a specification and articulate a workflow, which is exactly what developers need from clients.

It also means you should be specific about where AI enters the build AI tools are genuinely useful for scaffolding plugin structure, writing repetitive boilerplate, and generating cases. They are risky for security-sensitive logic, complex database queries, and anything involving WordPress's many historical edge cases. The failure mode is not obviously broken code — it is code that fine until someone submits a carefully crafted request to it.

Ask any candidate three questions:

  1. Where do you use AI in your workflow, and where do you deliberately not?
  2. How do you review AI-generated code before it reaches a client site?
  3. Will you disclose AI-generated portions in the handover documentation?

A developer who answers these directly is one you can trust with technical judgment. A developer who becomes defensive has told you something useful too.

If you are building content or marketing on WordPress, it also helps to see how plugin logic connects to your broader stack. work on custom WordPress development and integrations covers how these pieces fit together for marketing teams.


A 60-Minute Shortcut for Non-Technical Buyers

If have a small budget and no technical background, you can this entire process into one hour:

  1. Minutes 0–10: Write a one-page functional spec with numbered.
    2.Minutes 10–20:** Source three candidates from a WordPress-specific marketplace and one from a referral.
    3.Minutes 20–35 Ask each for two repository-hosted plugins or a five-minute screen-share walkthrough of past work.
  2. Minutes 35–45: Ask the six technical questions above and listen for specifics.
  3. Minutes45–55: Request written fixed-price quote with milestones and a contract.
  4. Minutes 55–60: Hire the-priced candidate who answered with specifics, not the cheapest.

That last instruction is the whole article in one line. Price is the least informative signal in this market. Specificity is the strongest one.


Frequently Asked Questions

How much does it cost to hire a WordPress plugin developer in the USA?

Costs vary enormously with scope. Simple utility plugins with tightly defined requirements typically start in the hundreds of dollars, while plugins handling payments, membership data, or multiple integrations commonly run into thousands. You should also budget for ongoing maintenance, since WordPress and other plugins update continuously and custom code must keep pace.

Can I hire a WordPress plugin developer on a freelance platform safely?

Yes, but the platform is not theting — you are. Use milestones, pay by milestone, request repository-hosted examples, and release a final payment before completing your QA checklist. Check that the person claiming to be US-based will actually work in your time zone### Do I own the code after I pay for it?

Only if your contract says so. Copyright in custom code does not automatically transfer to the buyer. Insist on a written IP assignment clause that takes effect on payment, and confirm the plugin is licensed under GPL v2 or later as WordPress requires.

Should I hire an individual developer or an agency?

Individuals typically cost less, communicate more directly, and are easier to hold accountable by name. Agencies offer continuity if the lead developer leaves, plus project management for larger builds. For most small and custom plugin projects, an experienced individual is the better value.

How long does a custom WordPress plugin take to build?

A utility plugin might take one to two weeks. A plugin with a custom admin interface, multiple, and data migration commonly takes four to ten weeks including testing. Treat any estimate far below these as a sign the scope has not been understood.

Is a US-based developer worth the premium over a lower-cost overseas option?

It depends on your priorities. US-based developers generally cost more but offer overlapping hours, clearer contractual accountability, and familiarity with US legal and data-handling expectations. For projects involving payments, personal data, or regulated industries, the premium is often worth paying.

Can I build WordPress plugin myself using AI tools?

For personal projects with no security or payment components, sometimes. For anything customer-facing, the answer is usually no not because AI cannot produce working code, but because that code requires exactly the expertise you were trying to avoid hiring. The cost of a security hole almost always exceeds the cost of a developer.


Conclusion

The US plugin market is full of confident talkers; the only reliable filter is shipped, inspectable work. Hiring WordPress plugin developer in the USA comes down to three disciplines: specify before you shop verify instead of assuming, and pay milestones you can test. The checklist above protects you from technical incompetence; the red flags protect you from commercial and professional risk; the QA process protects the asset you just paid for. Together they turn a vague, trust-based purchase into a decision you can defend evidence.

The developers worth hiring will welcome this level of scrutiny. If a candidate reacts to a security question with irritation rather than specifics, reaction is your answer — and it just saved you thousands of dollars and several weeks of your life.

If you want to move straight to a scoped conversation with a developer who already works this way, hire me — bring your functional spec, and we will turn it into a milestone plan you can hold me to.

Tuesday, September 15, 2026

Order Management Integration in WooCommerce: A Practical Guide for Store Managers

WooCommerce powers a significant share of all online stores, yet most merchants discover the same limitation within their first year of growth: WooCommerce is an excellent storefront, but it is not a complete order management system. As order volume climbs, the gap between "processing orders" and "managing fulfillment" becomes expensive. Manual spreadsheet tracking, disconnected shipping labels, and inventory that drifts out of sync with reality all add hidden costs that compound with every order.

Order management integration in WooCommerce closes that gap—connecting your store to the systems that pick, pack, ship, invoice, and report on every order automatically. The right integration approach depends less on your budget than on your order volume and channel complexity, and most stores get this backwards. A single-channel store doing 200 orders a month does not need the same infrastructure as a multi-channel operation doing 5,000. This guide breaks down what order management integration actually involves, the main approaches available to WooCommerce store managers, the integration points that matter most, and a step-by-step process for implementing it without disrupting live sales.

WooCommerce order management dashboard
Source: woocommerce.com

What Order Management Integration Covers in WooCommerce


Order management integration is the practice of connecting WooCommerce to external platforms so order data flows automatically between systems in both directions. Instead of downloading CSV exports and re-keying customer details, your e-commerce store becomes one node in a coordinated fulfillment workflow.

order fulfillment workflow diagram
Source: www.researchgate.net

The Six Core Areas of Order Management


A complete WooCommerce integration typically touches these order management functions:

- Order capture and routing — Orders flow from checkout into a fulfillment queue, warehouse system, or third-party logistics provider (3PL).
- Inventory synchronization — Stock levels update across sales channels in near real time.
- Fulfillment and shipping — Labels, carrier rates, and tracking numbers are generated and pushed back to WooCommerce.
- Payments, tax, and accounting — Transactions reconcile automatically with your bookkeeping software.
- Returns and refunds — Reverse logistics are tracked with the same rigor as outbound orders.
- Customer communication — Shipping confirmations, delays, and delivery updates trigger from the order management platform.

warehouse inventory stock discrepancy
Source: www.stockount.com

Why WooCommerce Alone Isn't Enough


WooCommerce handles order creation and basic status changes well. What it does not natively provide is multi-warehouse routing, batch picking logic, carrier rate shopping, or consolidated financial reporting.

Consider what happens without order management integration at 500 orders per month. A customer orders the last unit of a product. Your warehouse team hasn't updated the stock count from yesterday's offline sale. The order goes through. Two days later, you cancel it and refund the customer—who has already told three people about your store. Multiply this scenario across dozens of SKUs and multiple sales channels, and the cost of disconnected systems becomes clear.

Every manual step between an order being placed and a package being delivered is a place where errors and delays enter your operation. Integration eliminates those steps—not by adding complexity, but by removing the human handoffs where mistakes happen.

The Main Integration Approaches for WooCommerce


Not every store needs an enterprise-grade order management system (OMS). Matching the approach to your order volume and operational complexity is the single most important decision you'll make. The table below provides a decision framework; the sections that follow explain when each WooCommerce integration approach makes sense.

| Approach | Best For | Typical Tools |
|---|---|---|
| Native WooCommerce extensions | Stores under ~500 orders/month | ShipStation, WooCommerce Shipment Tracking, Advanced Shipment Tracking |
| Dedicated OMS or shipping platform | 500–10,000 orders/month, multi-channel | ShipStation, Linnworks, Veeqo, Katana |
| ERP integration | Manufacturers, B2B, complex inventory | NetSuite, SAP Business One, Odoo, Microsoft Dynamics |
| Accounting and CRM sync | All stores needing financial accuracy | QuickBooks, Xero, Zoho Books, HubSpot |
| Middleware / iPaaS | Custom or legacy system bridges | Zapier, Make, n8n, custom REST API |

Native extensions offer the fastest path to value. A plugin like Advanced Shipment Tracking or a shipping automation tool connects directly to WooCommerce and adds fulfillment features without replacing your existing stack. The trade-off is fragmentation: five plugins solving five problems rarely share data cleanly, and you may eventually spend more time managing plugin conflicts than you saved on setup.

Dedicated OMS and shipping platforms connect to WooCommerce via API, then act as your fulfillment command center. They excel at multi-channel selling—syncing inventory across WooCommerce, Amazon, eBay, and POS simultaneously. If you sell on more than one channel, this is usually the right tier.

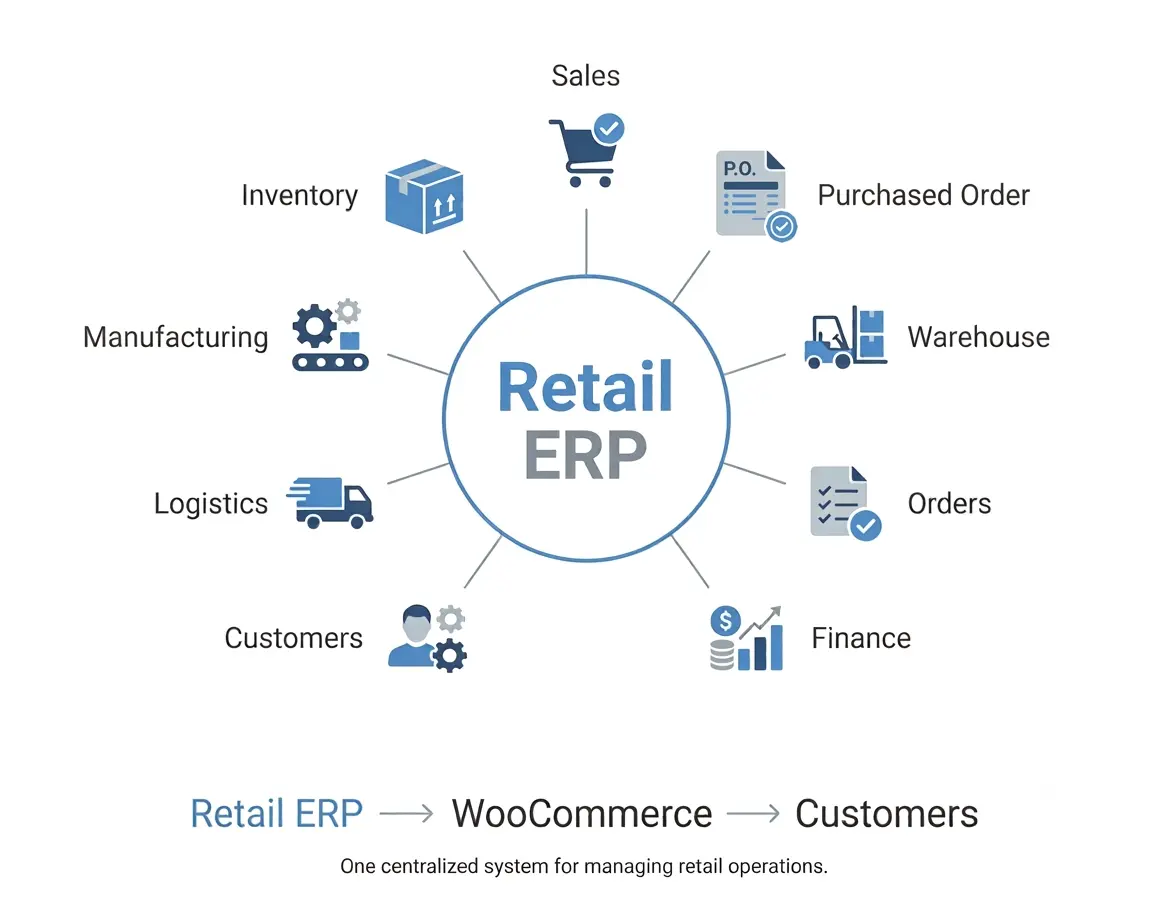
ERP integration ensures orders, purchase orders, and financial records stay aligned. These projects are longer and costlier but prevent the reconciliation nightmares that plague growing operations. If you manufacture, hold significant inventory, or sell B2B, the investment typically pays for itself within the first year.

Middleware and custom APIs handle the translation when no prebuilt connector fits. WooCommerce's REST API exposes orders, products, customers, and webhooks, making custom integrations viable for teams with developer resources.

Critical Integration Points to Configure


With the main approaches outlined, the next step is understanding which specific connection points require careful configuration. These are the areas where order management integration succeeds or fails in practice.

Inventory and Product Sync


Choose one system as the single source of truth for stock levels and enforce it. Fragmented stock data causes overselling, canceled orders, and marketplace penalties.

If your OMS says 12 units and WooCommerce says 8, a customer can buy inventory you don't have. The fix is to designate one system—usually the OMS if you sell on multiple channels, WooCommerce if you're single-channel—and push updates one direction only. Two-way sync sounds elegant but creates race conditions when both systems try to be authoritative.

Order Status and Workflow Mapping


WooCommerce order statuses—pending, processing, on-hold, completed, cancelled, refunded—must map cleanly to your OMS workflow stages. Define exactly which status change triggers shipment, which triggers a customer email, and which requires manual review. A common mistake is assuming WooCommerce's default statuses align with your OMS out of the box; they rarely do, and the mismatch causes orders to stall silently.

Shipping, Tracking, and 3PL Handoffs


Automate label generation and push tracking numbers back into WooCommerce order notes so customers receive accurate, timely notifications without staff intervention. For 3PL relationships, confirm that your provider accepts orders in a format your integration can produce—EDI, API, or CSV—before you sign the contract.

Payments, Tax, and Reconciliation


Ensure payment gateways, tax engines, and accounting software all reference the same order ID. This makes month-end reconciliation a report rather than a research project. When order IDs diverge across systems, every refund and chargeback becomes a manual investigation.

Error Handling and Monitoring


Integrations fail. APIs time out, credentials expire, and webhooks get missed. Build in retry logic, alerting, and a documented manual fallback so a single failed sync never becomes a lost customer. The goal is not to prevent all failures but to ensure you know about them before your customers do.

A Step-by-Step WooCommerce Integration Process


With the key integration points identified, here's how to sequence an implementation that minimizes disruption to live sales.

1. Map your current workflow. Document every step from checkout to delivery, including who does what and where delays occur. This baseline becomes your measure of success.

2. Define requirements and budget. Decide whether you need shipping automation, full inventory management, or both. A clear scope prevents feature creep and keeps vendors honest.

3. Select your tools. Prioritize connectors with official WooCommerce support and active maintenance. Check the plugin's update history—abandoned integrations are a liability.

4. Test in a staging environment. Never configure a live store integration for the first time. Replicate your product catalog and run test orders through the full cycle.

5. Sync historical data carefully. Match SKUs and customer records before importing. Mismatched SKUs create phantom inventory that takes weeks to untangle.

6. Configure notifications and error alerts. Know about failures before your customers do. Set up email or Slack alerts for sync failures, API errors, and order routing exceptions.

7. Train your team and document the workflow. Adoption determines ROI. A perfect integration that staff don't trust will be bypassed within a month.

8. Go live, then optimize. Review sync accuracy weekly for the first month. Expect to adjust status mappings and notification triggers as real-world edge cases emerge.

Avoiding Common Order Management Integration Mistakes


Integration projects fail for predictable reasons. Here are the pitfalls that matter most—and how to sidestep them.

Integrating without documenting the target workflow first. Technology cannot fix a process you haven't defined. Map the desired state before you shop for tools.

Running two systems that both claim authority over inventory. Pick one source of truth and enforce it. Two-way sync creates conflicts that compound over time.

Assuming default statuses will map cleanly. WooCommerce's order statuses are generic; your OMS workflow is specific. Budget time for mapping and testing every status transition.

Ignoring timezone differences in order timestamps. An order placed at 11 PM EST is a different date in UTC. This matters for reporting, SLAs, and carrier cutoffs.

Skipping load testing before a peak sales period. Sync operations are resource-intensive. Test at 3x your normal volume before Black Friday, not during it.

Treating integration as a one-time project. APIs change, business rules evolve, and new sales channels get added. Schedule quarterly reviews of your integration health.

Measuring Integration Success


Track these metrics before and after implementation to quantify your return on order management integration:

- Order processing time — From order placement to shipment handoff
- Fulfillment error rate — Wrong items, wrong addresses, missed orders
- Overselling incidents — Orders canceled due to stock discrepancies
- Customer service tickets — Volume related to order status inquiries
- Cost per order shipped — Labor, postage, and packaging combined

Most stores report cutting manual order handling time by 60–80% after integration—a figure that compounds quickly across thousands of orders. The exact number matters less than the trend: if these metrics improve month over month, your integration is working.

Conclusion


Order management integration transforms WooCommerce from a capable storefront into the front end of a coordinated fulfillment operation. The approach you choose—a lightweight extension, a dedicated OMS, an ERP connection, or custom middleware—should follow your order volume and operational complexity, not the other way around.

For most e-commerce store managers, the path looks like this: start with a native WooCommerce extension if you're under 500 orders per month, migrate to a dedicated OMS when you add a second sales channel, and consider ERP integration only when financial complexity demands it. Expect a basic integration to take two to four weeks; complex multi-system projects can run three to six months.

The merchant who struggled with spreadsheet tracking in year one doesn't need to become an integration expert. They need to map their workflow, identify the manual steps costing the most time, and integrate in phases—starting with the bottleneck that hurts most. Done deliberately, order management integration pays for itself in accuracy, speed, and the customer loyalty that reliable delivery earns.

API Integration with Third-Party APIs in WooCommerce: A Developer's Guide

WooCommerce store scalability dashboard
Source: developer.woocommerce.com

Introduction: Why Third-Party API Integration in WooCommerce Decides Whether Your Store Scales


WooCommerce powers more than 20% of all online stores, yet no single plugin can deliver everything a modern merchant needs. Shipping carriers, ERPs, CRMs, subscription engines, tax services, and marketing platforms all live outside WordPress—and they all communicate through APIs. Mastering API integration with third-party APIs in WooCommerce is what separates a store that merely sells from one that scales.

The challenge is not connecting to an API; it is connecting reliably. WooCommerce runs inside WordPress on shared hosting, PHP execution limits, and unpredictable traffic spikes. A naive wp_remote_get() call inside a checkout hook can stall a customer's payment or silently drop an order sync. A synchronous call inside woocommerce_checkout_update_order_meta, for example, can add 8–15 seconds to checkout when the upstream API is slow—turning a completed sale into an abandoned cart. This guide walks through the architecture, authentication, code patterns, and operational safeguards that professional web developers use to build third-party API integrations that hold up under production load.

WooCommerce API architecture diagram
Source: wp-umbrella.com

Understanding the WooCommerce API Landscape


Before writing a single line of code, it helps to separate the two directions of traffic.

WooCommerce REST API endpoints diagram
Source: wp-umbrella.com

The WooCommerce REST API (Inbound)


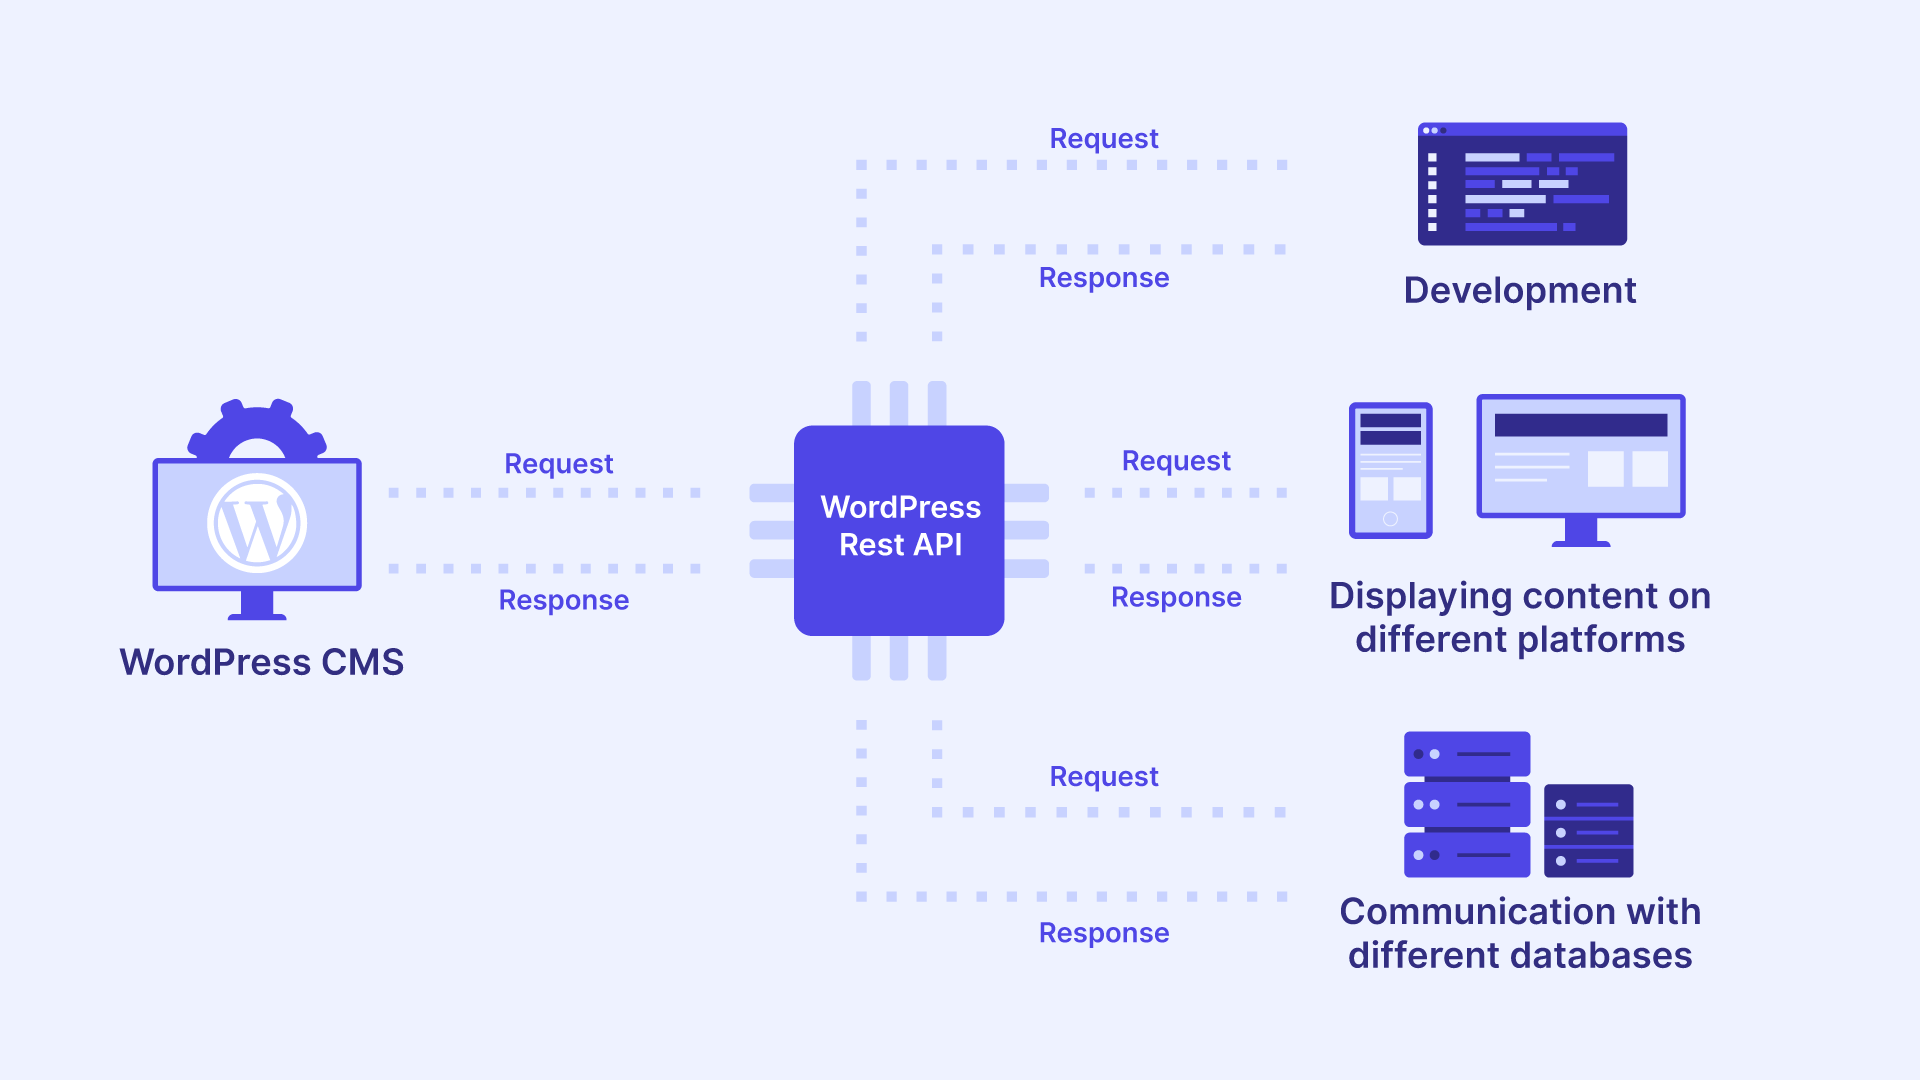
WooCommerce exposes its own REST API at /wp-json/wc/v3/, covering products, orders, customers, coupons, and reports. This is how external systems read from or write to your store—think a mobile app pushing inventory, or an ERP pulling completed orders.

Third-Party APIs (Outbound)


Outbound integrations send WooCommerce data to an external service: creating a shipment in a carrier's system (ShipStation, Shippo), syncing a customer to a CRM (HubSpot, Salesforce), or issuing an invoice through accounting software (QuickBooks, Xero). Most WooCommerce integration bugs live here, because outbound calls depend on a third party's uptime, latency, and rate limits.

Choosing a Communication Pattern


Inbound and outbound traffic aren't the only axis to think about. You also need to decide how data moves between systems—and each pattern carries different reliability and performance tradeoffs.

| Pattern | Direction | Best For |
|---|---|---|
| REST request/response | Outbound | Order sync, inventory push, address validation |
| Webhooks | Inbound | Real-time notifications (shipped, paid, refunded) |
| Scheduled polling | Both | Batch reconciliation, stock level refresh |

Choosing the right pattern matters. Webhooks eliminate polling overhead but require a publicly reachable, signature-verified endpoint. Request/response is simpler but must never block a user-facing request. Polling is the fallback when neither side can push—use it for reconciliation, not for real-time sync.

Prerequisites and Authentication for WooCommerce API Integration


What You Need Before You Start


- WooCommerce 8.0+ running on PHP 8.1 or higher
- HTTPS enforced site-wide (never send API keys over HTTP)
- A staging environment with sandbox credentials
- Access to wp-config.php for secure constant storage

Choosing an Authentication Method


The right auth model depends on who is calling whom. Match the method to the trust relationship, not to whatever the provider's docs list first.

| Method | Use When | Notes |
|---|---|---|
| API keys / Basic Auth | Server-to-server calls where the credential never touches a browser | Simplest; rotate regularly |
| OAuth 2.0 | A service acts on behalf of a merchant (marketplaces, analytics platforms) | Handles token refresh; more setup |
| JWT | Stateless microservice calls | Short-lived tokens; verify signature server-side |

For inbound webhooks, always verify an HMAC signature header before processing the payload—an unverified webhook endpoint is an open door for forged order events.

Store credentials in wp-config.php or environment variables—never in the database as plain text, and never in a JavaScript file. A leaked CRM token is a data breach, not a bug.

Step-by-Step: Building a Third-Party API Integration in WooCommerce


With credentials stored and the right event identified, the integration itself becomes a five-step process: hook, map, queue, send, and verify.

Step 1: Hook Into the Right WooCommerce Event


WooCommerce fires hundreds of actions. Pick the narrowest one that matches your business event.

add_action( 'woocommerce_order_status_completed', 'myplugin_sync_order_to_crm', 10, 1 );


Step 2: Build a Clean Payload


Map WooCommerce order data into the third party's expected schema. Avoid passing raw WC_Order objects.

function myplugin_sync_order_to_crm( $order_id ) {
$order = wc_get_order( $order_id );
if ( ! $order ) {
return;
}

$payload = array(
'reference' => $order->get_order_number(),
'total' => (float) $order->get_total(),
'currency' => $order->get_currency(),
'customer' => array(
'email' => $order->get_billing_email(),
'name' => $order->get_formatted_billing_full_name(),
),
);

myplugin_queue_request( $order_id, $payload );
}


Step 3: Queue Instead of Blocking


The critical architectural decision: never call an external API synchronously inside a customer-facing hook. Use Action Scheduler (bundled with WooCommerce) to process the request in the background with automatic retries.

function myplugin_queue_request( $order_id, $payload ) {
as_enqueue_async_action(
'myplugin_send_order',
array( 'order_id' => $order_id, 'payload' => $payload ),
'myplugin-integration'
);
}


Step 4: Make the Request With Guardrails


Two patterns do the heavy lifting here. First, an Idempotency-Key—a unique request identifier that tells the API to ignore duplicates—ensures a retried request never creates a duplicate record. Second, throwing an exception on failure tells Action Scheduler to retry automatically with backoff.

add_action( 'myplugin_send_order', 'myplugin_send_order_handler', 10, 2 );

function myplugin_send_order_handler( $order_id, $payload ) {
$response = wp_remote_post(
'https://api.your-crm-provider.com/v2/orders',
array(
'timeout' => 15,
'headers' => array(
'Authorization' => 'Bearer ' . MYPLUGIN_CRM_TOKEN,
'Content-Type' => 'application/json',
// Unique per order — retries won't duplicate the record.
'Idempotency-Key' => 'wc-order-' . $order_id,
),
'body' => wp_json_encode( $payload ),
)
);

// Throwing signals Action Scheduler to retry with backoff.
if ( is_wp_error( $response ) ) {
throw new Exception( $response->get_error_message() );
}

if ( wp_remote_retrieve_response_code( $response ) >= 500 ) {
throw new Exception( 'Upstream error' );
}
}


Step 5: Verify the Response and Record the Outcome


A 200 response is not proof of success. Check the response body for the third party's own status field, then persist the external ID so future operations (refunds, cancellations, status updates) can reference it.

function myplugin_send_order_handler( $order_id, $payload ) {
// ... request code above ...

$code = wp_remote_retrieve_response_code( $response );
$body = json_decode( wp_remote_retrieve_body( $response ), true );

if ( 200 !== $code || empty( $body<a href="https://woocommerce.github.io/woocommerce-rest-api-docs/">'id'] ) ) {
throw new Exception( 'Unexpected response shape' );
}

// Store the external ID for later reconciliation.
$order = wc_get_order( $order_id );
$order->update_meta_data( '_crm_order_id', sanitize_text_field( $body['id'] ) );
$order->save();
}


If you skip this step, you'll have no way to match a WooCommerce order to its CRM counterpart when a customer calls support six weeks later.

Best Practices for Reliable WooCommerce API Integrations


The code above works in a demo. Here's what breaks it in production—and how to prevent each failure.

Respect Rate Limits


Read the Retry-After and X-RateLimit-Remaining headers, and implement exponential backoff (waiting progressively longer between retries). A burst of 200 order syncs after a flash sale will trip most APIs. If you're firing requests in a loop, add a small delay between them and stop when the remaining count drops below a safety threshold.

Log Everything, Expose Nothing


Write structured logs to a custom table or a monitoring service. Capture the request ID, endpoint, response code, and duration. Never surface API error bodies to customers—they often contain internal identifiers, stack traces, or partial tokens.

Isolate Failures


One broken integration should not disable checkout. Wrap third-party calls in try/catch blocks and degrade gracefully. If the CRM is down, the order should still complete; the sync should retry later.

Version Your Endpoints


Pin to /v2/ rather than /latest/. When a provider deprecates a version, you want a scheduled migration, not an emergency. Add a calendar reminder 60 days before any announced sunset.

Sanitize Outbound Data Too


Customer-supplied notes and addresses go into your payload. Escape and validate them before sending—this protects the receiving system from injection and protects your reputation when a customer's free-text note contains something unexpected.

Testing, Monitoring, and Maintenance


Test against sandbox endpoints with realistic order volumes before production. Use Postman or Insomnia to validate payload shape independently of WordPress. Replay a queue of 50 failed actions in staging to confirm your retry logic actually recovers.

Once live, monitor three signals in this order of importance:

1. Queue depth — rising depth is the earliest warning that a provider is throttling you or has gone down. Watch this before failure rate climbs.
2. Failure rate per integration — a sudden spike usually means an auth token expired or the provider shipped a breaking change.
3. Average response latency — creeping latency predicts timeouts before they happen.

Finally, subscribe to every third-party provider's changelog. Breaking API changes arrive with little notice, and the developers who catch them early are the ones who avoid midnight firefighting.

Conclusion: Treat Every Third-Party API Integration as a Product


The integrations that survive production are not the cleverest ones—they are the most defensive ones. Your real milestone isn't shipping the first sync; it's watching it run for thirty days without manual intervention. That's when you know the retry logic, logging, and monitoring are actually doing their job—and that's when you have a reusable blueprint for every API connection that follows.

So pick your highest-volume third-party dependency this week. Instrument it. Queue every outbound call. Log every response. Treat it as a product rather than a script. The next WooCommerce API integration will take half the time, and the one after that will take half again.

Further Reading


- [WooCommerce REST API documentation
- WordPress HTTP API reference
- Action Scheduler documentation
- WooCommerce hooks and filters reference
- Securing WordPress credentials in wp-config.php

Saturday, September 12, 2026

Mastering Order Management Integration in WooCommerce: A Complete Guide for Store Managers

A single mistyped shipping address costs an average of $17.50 to correct—and that's before the customer service fallout. Now multiply that by every manual order entry your team performs daily. As your WooCommerce store grows, the cracks in manual order management widen: orders scattered across email threads, spreadsheets, and disjointed tools lead to delays, data entry errors, and frustrated customers who take their business elsewhere. For e-commerce store managers seeking to scale operations, the question is no longer if to integrate, but how to do it strategically.

Order management integration changes this picture entirely. It connects your WooCommerce store to the systems you rely on daily, ensuring orders flow automatically from checkout to fulfillment without duplication or delay. This automated synchronization of order data—spanning inventory, accounting, shipping, and customer relationship tools—eliminates re-keying errors and provides a unified operational view. For e-commerce store managers, understanding how this integration works and how to implement it effectively is critical for scaling operations while maintaining accuracy and customer trust.

This guide argues that a deliberate, staged integration approach—not merely installing a plugin—is the only reliable path to scaling order operations without sacrificing accuracy. We'll explore the integration process, the key connection points, and the best practices that keep your order data synchronized across every system. Stores that fail to integrate typically see order error rates of 2–3%, directly impacting customer retention and bottom-line profitability. The stakes are clear; here's how to get order management integration in WooCommerce right.

WooCommerce order management integration diagram
Source: webkul.com

What Order Management Integration Really Means for WooCommerce Stores


Before diving into the technical steps, it's worth clarifying what order management integration actually means in practice—and why it matters beyond the buzzword. Order management integration refers to the automated synchronization of order data between WooCommerce and other business systems, such as inventory management solutions, ERPs, accounting software, and shipping carriers. At its core, integration eliminates the need for manual re-keying of customer orders into separate platforms, creating a seamless data pipeline from cart to delivery.

ecommerce store manager order errors dashboard
Source: apps.shopify.com

Why Store Managers Need Order Management Integration


Without integration, store managers face a familiar set of daily hurdles that erode efficiency and profitability:

- Order data entry errors that lead to shipping the wrong products or incorrect quantities
- Inventory discrepancies between the website and actual stock levels, causing overselling or stockouts
- Delayed order fulfillment caused by manual data transfer across disconnected systems
- Poor customer visibility into order status, tracking details, and delivery timelines
- Time-consuming reconciliation between sales channels, payment gateways, and accounting records

The operational benefits of order management integration fall into three categories: speed, accuracy, and visibility. By connecting your order management systems, you streamline these workflows, giving you a single, unified view of every transaction. Instead of juggling multiple dashboards, all order information—payment details, shipping addresses, fulfillment status, and inventory impact—stays synchronized in real time. This centralized approach not only reduces operational friction but also empowers store managers to make data-driven decisions about stocking, staffing, and customer service.

WooCommerce integration connection points chart
Source: storeconnect.com

The Core Connection Points for WooCommerce Orders


To build an effective order management system, you need to identify which systems your orders must interact with. Most store managers connect WooCommerce to the following categories, each addressing a critical aspect of the order lifecycle:

1. Inventory and Warehouse Management Systems (WMS)


Order and inventory data are inherently linked. When a customer purchases a product, stock levels must decrease immediately to prevent overselling. Integrating WooCommerce with a WMS or inventory tool ensures:

- Real-time stock level updates across all sales channels, preventing overselling
- Automated low-stock alerts for replenishment planning and procurement
- Accurate backorder and pre-order management, reducing customer disappointment
- Seamless pick, pack, and ship workflows for warehouse staff, minimizing fulfillment time

2. ERP and Accounting Platforms


Financial accuracy depends on order data flowing into your accounting system without manual intervention. Integrating WooCommerce with platforms like QuickBooks, Xero, or a full ERP syncs:

- Transaction records and payment data for accurate revenue tracking
- Tax calculations and automated invoice generation, reducing compliance risk
- Refund and chargeback tracking to maintain clean financial books
- Profitability reporting by product, channel, or customer segment

3. Shipping Carriers and Fulfillment Providers


Once an order is confirmed, it needs a shipping label and tracking number. Integration with carriers like UPS, FedEx, or DHL, or with third-party logistics (3PL) providers, automates the process of rate calculation, label printing, and tracking number submission back into WooCommerce. This automation reduces shipping errors and accelerates the time from order placement to dispatch.

4. Marketing and Customer Service Tools


Order data enriches your customer relationships and enables personalized communication. Syncing orders to your CRM or email marketing platform allows you to send triggered campaigns—such as post-purchase follow-ups, shipping notifications, or win-back offers for abandoned orders. A CRM integration might automatically create a customer profile with order history, enabling support agents to resolve issues without asking customers to repeat information they've already provided.

Consider a store selling specialty coffee equipment. When a customer orders a grinder and beans, the integration ensures the WMS deducts both items from inventory, the accounting system records the sale, and the shipping carrier receives the correct weight-based rate—all within seconds of checkout. That's the power of well-executed order management integration in WooCommerce.

How to Integrate Order Management in WooCommerce: A Step-by-Step Approach


Integrating order management in WooCommerce involves a structured approach. Following a clear process prevents costly mistakes, ensures long-term reliability, and maximizes the return on your integration investment.

Step 1: Audit Your Current Order Management Workflows


Before connecting anything, map out how orders currently move through your business. Document every manual step, each system involved, and where errors typically occur. This audit helps you identify which integration points deliver the highest value first. For example, if inventory discrepancies are your biggest pain point, prioritize WMS integration over marketing tools.

Step 2: Choose Your Integration Method for WooCommerce


There are three primary approaches to connecting WooCommerce with external systems. This is the most consequential decision you'll make, so consider each option carefully based on your technical resources and operational complexity:

Native Plugins: Many software providers offer dedicated WooCommerce plugins. These are the easiest to set up, requiring minimal technical knowledge, and provide out-of-the-box functionality for order sync. Choose this if you have limited development resources and your needs align with standard features. They are ideal for small to medium-sized stores seeking quick wins.

Middleware or Integration Platforms: Tools like Zapier, Make, and Automate.io act as bridges between WooCommerce (via REST API) and dozens of other applications. They offer flexibility without custom development and are excellent for connecting multiple systems with moderate complexity. Choose this if you want visual, code-free workflow design and need to automate cross-platform processes without heavy IT involvement.

Custom API Development: When you have complex, unique requirements, a custom integration built on the WooCommerce REST API provides complete control. This approach requires a developer but delivers the highest level of customization, scalability, and data governance. Choose this if you have intricate fulfillment networks, proprietary systems, or scaling needs that off-the-shelf solutions can't accommodate.

Step 3: Map Data Fields Between Systems


Successful integration depends on field mapping—matching customer names, addresses, SKUs, prices, and order statuses across your WooCommerce store and target systems. This is where data standardization becomes crucial:

- Define which order statuses trigger which downstream actions (e.g., "Processing" initiates fulfillment, "Completed" updates accounting records)
- Standardize product identifiers like SKUs to ensure items are recognized correctly across all platforms
- Determine how discounts, taxes, and shipping costs are passed through to maintain financial accuracy

Step 4: Configure Sync Triggers and Real-Time Updates


Decide exactly what triggers data to flow between systems. Real-time sync via REST API calls or webhooks means that events like new orders or status changes instantly update connected platforms. This immediacy is essential for maintaining inventory accuracy and customer satisfaction.

For example, a webhook can notify your warehouse system the moment a customer completes a payment. Similarly, when the warehouse marks an order shipped, the tracking number automatically appears in the customer's WooCommerce order page and notification email—no manual input required.

Step 5: Test Thoroughly Before Going Live


Testing is especially critical for order data because errors here have direct customer consequences—shipping incorrect items, charging wrong amounts, or overselling inventory can damage trust and incur real costs. Plan a staged testing phase across multiple scenarios to validate your order management integration:

- Normal single-item orders to verify basic data flow
- Multi-item orders with varying quantities to test line-item accuracy
- Orders with special shipping instructions or gift notes
- Refunds and partial cancellations to ensure two-way synchronization works

Verify data accuracy in every connected system before processing a single real order through the integration. This diligence pays off in preventing costly customer-facing errors.

Step 6: Monitor Performance and Establish a Feedback Loop


Integration is not a set-and-forget project. Continuously monitor synchronization logs for failed transactions, data mismatches, or API delays. Set up alerts that notify your team when an order fails to sync so you can fix issues quickly before they impact customers. Regular performance reviews also help you identify opportunities for optimization, such as batching operations during peak traffic.

Common Pitfalls in WooCommerce Order Integration and How to Avoid Them


Even well-planned integrations encounter obstacles. Being aware of the most common failure points helps you address them proactively and maintain operational continuity:

- Inconsistent data formats: If your SKUs differ between WooCommerce and your WMS, orders will fail to match. Standardize identifiers before integration, not after, to prevent downstream errors.
- Overlooking webhook failures: Webhooks can silently fail, causing data drift between systems. Implement logging and alerting from day one so you know when synchronization breaks and can act immediately.
- Ignoring API rate limits: Some platforms throttle API calls, which can cause delays during high-volume periods. Design your integration to batch operations during peak traffic rather than hammering endpoints with individual requests.
- Skipping security reviews: Order data includes payment and personal customer information, making it a prime target for breaches. Verify that your integration encrypts data in transit and at rest, and confirm PCI DSS compliance with your payment processor and all connected systems.

Best Practices for WooCommerce Order Management Implementation Success


Your integration's success depends on more than tool selection. Follow these best practices to maximize reliability, minimize risks, and ensure your order management integration delivers lasting value:

- Standardize your data early. Clean, consistent product data prevents most sync errors. Ensure SKUs, pricing structures, and naming conventions are uniform across all systems before you connect anything. This foundational step saves countless hours of troubleshooting later.
- Prioritize two-way synchronization. Integration should not only move order data outward to your fulfillment system but also bring status updates and tracking information back into WooCommerce automatically. This bidirectional flow keeps all stakeholders informed and reduces support inquiries.
- Segment testing into phases. Start with a pilot involving a handful of real orders or a staging environment before rolling out to your entire operational flow. This approach allows you to identify and resolve issues without disrupting your live store.
- Maintain data security compliance. Review how your integration handles data transmission and storage to remain PCI DSS compliant and protect customer privacy. Regular security audits are essential as your integration evolves.
- Document your integration logic. Create a reference guide that details your mapping rules, triggers, and escalation points so any team member can troubleshoot issues effectively. This documentation is invaluable for onboarding new staff and planning future enhancements.

Choosing the Right Order Management Integration Solutions for Your Store


The ideal integration solution depends on your technical resources, budget, and operational complexity. Smaller stores often thrive with lightweight plugins or middleware platforms that require no coding skills, offering a quick path to automation. Enterprise-level operations with intricate fulfillment networks usually benefit from custom API integrations or dedicated ERP systems with native WooCommerce connectors, which provide deeper control and scalability.

Regardless of the solution, selecting tools that offer reliable documentation, active support, and transparent pricing reduces your risk and simplifies future scaling. When evaluating options, ask vendors about their experience with WooCommerce specifically, request case studies from similar businesses in your industry, and test their customer support responsiveness before committing. A vendor that understands WooCommerce's nuances will be a more valuable long-term partner.

The Future of Order Management Integration in E-Commerce


E-commerce tools evolve rapidly, and order management integration is no exception. AI-driven order routing can now automatically direct orders to the optimal fulfillment center based on inventory proximity and shipping costs, reducing delivery times and expenses. Headless commerce architectures are decoupling front-end experiences from back-end operations, making integration layers even more critical for data consistency. As these technologies mature, store managers who build flexible, well-documented integration foundations today will be positioned to adopt new capabilities without rebuilding their entire stack.

Conclusion


Order management integration in WooCommerce transforms order processing from a manual, error-prone chore into an automated, streamlined workflow. By connecting your store to inventory systems, accounting platforms, shipping carriers, and marketing tools, you regain control over operations and also build a foundation for sustainable growth. The benefits extend beyond efficiency—they include improved customer satisfaction, reduced operational costs, and the agility to scale without breaking.

The path to integration is not a single purchase but a deliberate process of auditing, mapping, testing, and refining. Begin with one high-value connection—perhaps inventory or accounting—and expand only once you've verified reliability. Done properly, order management integration becomes the operational backbone that lets your store scale without sacrificing the accuracy your customers depend on.

Start by auditing your current processes, identifying your highest-value integration points, and selecting a solution that matches your team's capabilities. A deliberate, tested integration approach will ensure your store operates smoothly, no matter how high your order volume climbs. The time to act is now—your customers, your team, and your bottom line will thank you.

---

Ready to streamline your order operations? Subscribe Now for expert insights on WooCommerce integration, automation strategies, and e-commerce growth tactics delivered straight to your inbox. --- Labels:

Mastering API Integration with Third-Party APIs in WooCommerce

A single API call without a timeout during checkout can take an entire store offline. That is not a hypothetical — it is one of the most common causes of WooCommerce outages, and it illustrates why API integration with third-party APIs in WooCommerce is a discipline rather than a checkbox. WooCommerce powers over 20% of all online stores, yet its default feature set rarely satisfies the full demands of a modern ecommerce operation. Merchants need shipping rates from carriers, inventory data from ERPs, customer records from CRMs, and payment updates from gateways — all in real time.

For web developers, the challenge is not understanding what an API does; it is implementing integrations that are secure, performant, and resilient when remote services fail. This article assumes familiarity with WordPress plugin development and WooCommerce hooks. It examines WooCommerce's API architecture, the practical patterns for connecting third-party services, and the technical safeguards that separate a stable integration from a fragile one.

WooCommerce API architecture diagram
Source: wp-umbrella.com

Understanding WooCommerce API Architecture


WooCommerce exposes two distinct API surfaces, and confusing them is a common source of integration bugs.

WooCommerce REST API integration diagram
Source: wp-umbrella.com

WooCommerce REST API vs. Third-Party APIs


The WooCommerce REST API allows external systems to read and write store data — products, orders, customers, coupons. It is inbound: other platforms call your store.

A third-party API works in the opposite direction. Your store calls an external service, such as ShipStation, HubSpot, Stripe, or a custom ERP endpoint. Most real integrations use both: your store receives orders via its own REST API and pushes them outward to fulfillment or accounting systems.

WooCommerce API integration patterns diagram
Source: webkul.com

Core API Integration Patterns for WooCommerce


Three patterns dominate WooCommerce development, and each is the right choice under different conditions:

- Pull (scheduled sync): A cron job fetches inventory or pricing every few minutes. Best when the remote system cannot push data and near-real-time accuracy is not critical — for example, syncing a supplier price list overnight.
- Push (event-driven): WooCommerce hooks fire on order events and immediately send data outward. Best when downstream systems need data the moment it exists, such as notifying a fulfillment provider the instant an order is marked "processing."
- Webhook (reactive): The third party notifies your store when remote data changes. Best when the external service owns the data and exposes subscription events — for example, a shipping carrier posting tracking updates back to your store.

Event-driven pushes deliver the best user experience for order data because information moves the moment a customer completes checkout, not on the next polling cycle. Pull and webhook patterns remain essential for data your store does not originate.

Preparing Your WooCommerce Store for API Integration


Authentication and API Keys


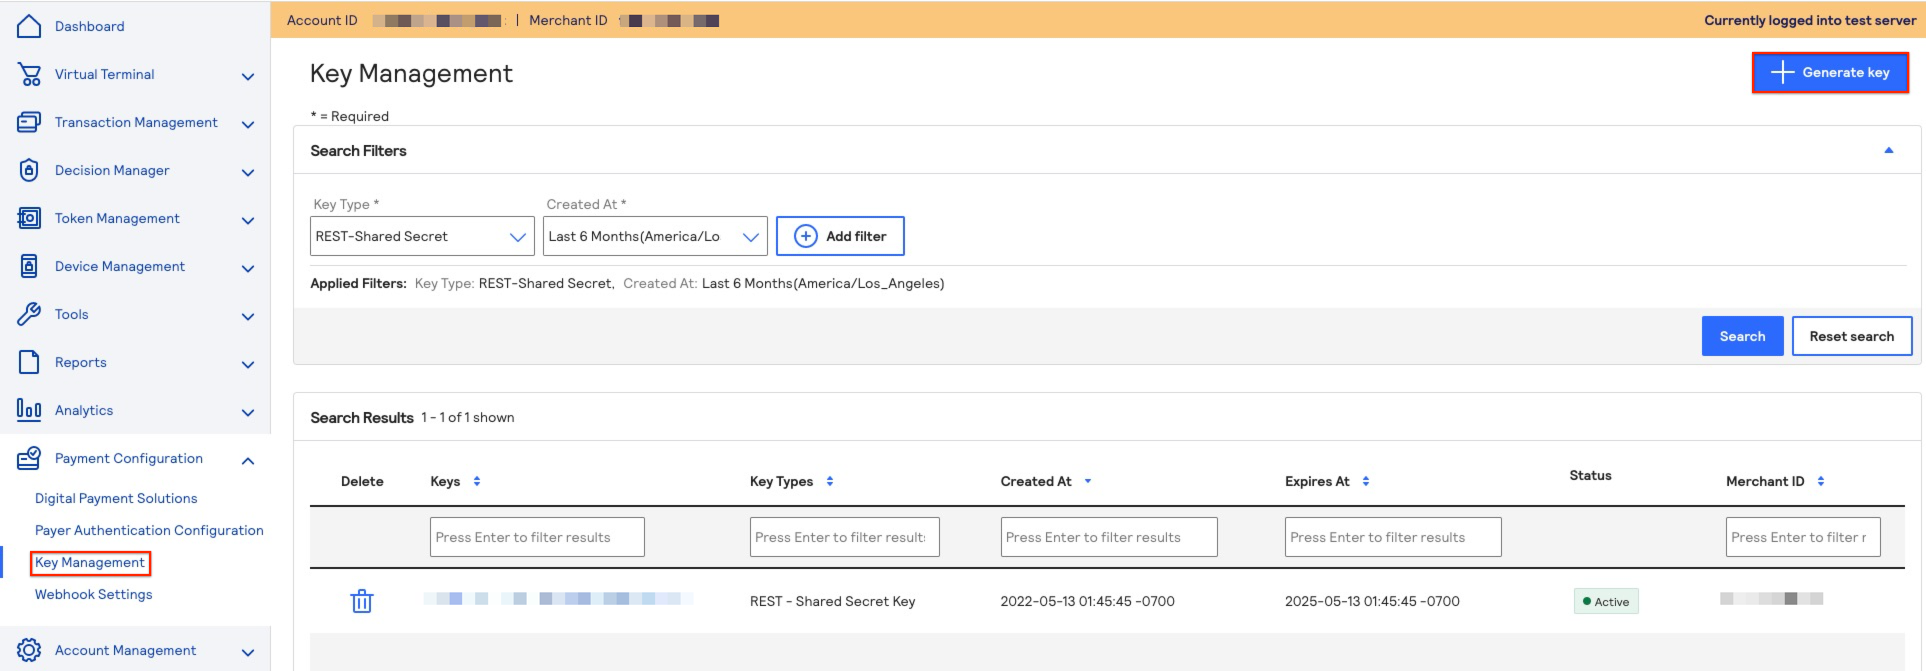
WooCommerce generates consumer keys under WooCommerce → Settings → Advanced → REST API. Each key pair consists of a consumer key and secret, with read, write, or read/write permissions.

| Method | Best Use Case | Security Level |
|---|---|---|
| Basic Auth over HTTPS | Internal scripts and testing | Moderate |
| OAuth 1.0a | Third-party apps acting on behalf of users | High |
| Bearer tokens (third party) | Calling external services | Provider-dependent |
| API keys in headers | Server-to-server calls | High when rotated |

Credential Storage and Rotation


Never hardcode credentials in theme files. Store them in wp-config.php constants or environment variables so they survive plugin updates and never reach version control. Rotate keys on a schedule, immediately after staff changes, and whenever a provider reports a breach. Scope each token to the minimum permissions required — a read-only inventory token should never carry write access to orders.

Environment and Security Configuration


Confirm that your server supports outbound HTTPS requests and that wp_remote_post() is not blocked by a firewall. Add a staging environment with sandbox credentials from every third-party provider — testing order syncs against a live accounting system is an expensive mistake.

Practical API Integration Techniques for Web Developers


With credentials and environments configured, the next step is choosing the right transport layer and knowing how inbound and outbound data should move.

Using the HTTP API for Outbound Requests


WordPress ships with the WP_HTTP class, accessible via wp_remote_post(), wp_remote_get(), and related helpers. Always prefer these over cURL directly: they respect proxy settings, handle SSL verification, and integrate with WordPress filters for debugging.

Code Example: Pushing Order Data to a CRM


The following example fires when an order reaches "completed" status, builds a payload from the order object, and posts it to a CRM. wc_get_order() returns a WC_Order object with getter methods for every field; wp_json_encode() is preferred over json_encode() because it handles UTF-8 and edge cases consistently across WordPress environments.

add_action( 'woocommerce_order_status_completed', 'my_store_push_order_to_crm', 10, 1 );

function my_store_push_order_to_crm( $order_id ) {
$order = wc_get_order( $order_id );

$payload = array(
'external_id' => $order->get_id(),
'customer' => array(
'email' => $order->get_billing_email(),
'name' => $order->get_formatted_billing_full_name(),
),
'total' => $order->get_total(),
'currency' => $order->get_currency(),
'line_items' => array(),
);

$response = wp_remote_post( 'https://api.your-crm-provider.com/v2/orders', array(
'timeout' => 20,
'headers' => array(
'Authorization' => 'Bearer ' . MY_CRM_API_TOKEN,
'Content-Type' => 'application/json',
),
'body' => wp_json_encode( $payload ),
) );

if ( is_wp_error( $response ) ) {
$order->add_order_note( 'CRM sync failed: ' . $response->get_error_message() );
}
}


Note the explicit timeout. Without it, a slow third-party API can exhaust PHP workers and take your storefront down.

Handling Webhooks for Inbound API Data


Webhooks invert the direction of control: the third party decides when your code runs. That makes them powerful and dangerous in equal measure, and it is why they deserve dedicated treatment rather than a subsection of general integration technique.

Register a REST route to receive webhook payloads:

add_action( 'rest_api_init', function () {
register_rest_route( 'my-store/v1', '/shipping-update', array(
'methods' => 'POST',
'callback' => 'my_store_handle_shipping_update',
'permission_callback' => 'my_store_verify_signature',
) );
} );


The permission_callback is mandatory in WordPress 5.5 and later, but the security requirement goes deeper than satisfying the API. Your callback must validate an HMAC signature or shared secret against the raw request body — parsing JSON first and then hashing will fail against most providers. An unauthenticated webhook endpoint is an open door to data manipulation.

Two further safeguards matter. First, guard against replay attacks by rejecting payloads whose timestamp is older than a few minutes, or by tracking recently seen event IDs. Second, make handlers idempotent: providers retry webhooks aggressively, and the same event may arrive three times before your handler finishes processing the first.

Error Handling, Logging, and Retry Logic


Networks fail. Third-party APIs return 429 and 503 responses. A resilient integration assumes failure and recovers gracefully.

Logging and Alerting


Log every request and response using WC_Logger with a dedicated channel such as my-store-crm. Without a channel, logs from multiple integrations interleave and become useless during an incident. Alert on repeated failures — a Slack notification after three consecutive errors surfaces problems long before a customer complaint does.

Retry Strategies


Queue failed requests in a custom database table or Action Scheduler job, then retry with exponential backoff. Action Scheduler, bundled with WooCommerce, is purpose-built for this: it persists jobs outside the request lifecycle and retries automatically. Use idempotency keys so retried requests do not create duplicate records downstream — most modern APIs accept an Idempotency-Key header and will return the original response for repeated submissions.

Performance Considerations and Caching for API Integration


Synchronous API calls during checkout degrade conversion rates. The rules below map each concern to a concrete technique:

| Concern | Technique |
|---|---|
| When calls fire | Defer non-critical calls to shutdown or Action Scheduler; never fire them on woocommerce_checkout_process. |
| Repeated reads | Cache read-heavy responses — shipping rates, tax tables, currency conversions — in transients with sensible TTLs. |
| Round-trip volume | Batch requests where the provider supports it, reducing round trips for large catalogs. |
| Browser blocking | Never block the customer's browser on an external service. |

The principle underneath all four: the checkout flow must succeed even if every third-party API is offline.

Security Best Practices


Validate and sanitize every inbound payload with sanitize_text_field(), absint(), or schema-based validation. Enforce HTTPS for all endpoints. As covered earlier, rotate API keys on a schedule and scope tokens to the minimum permissions required. Treat every credential as a liability with an expiration date, and every inbound request as untrusted until proven otherwise.

Testing and Monitoring Your WooCommerce API Integration


Use the provider's sandbox for functional testing, then simulate failure states: invalid credentials, timeouts, malformed JSON, and HTTP 500 responses. Tools like Query Monitor reveal unexpected HTTP calls, while New Relic or Sentry surface production exceptions.

Set up uptime and endpoint monitoring so you learn about an outage from your dashboard, not from a customer's complaint. These practices add complexity and cost — retry queues, monitoring subscriptions, and staging environments all demand ongoing attention — but the alternative is discovering failures through lost revenue.

Conclusion


Integrating third-party APIs with WooCommerce rewards developers who respect three truths: the network is unreliable, the checkout path is sacred, and credentials are liabilities. Every hour of checkout downtime translates directly into abandoned carts and lost revenue, and the practices in this article — using WP_HTTP and Action Scheduler correctly, authenticating every webhook, logging exhaustively, and caching aggressively — are how you avoid that outcome as order volume grows.

Start with one integration — perhaps order sync to your fulfillment provider — implement retry logic and monitoring from day one, and treat every external call as a failure waiting to happen. Your store, your clients, and your uptime will all be better for it.

---

Enjoyed this deep dive into WooCommerce API integration? Subscribe Now to get more expert-level WordPress development tutorials, ecommerce architecture guides, and performance optimization strategies delivered straight to your inbox.woocommerce api, third-party integration, web developers, api architecture, error handling

Custom Payment Gateway Integration in WooCommerce: A Complete Developer's Guide

Your client's regional acquirer has no WooCommerce plugin. The merchant is losing sales every day the checkout doesn't work. The processor's API documentation is dense, the existing plugins on the market are abandoned or bloated, and the deadline is real. This is the situation where custom payment gateway integration in WooCommerce stops being a theoretical exercise and becomes the only path forward.

WooCommerce runs on millions of live sites, yet its built-in payment options cover only a fraction of the processors merchants actually want to use. When a business needs a regional acquirer, a niche BNPL provider, or a proprietary internal payment system, e-commerce developers must build the bridge themselves. This guide walks professional developers through the architecture of WooCommerce payments, a working gateway plugin with verified webhooks and refund support, and the security and compliance requirements that separate a prototype from a production-ready integration.

WooCommerce custom payment gateway decision
Source: woocommerce.com

Does Your WooCommerce Project Actually Need a Custom Payment Gateway?


Before writing a single line of code, confirm that building from scratch is the right call. A custom payment gateway is justified when:

1. No official plugin exists for your target processor or market.
2. Existing plugins are bloated, unmaintained, or incompatible with your stack.
3. The merchant requires a bespoke checkout experience, such as split payments or internal credit ledgers.
4. Compliance demands full control over where card data flows.

If a well-maintained official plugin exists, use it. Build custom only when the commercial or technical requirement genuinely cannot be met otherwise. The rest of this guide assumes you've made that call and are committed to shipping your WooCommerce payment integration.

WooCommerce payment architecture diagram
Source: help.aura-software.com

Understanding the WooCommerce Payment Architecture


WooCommerce does not process payments itself. It orchestrates them. The platform provides a standardized contract that every gateway must fulfill, then delegates the actual transaction to an external processor through an API call, a redirect, or an embedded form.

Here's the full lifecycle at a glance:

Customer → WooCommerce Checkout → process_payment() → Processor API
↓
Redirect / Hosted Page
↓
Customer completes payment → Processor → Webhook → WooCommerce
↓
Order status updated → payment_complete()


WC_Payment_Gateway class PHP code
Source: github.com

The WC_Payment_Gateway Class


Every gateway extends the abstract WC_Payment_Gateway class. This parent class supplies settings management, admin UI rendering, and the method registry that makes your gateway appear in WooCommerce → Settings → Payments.

Key properties you will define include:

- $id — a unique slug such as acme_gateway
- $method_title and $method_description — labels for the admin interface
- $has_fields — whether the gateway renders custom checkout fields
- $supports — an array declaring features. The full set you'll commonly use:
- products — one-time purchases
- refunds — partial and full refunds from the admin
- subscriptions — recurring billing via WooCommerce Subscriptions
- add_payment_method — saving a card from the My Account page
- tokenization — storing payment methods for later use

Declare only what you actually implement. Claiming refunds without a working process_refund() produces broken admin buttons and support tickets.

Checkout Flow and Hooks


The transactional lifecycle moves through process_payment(), an optional redirect to the processor, and a return or webhook that finalizes the order. WooCommerce fires hooks at each stage — woocommerce_checkout_order_processed, woocommerce_payment_complete, and woocommerce_order_status_failed — giving you clean insertion points for logging, notifications, and reconciliation.

Step-by-Step Custom Payment Gateway Integration Walkthrough


Now that you've decided to build, here's how the pieces fit together. Each step builds on the previous one; read them in sequence the first time through.

Step 1: Scaffold a Dedicated Plugin for Your Gateway


Never place gateway code in a theme's functions.php. Create a standalone plugin with a clear directory structure, a PSR-4 autoloader, and a Requires Plugins: woocommerce header. This isolation prevents fatal errors when WooCommerce is deactivated.

acme-gateway/
├── acme-gateway.php
├── includes/
│ ├── class-wc-gateway-acme.php
│ └── class-acme-webhook-handler.php
├── composer.json
└── readme.txt


Step 2: Extend WC_Payment_Gateway


Initialize the gateway inside the plugins_loaded hook, after verifying WooCommerce is active:

add_filter( 'woocommerce_payment_gateways', 'acme_register_gateway' );
function acme_register_gateway( $gateways ) {
$gateways<a href="https://woocommerce.com/community-slack/">] = 'WC_Gateway_Acme';
return $gateways;
}


Your class constructor populates init_form_fields() with API keys, sandbox toggles, and title settings, then calls init_settings(). Persist admin changes by hooking woocommerce_update_options_payment_gateways_{$this->id} to process_admin_options().

Step 3: Handle process_payment()


This is the method that does the real work, and it's where most integrations live or die. It returns an array with a result and a redirect key. A minimal hosted-redirect implementation looks like this:

public function process_payment( $order_id ) {
$order = wc_get_order( $order_id );

$response = wp_remote_post( $this->api_endpoint . '/charges', [
'headers' => [
'Authorization' => 'Bearer ' . $this->secret_key,
'Idempotency-Key' => $order->get_order_key(), // prevents duplicate charges
'Content-Type' => 'application/json',
],
'body' => wp_json_encode( [
'amount' => (int) round( $order->get_total() <em> 100 ),
'currency' => $order->get_currency(),
'reference' => $order->get_id(),
] ),
'timeout' => 30,
] );

if ( is_wp_error( $response ) || 200 !== wp_remote_retrieve_response_code( $response ) ) {
wc_add_notice( __( 'Payment could not be initiated.', 'acme-gateway' ), 'error' );
return [ 'result' => 'failure' ];
}

$body = json_decode( wp_remote_retrieve_body( $response ), true );
$order->update_meta_data( '_acme_transaction_id', sanitize_text_field( $body['id'] ) );
$order->save();

return [
'result' => 'success',
'redirect' => esc_url_raw( $body['checkout_url'] ),
];
}


Note the idempotency key. It is not optional. Networks retry; without it, a single customer click can become two charges.

Step 4: Process Webhooks Securely


Asynchronous notifications are the source of truth for final order status. Register a REST route or an admin-post.php endpoint, and always verify the signature. Two details trip up most developers:

1. Read the raw request body, not $_POST. JSON webhooks won't populate $_POST at all.
2. Use hash_equals(), not ===, for the signature comparison. String comparison is timing-attack vulnerable.

public function verify_webhook( WP_REST_Request $request ) {
$raw_body = $request->get_body();
$signature = $request->get_header( 'x-acme-signature' );
$expected = hash_hmac( 'sha256', $raw_body, $this->webhook_secret );

if ( ! hash_equals( $expected, (string) $signature ) ) {
return new WP_Error( 'invalid_signature', 'Signature mismatch', [ 'status' => 401 ] );
}
return true;
}


Reject unsigned payloads without exception. Log the rejection, but never act on it.

Step 5: Manage Order Status and Refunds


If your gateway declares refunds in $supports, implement process_refund( $order_id, $amount, $reason ). Return true on success, or a WP_Error with a human-readable message:

public function process_refund( $order_id, $amount = null, $reason = '' ) {
$order = wc_get_order( $order_id );
$txn = $order->get_meta( '_acme_transaction_id' );

$response = wp_remote_post( $this->api_endpoint . "/charges/{$txn}/refunds", [
'headers' => [ 'Authorization' => 'Bearer ' . $this->secret_key ],
'body' => [ 'amount' => (int) round( $amount </em> 100 ) ],
] );

if ( is_wp_error( $response ) || 200 !== wp_remote_retrieve_response_code( $response ) ) {
return new WP_Error( 'refund_failed', __( 'The processor rejected the refund.', 'acme-gateway' ) );
}
return true;
}


Accurate status transitions — pending to processing or failed — keep inventory and reporting trustworthy. When you get them wrong, downstream systems (fulfillment, accounting, email) all drift.

Step 6: Handle Failure Recovery


A webhook will eventually be missed. The processor's server will hiccup, your endpoint will time out, or a firewall rule will silently drop the request. Production integrations need a reconciliation path:

- Store the processor's transaction ID against the order (as shown in Step 3).
- Schedule a daily cron job that queries the processor for orders stuck in pending beyond a threshold (e.g., 24 hours) and syncs their status.
- Expose a manual "Sync with processor" action in the order admin screen so support staff can resolve edge cases without developer intervention.

This is the part that separates gateways that survive Black Friday from gateways that generate angry support tickets in January.

Security and Compliance Essentials for WooCommerce Payments


PCI DSS Scope


Your compliance burden depends entirely on how card data reaches your server. Hosted payment pages and tokenized fields keep you in SAQ A, the lightest validation tier. Directly posting card numbers to your own endpoint pushes you toward SAQ D, which requires network segmentation, quarterly scans, and substantially more documentation. Choose the hosted path unless you have a compelling reason not to.

Idempotency and Replay Protection


Networks retry. Always send a unique idempotency key with each authorization request and store the processor's transaction reference against the order. This prevents duplicate charges when a webhook or redirect fires twice — a leading cause of support tickets in custom integrations.

Logging and Debugging


Use WC_Logger rather than error_log(). Log request payloads with sensitive fields redacted, and gate verbose logging behind a sandbox toggle so production logs stay lean.

$logger = wc_get_logger();
$logger->info( 'Charge initiated', [
'source' => 'acme-gateway',
'context' => [ 'order_id' => $order_id, 'amount' => $amount ],
] );


Never log full card numbers, CVVs, or API secrets — even in sandbox mode.

Testing Your Custom Gateway Integration


A gateway is not finished until it survives failure. Test the following scenarios before launch:

- Successful authorization, capture, and settlement
- Declined cards and insufficient-funds responses
- Timeout and network failure between WooCommerce and the processor
- Duplicate webhook delivery
- Partial and full refunds
- Currency mismatch and zero-decimal currency handling

Methodology matters as much as the scenario list. Use the processor's sandbox environment for all functional tests. For webhook testing on a local machine, tunnel your dev site with a tool like ngrok or Expose so the processor can reach your endpoint. Build a small mock processor that returns canned responses for each failure mode — this lets you test timeout handling and malformed payloads without waiting on the real API.

WooCommerce's built-in HPOS (High-Performance Order Storage) compatibility must also be declared via FeaturesUtil::declare_compatibility(), since direct postmeta queries will break under the new order tables.

Best Practices Checklist


Beyond the fundamentals already covered, these practices separate production-grade gateways from working prototypes:

| Practice | Why It Matters |
|---|---|
| Verify nonces on all admin forms | Prevents CSRF attacks on settings pages |
| Check current_user_can( 'manage_woocommerce' ) before privileged actions | Blocks unauthorized refund or status changes |
| Sanitize and escape every input and output | Prevents XSS in admin-rendered transaction data |
| Use the Settings API for credentials | Keeps secrets out of code and version control |
| Verify webhook signatures with hash_equals() | Blocks spoofed confirmations and timing attacks |
| Declare HPOS compatibility | Future-proofs against core upgrades |
| Translate all user-facing strings | Supports international storefronts |
| Never trust client-side totals | Prevents price manipulation attacks |
| Handle zero-decimal currencies (JPY, KRW) | Avoids 100x overcharges |
| Send idempotency keys on every mutation | Prevents duplicate charges on retry |

Frequently Asked Questions


Can I integrate a gateway without writing PHP?
Only if the processor publishes an official WooCommerce plugin. Otherwise, custom integration requires PHP development.

Does a custom gateway work with WooCommerce Subscriptions?
Yes, provided you declare subscriptions in $supports and implement the recurring payment hooks. Subscriptions adds meaningful complexity — budget accordingly.

Why is my webhook firing twice?
Almost always because the processor retried after your endpoint returned a non-2xx response, or because your handler isn't idempotent. Store the event ID on first receipt and short-circuit duplicates. Also confirm you're returning HTTP 200 before doing slow work like sending emails.

How do I handle 3DS / SCA?
Hosted payment pages handle this transparently — the customer is redirected to the processor, who manages the challenge. If you're doing direct API integration, you'll need to implement the redirect-and-return flow yourself and handle the authentication_required response code. For most merchants, the hosted path is dramatically simpler.

How long does integration typically take?
A hosted-redirect gateway takes roughly 40–80 developer hours. Direct API integration with tokenization, refunds, and 3DS commonly exceeds 150 hours.

Conclusion


Custom payment gateway integration in WooCommerce is a structured, repeatable engineering task. Extend WC_Payment_Gateway, route the transaction through process_payment(), verify every webhook with hash_equals(), and treat idempotency and failure recovery as first-class requirements rather than afterthoughts. Get those fundamentals right and you unlock any processor your clients demand — regional acquirers, emerging BNPL networks, or fully proprietary payment rails.

Your next concrete steps:

1. Confirm the decision-to-build criteria in the first section actually apply.
2. Scaffold the plugin and register a gateway that appears in WooCommerce settings.
3. Ship a working sandbox transaction end-to-end before adding refunds or subscriptions.
4. Add webhook verification and a reconciliation cron before going live.

When you get stuck — and you will — the [WooCommerce Community Slack and the woocommerce GitHub repository are where the developers who've hit the same wall tend to gather.

Further Reading


- WooCommerce Payment Gateway API documentation (opens in a new window)
- PCI Security Standards Council — SAQ validation documents (opens in a new window)
- WooCommerce High-Performance Order Storage guide (opens in a new window)
- WooCommerce Subscriptions — payment gateway integration (opens in a new window)

---

Enjoyed this guide? Subscribe Now to get our next deep-dive on WooCommerce payment architecture delivered straight to your inbox — no fluff, just field-tested engineering.custom payment gateway, e-commerce developers, integration, woocommerce, security